Select Language:
There is a wide range of build options in Monster Hunter Wilds, which is a key factor behind the game’s remarkable appeal. With countless ways to utilize each weapon and an extensive array of skill and armor effects available, it’s improbable that any player will exhaust every build possibility.
Focusing on the Great Sword, many strategies emphasize maximizing damage with each strike. This is logical; being one of the slowest weapons, it also delivers some of the most powerful hits. You’ll want to make each attack count, especially since you won’t be landing hits continuously as you would with faster weapons like the Dual Blades.
As builds continue to evolve in Monster Hunter Wilds, this particular setup isn’t the definitive Great Sword build. Nonetheless, it establishes a solid foundation for using the Great Sword, providing a jumping-off point to explore other builds.
Overview of the Great Sword Build
For this build, we dive deep into risk and reward. It will be one of the most challenging setups to use, not just for the monsters you face, but for you as well. Operating in highly risky conditions, this build will reward expertly timed maneuvers with spectacular results.
This build isn’t for everyone, especially for those new to the game. A single mistake could lead to fainting, and there’s only so much leeway before you risk failing an entire hunt.
However, for an experienced hunter, this build can produce some of the highest damage-per-hit in the game, ensuring that any monster struck will definitely feel the impact.
Guide to the Great Sword Build

This build focuses on maximizing damage through critical hits and boosting your damage in perilous situations. We’ll be utilizing the Guardian Doshaguma ‘b’ set, requiring four pieces to achieve the maximum Benefit Skill from this armor set, alongside its essential Heroic skill effects.
| Slot | Item | Effect | Decoration |
|---|---|---|---|
| Weapon | Artian Great Sword | Affinity Focus | Elemental Damage Boost | Critical Jewel | Critical Jewel | Ironwall Jewel |
| Head | Guardian Doshaguma Helm b | Heroics I | Doshaguma’s Might I | Mighty Jewel | Refresh Jewel | Physique Jewel |
| Chest | Rey Sandmail a | Maximum Might II | Stamina Surge I | Physique Jewel | Physique Jewel |
| Hands | Guardian Doshaguma Braces b | Heroics I | Doshaguma’s Might I | Refresh Jewel | Destroyer Jewel | Physique Jewel |
| Waist | Guardian Doshaguma Coil b | Heroics II | Doshaguma’s Might I | Partbreaker | Defense Jewel |
| Legs | Guardian Doshaguma Greaves b | Constitution I | Heroics I | Doshaguma’s Might I | Partbreaker | Defense Jewel |
| Talisman | Defense Charm I | Defense Boost I |
The ‘b’ variant of this armor set includes additional decoration slots, allowing for greater customization. In contrast, the ‘a’ variant lacks the beneficial skills suited for this setup.
Skill Effects
This combination of gear and decorations offers us the following skill effects:
| Maximum Might III |
This increases our affinity by 30% when our stamina gauge is full, significantly enhancing our critical hit potential. |
|---|---|
| Powerhouse II |
This grants a notable attack boost following a successful power clash or offensive maneuver, which is possible with the Great Sword. |
| Stamina Surge II |
We receive a 30% increase in stamina recovery speed, which maintains our stamina gauge and activates Maximum Might sooner. |
| Heroics V |
This key skill amplifies our attack by 30% when our health falls to 35% or lower, significantly increasing our damage output. |
| Constitution V |
Our stamina drain from actions is reduced by 50%, working alongside Stamina Surge to maximize our stamina efficiency for Maximum Might. |
| Partbreaker III |
This skill enhances the damage inflicted on monsters’ wounds and expedites the process of breaking their parts. |
| Defense Boost III |
Our defense receives both a percentage and a flat increase, helping us endure hits, especially when low on health. It could be swapped for Divine Blessing for added damage avoidance, though. |
| Critical Boost II |
This skill elevates the damage of our critical hits, amplifying our already impressive damage potential when combined with Maximum Might and Heroics. |
When we manage to keep our health below 35% while maintaining a full stamina gauge, this build can deliver extraordinary damage. The Partbreaker skill ensures we’re consistently breaking parts and inflicting wounds, while striking monsters at their weak points enhances our results significantly.
Choosing the Great Sword
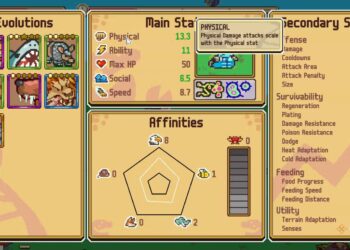
For this build, we will select a Great Sword with a focus on affinity and increased elemental damage, particularly Dragon Damage. The affinity bonus is crucial as it boosts our chances of landing critical hits, and it shines even more when targeting a monster’s elemental weaknesses.
Tips for Playing This Great Sword Build

This build may feel a bit nerve-racking to execute, as you’ll often find yourself on the edge of defeat. Often, one mistake could lead to disaster.
However, once you find your rhythm with the Great Sword’s slower strikes and keep out of harm’s way, this build can truly shine.
Your stamina enhancements will allow both dodging and blocking to consume less stamina than usual, and you’ll recover stamina more quickly. If you leverage this ability to maintain pressure on the monster, you’ll benefit greatly from Maximum Might; combine that with Heroics and Critical Boost, and possibly a Powerhouse bonus, and your damage numbers will astonish you.
When considering your Palico, equipping them with sleep or paralysis effects will create excellent openings for you to unleash high-damage attacks without worry.
The Evasion Mantle is an excellent choice for both defense and attack. It enhances your evasion capabilities, making your low health more manageable, while providing an attack bonus on perfectly executed dodges that can elevate those already impressive damage figures.