Select Language:
Upon arriving in Dawnshore, the first key area in Avowed’s Living Lands, you’ll notice a lot of markers on the map that indicate various areas. While many of these are simply informational, some contain critical details that can direct you to some of the game’s rarest loot.
The Pargrun Cache is one such location, and it’s significant enough to have its own marker on the map. Here’s how you can thoroughly explore the simpler Dawnshore Pargrun Cache.
Finding the Dawnshore Pargrun Cache
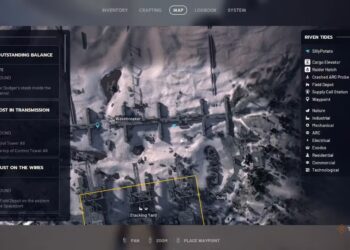
To reach the treasure hidden inside the Dawnshore Pargrun Cache, you’ll need to go all the way to the northernmost part of the map. Dawnshore is segmented into three main sections, separated by rivers, and you’ll locate the cache at the top of the northern section.
When you arrive, you’ll see three main structures but might struggle to find a way in. To access the Pargrun Cache, approach the top left corner of the bottom left building, where you’ll find some explosive barrels that can be detonated to break through the wall.
You can also use the Charge ability to break through the wall, but destroying the barrels is definitely a simpler solution.
Collecting Loot in the Dawnshore Pargrun Cache
Once you’ve created an entrance by blowing a hole through the wall, you’ll see some wooden platforms leading upwards. Jump up to the highest platform, then leap onto the marble ledge behind it to access the main area. Follow these steps to collect every treasure inside:
-
Your first treasure will be right in front of you after you land on the marble ledge. However, you’ll need a lockpick to open this chest. Inside, you can find one Agate, 20 Copper Skeyt, Common Brigandine Armor, Paradisan Ladder, three Pelts, Iron Chunk, and two Grenades.
-
After securing the first chest, take the left path and jump through the opening to the second building. Here, you’ll spot a few blade traps against the left wall.
Before the blades activate, you’ll notice a trip wire at the bottom. Disable this trip wire by disarming it on both ends to stop the blades. Once you’ve bypassed this trap, you’ll find another chest in the adjacent room.
-
Continue along the path to an open area, where you’ll face several spectres and skeletons. After defeating them, look for an entrance obscured by branches. On the left, you’ll find more explosive barrels that can be blown up.
Detonating these will reveal the entrance to the main building from the side, where you can also find a golden chest containing the unique item, Boots of the Bricklayer.
-
After claiming the main chest in the Dawnshore Pargrun Cache, continue upward using the wooden platforms in the room. Collect the blue chest located up here and proceed through the opening in the building.
After a few jumps, you’ll discover a totem fragment for Dawnshore, which will complete your exploration of this cache.