Select Language:
You just took down Vam, so you might think the Fantasian Neo Dimension is nearing its conclusion, right? Well, not quite! The Chaos Fields have emerged following your battle with Vam, but now another formidable foe, Jas, has made an entrance. However, first things first—Leo’s focus should shift to his own survival.
In the Chaos Fields, Leo finds himself alone, with no allies or escape routes. He has no choice but to press forward in a desperate search for anything that could lead him back to safety. The daunting nature of the Chaos Fields can be overwhelming, so here’s how to navigate through it successfully.
Navigating the Chaos Fields
To the Gauntlet
After waking up from his fight with Vam, Leo will awaken in the Chaos Fields, a place like no other he’s encountered. Leo is on his own, so it’s essential to exercise caution to avoid falling prey to the monsters lurking here.
Fortunately, random encounters are significantly less frequent in this particular area where Leo travels solo.
The path ahead is mostly straightforward, but be sure to check your map to explore optional routes that may lead to powerful items hidden along the way. You can discover the following items during your journey:
- Lolite: A gem that allows you to survive a potentially deadly attack with just 1 HP.
- A Heal Stone.
- An Ether L.
By this stage, you may have begun seeing mirages of Cheryl and Kina, along with Leo’s father, Bernard. Eventually, you’ll reach a large hill with the Gauntlet that Vam stole from Leo floating at the top. Determined, Leo ascends the hill and equips the Gauntlet, which contains the spirit of his mother.
Equipping it grants Leo the full power of this divine artifact, enhancing all his fire attacks, similar to how Cheryl’s Divine Tiara boosts her ice attacks. Additionally, this unlocks Leo’s Growth Map, allowing him to choose his own skills and passive abilities moving forward.
By the time you access Leo’s Growth Map, he likely has already acquired every skill available through leveling up.
With the Gauntlet now in Leo’s possession, continue onward to find three Potion Ls tucked away in a nearby chest before encountering a familiar face.
To the Laboratory
Previously spotted in the Secret Base of the Machine World before the Vam showdown, Prickle and Clicker have also been drawn into the Chaos Fields and eagerly rejoin Leo’s party. Since their first appearance at the start of the game, Prickle has gained a variety of new skills, so take a moment to familiarize yourself with these abilities.
After gifting you three Heal Stones, ten Potion Ls, and five Ether Ls, you’re free to explore again. As in previous areas, the path remains mostly linear with some hidden powerful items. Here’s what you can find:
- Large Jade: A gem that lowers your MP while boosting your HP.
- An Elixir.
- Five Ether S.
- Pearl L: A gem that provides a substantial HP boost.
- Three Poison Apples.
You’ll likely find the large black orb, which you need to explore. Head inside to meet a new character and uncover expansive lore concerning Leo’s father.
Meeting Valrika
After a brief exploration of the Laboratory, you will encounter Valrika, a being who resembles a human but isn’t quite one. She’s a creature of Chaos, native to the Chaos Realm. Upon noticing Leo and the Gauntlet on his arm, she identifies him as Bernard’s son—the same Bernard who utilized this lab during his time in the Chaos Realm.
Rather than delving into explanations herself, Valrika takes Leo to another room where a collection of journal entries written by his father is kept. These documents detail his discoveries across other realms and his attempts to revive his wife. Unfortunately, those attempts failed, leading to Bernard’s death, and his soul became trapped within the Gauntlet.
With this newfound information, Leo’s determination strengthens, and Valrika joins the party to help him. She provides him with a new Warp Device, and they set out to the Chaos Lakes in search of a suitable blue jewel to power it.
Pro Tip
Before leaving, ensure to interact with the nearby terminals to buy any necessary healing items or gear. The upcoming boss might be the toughest challenge yet.
The Chaos Lakes
Solving The Chaos Lakes Miasma Puzzle
Once you arrive at the Chaos Lakes, Valrika will give you a brief rundown on how to acquire the blue jewels—you’ll need to defeat the Chaos Serpent, but first, you must summon it. This involves amplifying the miasma of the lakes in the right sequence.
In simpler terms, you’ll need to interact with each lake in the order they erupt. If done correctly, all the lakes will erupt, summoning the Chaos Serpent into the central geyser.
Warning: Interacting with the lakes out of order will reset the sequence and summon a group of enemies.
To get started, approach the central geyser and interact with it. This will give you a view of the area, showing each lake erupting in order. There will be five lakes, and the order will be random each time, so pay close attention.
If you’re really having trouble, consider recording a short clip of the game to refer back to.
Once you’ve interacted with all the eruptions in the correct order (and picked up the glue from the chest on the upper left), the Chaos Serpent will appear in the central geyser. Be sure to save at the save point and heal up before moving forward—you’ll need full HP and MP for the battle ahead.
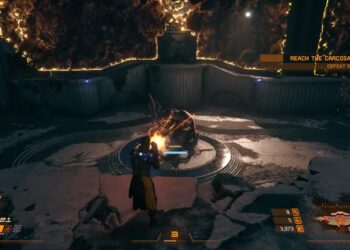
Defeating The Chaos Serpent
Before starting the fight with the Chaos Serpent, it’s wise to invest some points into Leo’s Growth Map. While there are several paths you could take, few will be helpful against this boss right now. Instead, focus on unlocking the Jewel Slot+ skill, allowing Leo to equip two jewels simultaneously.
We recommend equipping the Garnet M and Pearl L jewels to boost Leo’s attack and add some extra HP. This battle is all about endurance, so maximizing Leo’s health is key.
As always, start by analyzing the Chaos Serpent to keep track of its HP throughout the fight. Initially, the encounter isn’t particularly challenging, but things get significantly tougher once the boss hits its second phase.
The Chaos Serpent relies heavily on poison attacks, which you might not have effective counters for at this stage. Therefore, we’ll focus on a strategy that utilizes your current assets to outlast the fight.
You might encounter Funi enemies in the Chaos Fields, which can drop Rose Quartz that grants immunity to poison. If you’re having a hard time with the Chaos Serpent, consider farming these enemies.
The first half of the battle is relatively straightforward. Any poison effects can—and should—be cured by Prickle, who can also function as your primary healer. Meanwhile, Leo should constantly use Helm Bash to lower the boss’s defense and Samidare to maximize his attack hits. If you feel confident, use a turn to cast Concentrate on Leo.
With Valrika in the mix, you should maximize the use of Slow to give your team an upper hand against the boss. She should primarily use her regular attack to conserve MP, utilizing Heal when necessary and using Ethers to restore MP to others. Leo remains the primary damage dealer.
When the Chaos Serpent casts Poison Feast for the first time, expect that they’ll follow up with Poison Floor on their next turn. Immediately cast Barrier All with Prickle; this will prevent your team from getting poisoned when Poison Floor occurs. While it’s a temporary fix, it buys you time to avoid being affected by their poison attacks.
After that, the battle will proceed similarly as before. Don’t waste time curing poison, as it will return anyway. Instead, focus heavily on healing. When the boss reaches three charges, they will unleash Poison Breath on their next turn. Prepare for this by having Valrika cast Crush to reduce the boss’s attack and use Barrier All with Prickle.
The Barrier will not hold, but it will significantly lessen the damage taken. If your characters have more than 2,000 HP, you’ll only need one character to take a hit. Use this turn wisely to recover as much HP and MP as possible for your characters to get back to the offensive in the subsequent turn.
Note: The Poison effect can kill your characters, dealing around 200-300 HP damage per turn. Always ensure characters finish with at least this amount of HP to survive.
And that wraps up the fight plan! As long as Leo keeps the Serpent’s defense weakened, he can reliably deal solid damage with Samidare. Avoid being overly ambitious when the boss’ health is low unless you’re sure victory is within reach; Leo typically deals about 1,700-2,000 damage with Samidare.
After defeating the Chaos Serpent, you can return to the lab to power up the Warp Device, heading back to the Human Realm and kicking off Act 2.