Select Language:
Quick Links
In Fantasian Neo Dimension, every boss encounter stands out with its unique quirks. It’s rare to find a boss fight that doesn’t leave a lasting impression. Even in Act 2, as you face familiar foes again, they still feel invigorating.
Then there’s Omega, who is truly one of a kind. This colossal boss features permanent structures in the arena, making it an even tougher adversary. However, just getting to Omega is a challenge in itself, so let’s guide you through the steps to reach this treasure.
Beginning The Omega Quest
Most quests in Fantasian are tied to the story progression or are prerequisites for other quests, but the Omega quest is slightly different as it involves saving several robots to unlock it.
Once you discover eight out of the ten required robots, they divulge a secret about a hidden treasure beneath the Thaumatech Factory. The passcode is ‘Omega,’ which can be accessed from the rooftop of the factory. Let’s go on this treasure hunt.
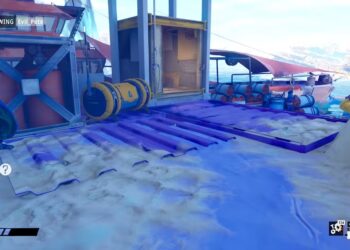
Exploring The Thaumatech Factory Depths
Start by warping to the Thaumatech Rooftop, and move right behind the elevator. This will trigger a short cutscene that reveals the entrance to the Depths, which can be quite hard to see otherwise. After this scene, you will enter the Depths, where a lengthy and intricate process begins.
During this section of the Depths, you won’t find any treasures or bosses until the end. Your task involves moving back and forth through three different areas, continually activating mechanical arms to pick up crates so you can eventually reach the boss.
Prickle suggests you warp back to the entrance if you find yourself lost.
Here’s the order of steps to follow:
- From the Save Point, move straight ahead to activate the console at the far end.
- Return to the Save Point and head right, following the mechanical arm you just activated.
- From there, proceed to the central platform and then go south to find another console.
- Head back to the central platform and enter the next area on the right.
Now you’ll reach the Depths – 2nd Belt. Let’s continue searching for consoles:
- Starting at the northeast corner, follow the path down and to the right until you reach the large platform. Activate the console.
- Next, head back to the entrance of this area and move to the platform in the northwest, activating that console.
- Head back east, then go south to the mechanical arm you just activated, and take it across to the large platform.
- Follow the path west to enter into the next area.
Welcome to the Top Secret Storage area, where the boss resides, although we aren’t finished just yet.
In this area, we are limited to one platform, so just activate it and then head back to the 2nd Belt.
- At the 2nd Belt, head north-east and then turn left to take a box to another platform.
- Follow the path around until you are near the large platform in the northwest, turning south before reaching it.
- This arm will carry you to the isolated strip. Follow this path into the Top Secret Storage.
- Navigate through, activating both consoles along the way.
Now, we need to return to the 1st Belt. There’s really no puzzle here, just retrace your steps until you’re back at the entrance to the 2nd Belt.
- From the northeast corner, head to the central platform and pass through the exit. This takes you back to the 2nd Belt. Continue following the path to return to the 1st Belt on the other side.
- At the end of this path, there’s a mechanical arm to carry you to the next platform. Activate the console here.
From this point, the final mechanical arm to reach the boss is now active. Go back to the 2nd Belt, and take the arm that leads to the isolated strip to re-enter the Top Secret Storage area. Just walk forward to get carried across, and be sure to save your progress.
There is no new warp point activated here. If you leave, you’ll have to traverse the Depths all over again.
In this area, you’ll discover several chests, all locked with Machine Keys. If you’re inclined, you can farm these in the Wormhole. Here’s what you’ll find inside, in counter-clockwise order:
- Onyx XL
- Pearl XL
- Diamond XL
- SP Capsule x2
- Opal XL
The Diamond XL will be particularly useful in the boss fight ahead, followed closely by the Pearl XL. So make sure to prioritize acquiring these items.
Facing Omega

Team Setup
Although there are no treasures, a formidable boss awaits you! Omega presents a significant challenge due to its unique mechanics. Prickle is essential for this fight and provides both healing and Lightning attacks. Leo also has Lightning skills, making him crucial for your team.
As for a third party member, Ez will prove beneficial. It’s wise to prepare Cheryl or Tan with buffs like Charge and Concentrate to bring them in when Omega’s health is low, but otherwise, focus on the first three members during this battle.
Make sure to complete the elemental trials first so you can unlock skills like Plasma and have an additional Diamond XL.
Here are the key skills you’ll want for the fight:
- Leo – Samidare Lightning +2
- Prickle – Barrier All, Plasma, Heal All
- Ez – Quick All, All Potion L, All Potion +
Omega delivers powerful attacks, mainly utilizing Holy damage. Therefore, equip your party with as many Diamonds as possible. Place Diamond XLs on the two weakest members and a Diamond L on the strongest to boost everyone’s defense. For the second jewel, consider equipping a Ruby or Emerald.
Strategy to Defeat Omega
Omega operates similarly to a superboss in many respects, employing mechanics unseen in other boss fights and punishing mistakes with nearly instant elimination. However, once you decipher their attack patterns, the fight becomes more manageable.
The boss stands in the center, flanked by two devices on either side. These devices are weak to Lightning damage and enhance the potency of all Omega’s moves while active. They shift through stages from fully powered to weakened, finally becoming depleted.
The left device reinforces Omega’s left-handed attacks, while the right device boosts right-handed moves. Omega consistently uses physical attacks with its left hand (from your viewpoint) and Holy damage with the right. While none of the attacks are weak, the Holy attacks inflict massive damage even on characters wearing Diamonds, so prioritize destroying the right device first.
Keep in mind that Omega cannot be debuffed, so your focus should be solely on destroying the devices to minimize damage.
This general structure remains throughout the battle, but Omega also counts down after each attack. When the countdown reaches zero, they activate Overboost, fully restoring both energy devices and granting you a limited number of turns to destroy them. Once Omega’s turn resumes, both arms will attack in a single turn, with the type of attack depending on the health of the energy devices.
- If the right device is at full or half strength, Omega will use Sacrament Omega or Sacrament Lambda, respectively, targeting the entire party. If it’s fully depleted, it casts Sacrament, dealing Holy damage to a single character.
- If the left device is at full or half strength, Omega attacks with Ultra Swing, hitting the whole party. If it’s fully depleted, it strikes with just Ultra Punch on one character.
During this phase, it’s crucial to apply Quick All to your party to maximize their turns. If available, Bounce Field can also be beneficial when cast around one of the Energy Devices, enhancing Prickle’s Plasma attack damage. This Overboost phase is the best time to utilize Tension skills.
After the Overboost phase, Omega will rest for a few turns, giving you the chance to recover and land some free hits.
And that’s the overall tactical flow. Omega does not gain new moves as the battle progresses, but they will start using attacks like Thaumatech Laser more frequently, which targets the entire party while reducing their defense. Beyond healing, Ez’s buffs like Quick All are essential to counteract the frequent debuffs your party will face.
Upon defeating Omega, you will receive the Positron Blaster for Prickle.