Select Language:
Many users are already familiar with Windows Defender, the built-in antivirus solution within Windows Security. It actively scans the system for signs of suspicious activity and blocks harmful intruders, utilizing a comprehensive database of virus definitions.
However, relying solely on antivirus software won’t stop users from unintentionally installing applications that grant unwanted access to their computers, akin to the deceptive Trojan horse of ancient lore.
To mitigate these risks, a strategic approach is to create a whitelist for the core configuration of your system. Whitelisting involves the administrator generating a list of applications that are deemed safe and permitted to run.
Any applications not included in this whitelist will automatically be blocked by Windows, preventing them from executing unless manually approved.
This proactive measure ensures that family members, students, or employees cannot discreetly install programs that may carry viruses, while simultaneously bolstering protection against newly emergent malware that hasn’t yet been added to antivirus databases.
Creating a Whitelist for Programs
The Local Security Policy tool is available in both Windows Pro and Home versions, although it requires integration through the command prompt in the Home edition.
Microsoft
To establish a whitelist, you will need to utilize the Local Security Policy tool available in Windows.
This feature is present in the Pro and Enterprise versions of Windows 10 and 11, and can also be enabled in the Home editions with a specific command. Instructions for this process can be found at the end of this article.
The Local Security Policy can be used to configure Windows Applocker, which has been included in all versions of Windows since Windows 10 version 1809.
Applocker uses rule-based policies, making it similar to the Windows Firewall. You can create both whitelists and blacklists using this feature.
While a blacklist allows all applications to run, blocking only certain specified programs, a whitelist offers a more effective strategy by permitting only acknowledged applications and blocking everything else, which is crucial considering the daily emergence of new malware.

Utilize the Local Security Policy tool to configure Applocker for application control, a feature available since Windows 10 version 1809.
Foundry
Setting Up the Applocker Whitelist
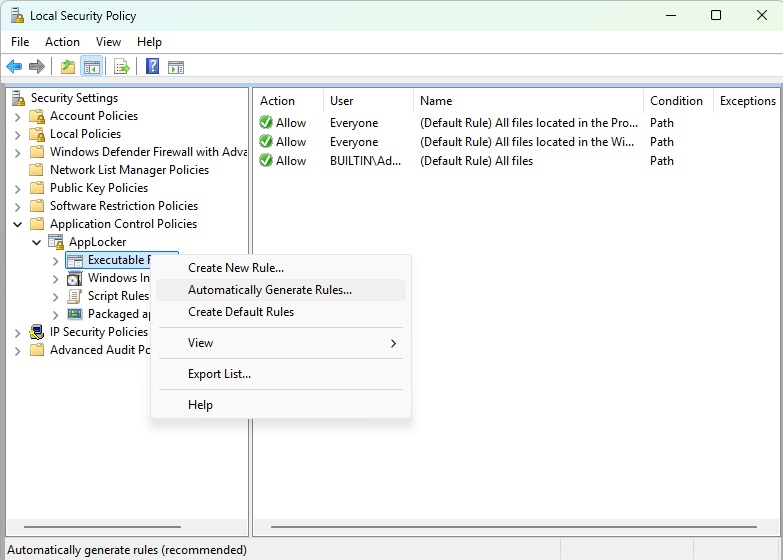
To open the Local Security Policy, enter secpol into the search field on your taskbar and select the corresponding result. Navigate to Application Control Policies > AppLocker, where you’ll find four subfolders, with “Executable rules” being particularly relevant as it pertains to files with the EXE and COM extensions.
You can customize the rules for each program individually, though this can be tedious. Microsoft provides a straightforward option to create default rules that fit common needs.
To establish standard rules, right-click on Executable rules and choose “Create default rules.” You can then right-click again and select “Automatically generate rules.”
Foundry
This initiates a wizard that prompts you to select the folder C:\Program Files. After proceeding to the next step, you will encounter the “Rule settings” window.
Here, you have a choice between “File hash” or “Path,” deciding how Applocker identifies programs: by the hash of their EXE or COM file, or by their installation path.
App names like Notepad.exe aren’t reliable identifiers, as many malware programs can use common Windows tool names to disguise themselves. It’s best to stick with the default “File hash” option and click “Next.”
Applocker will now generate rules for applications within C:\Program Files. Confirm by clicking “Create,” then repeat the steps for C:\Program Files (x86) and C:\Windows folders.
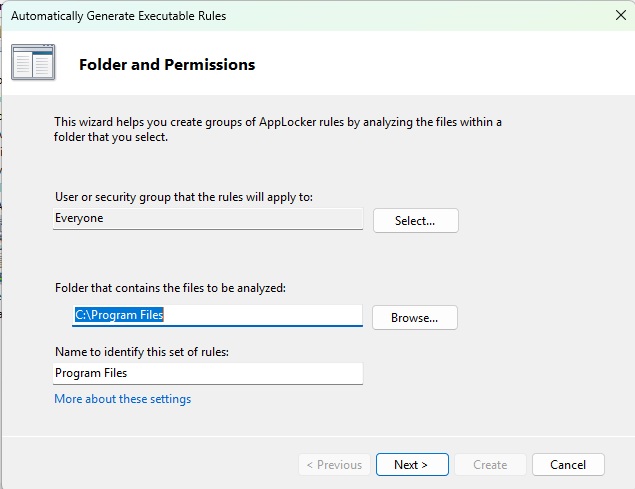
After establishing your default rules, specify which folders these rules should govern. The wizard starts with C:\Program Files as a suggested directory.
Foundry
Activating Application Identity
In order for Applocker to function, the Application Identity service must be enabled.
Search for services in the taskbar and select the matching entry. Find “Application Identity” in the list, double-click it, and click the “Start” button.
Now, if you attempt to run a program outside the specified folders, you’ll encounter the message “This app has been blocked by the system administrator.”

Once everything is configured, Applocker will maintain a detailed list of applications that are allowed to run based on your whitelist.
Foundry
At this point, only programs located in the C:\Program Files, C:\Program Files (x86), and C:\Windows folders will be accessible. Applocker has integrated these applications into the whitelist.
Standard users are unable to add additional programs to these folders due to lack of write permissions; this is an action reserved for administrator accounts.
This configuration effectively guards against potential virus threats infiltrating the system. Additionally, non-admin users are prevented from installing personal software, while access to documents, images, videos, and music remains intact.
Test out this enhanced security for your Windows environment, but be aware that all EXE and COM files installed under C:\Users or other non-whitelisted directories will be blocked.
If issues arise, a simple restart of Windows is all that is required. As the startup type for the Application Identity service is set to “Manual,” it will be deactivated upon restart, which will also disable Applocker.
If you encounter a failure when changing the startup type with an “Access denied” message, open the registry editor through Regedit.exe. Navigate to the section:
HKEY_LOCAL_MACHINE\SYSTEM\CurrentControlSet\Services\AppIDSvcand modify the “Start” key value to “2.” This change takes immediate effect and cannot be reverted through service properties. To revert to manual startup type, open the registry editor again and set “3” for the key mentioned above.
If you inadvertently lock yourself out of the Windows system and cannot access the registry editor, right-click the Start button on the taskbar, and choose “Terminal (Administrator)” from the menu. You may also access the editor from the command line by typing regedit, then follow the earlier steps to reset the manual startup type, and reboot.
To permanently disable Applocker, select the executable rules within Local Group Policy, right-click on the list, and choose “Delete.”
Cyberlock: An Alternative to Applocker
Applocker offers extensive options, but the Cyberlock tool takes it a step further. Previously available as free software under the name Voodooshield, Cyberlock now requires a $30 license, though a 15-day free trial is available.
Upon installation, Cyberlock scans your Windows installation, creates a snapshot of the identified applications, and generates a whitelist.
When you attempt to download, install, or run an unsigned application, it triggers a notification in the taskbar, presenting three options: “Block,” “Sandbox,” or “Install/Allow.” You have 20 seconds to make a selection; otherwise, Cyberlock terminates the installation process.
Applocker stems from the Software Restriction Policies (SRP) that have been part of Windows since XP; however, Microsoft has disabled this feature in Windows 11 version 22H2.

Windows Smart App Control activates when you primarily use digitally signed standard applications.
Foundry
Another tool for whitelisting is tailored to prevent novice Windows users from installing potentially harmful applications. In the Settings of Windows, you can select “Microsoft Store only (recommended)” under Apps > Advanced app settings.
With this option, users can only install verified apps from the Store, although this block can be circumvented using the command line tool winget, which is included in newer Windows versions.
You can also find “Smart App Control” within the Settings under Privacy & security > Windows Security > App & browser control. Initially inactive, this feature monitors your PC usage in evaluation mode post-installation.
Smart App Control will activate after several weeks of usage if it identifies that you mostly work with standard applications, restricting installations only to those that possess a digital signature or pass a cloud-based AI assessment.
In contrast, if you frequently use lesser-known tools, Smart App Control remains disabled, and you have no control over this setting.
Kiosk mode in Windows permits only one application to run, ideal for presentations at events or in retail windows.
Foundry
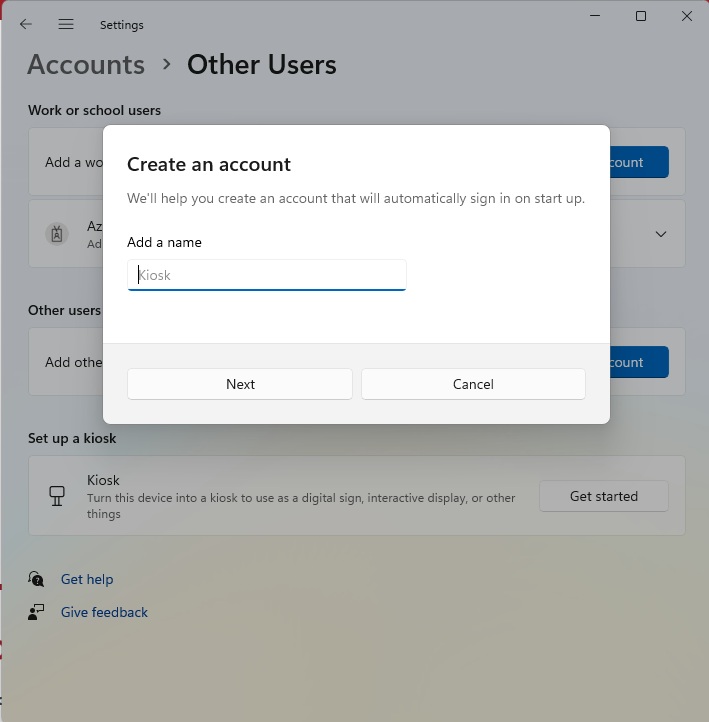
Kiosk mode provides configurable whitelisting, accessible via Settings under Accounts > Other Users > Kiosk.
Initiate the setup process by clicking “Let’s go,” which starts a wizard to create a new user account that logs in automatically at Windows startup. This account is restricted to running a single designated application, tailored for instances such as storefront displays.
Activating Local Security Policy in Windows Home
The Local Security Policy tool is a feature in Windows 10 and 11 Pro and Enterprise versions. It is also available in Windows 10 and 11 Home, though not enabled by default.
To enable this feature, you’ll need to use the command prompt. Search for cmd in the Start menu, right-click and choose “Run as administrator.” Type the command:
FOR %F IN (″%SystemRoot%\servicing\Packages\Microsoft-Windows-GroupPolicy-ClientTools-Package~*.mum″) DO (DISM /Online /NoRestart /Add-Package:″%F″)
Press Enter, and when that’s complete, run the following command:
FOR %F IN (″%SystemRoot%\servicing\Packages\Microsoft-Windows-GroupPolicy-ClientExtensions-Package~*.mum″) DO (DISM /Online /NoRestart /Add-Package:″%F″)
After this, you will be able to search for the Local Security Policy in the Start menu and access it.