Select Language:
The Bow is one of the ranged weapons available in Monster Hunter Wilds and stands out as one of the most powerful tools in the game. It enables hunters to dish out steady damage, which can lead to swift victories while also allowing for graceful dodges against monster attacks. Mastery requires practice, but once you get the hang of it, you’ll enjoy fluid and efficient hunts.
That said, using the Bow can be complex, especially when it comes to setting up the right gear and playing effectively if you’re new to the weapon. If you’re interested in making the Bow your primary hunting tool, this comprehensive build guide will prepare you for the endgame.
Overview of the Bow Build
Stamina management is key when using the Bow in this game. You can swiftly navigate the battlefield while charging your weapon for powerful hits. Although dodging attacks can help replenish your stamina, there will be times when you can’t rely on that strategy. Thus, equipping the right Decorations is crucial to ensure your stamina rebuilds efficiently, allowing you to execute your combos successfully.
In addition to stamina management, proficiency with the Bow requires skillful positioning, perfect dodging, and familiarity with monster behavior. Understanding the optimal times to charge your Dragon Piercer is essential to avoid disruptions during your attacks.
Keep in mind that Decorations have limitations in this game; you can’t simply place them anywhere. Decorations for weapons and armor are distinct, so you’ll need to farm endgame Tempered monsters to gather everything you need for your Bow build.
The primary focus of this Bow build will be on Dragon Piercer, as it offers an effective way to engage with monsters. If that playstyle becomes monotonous, feel free to swap out the Pierce Shot for a Spread Shot to refresh your gameplay.
Guide to the Bow Build
Here’s a detailed list of the endgame Bow Build you should consider:
| Gear Slot | Gear Name | Decorations |
|---|---|---|
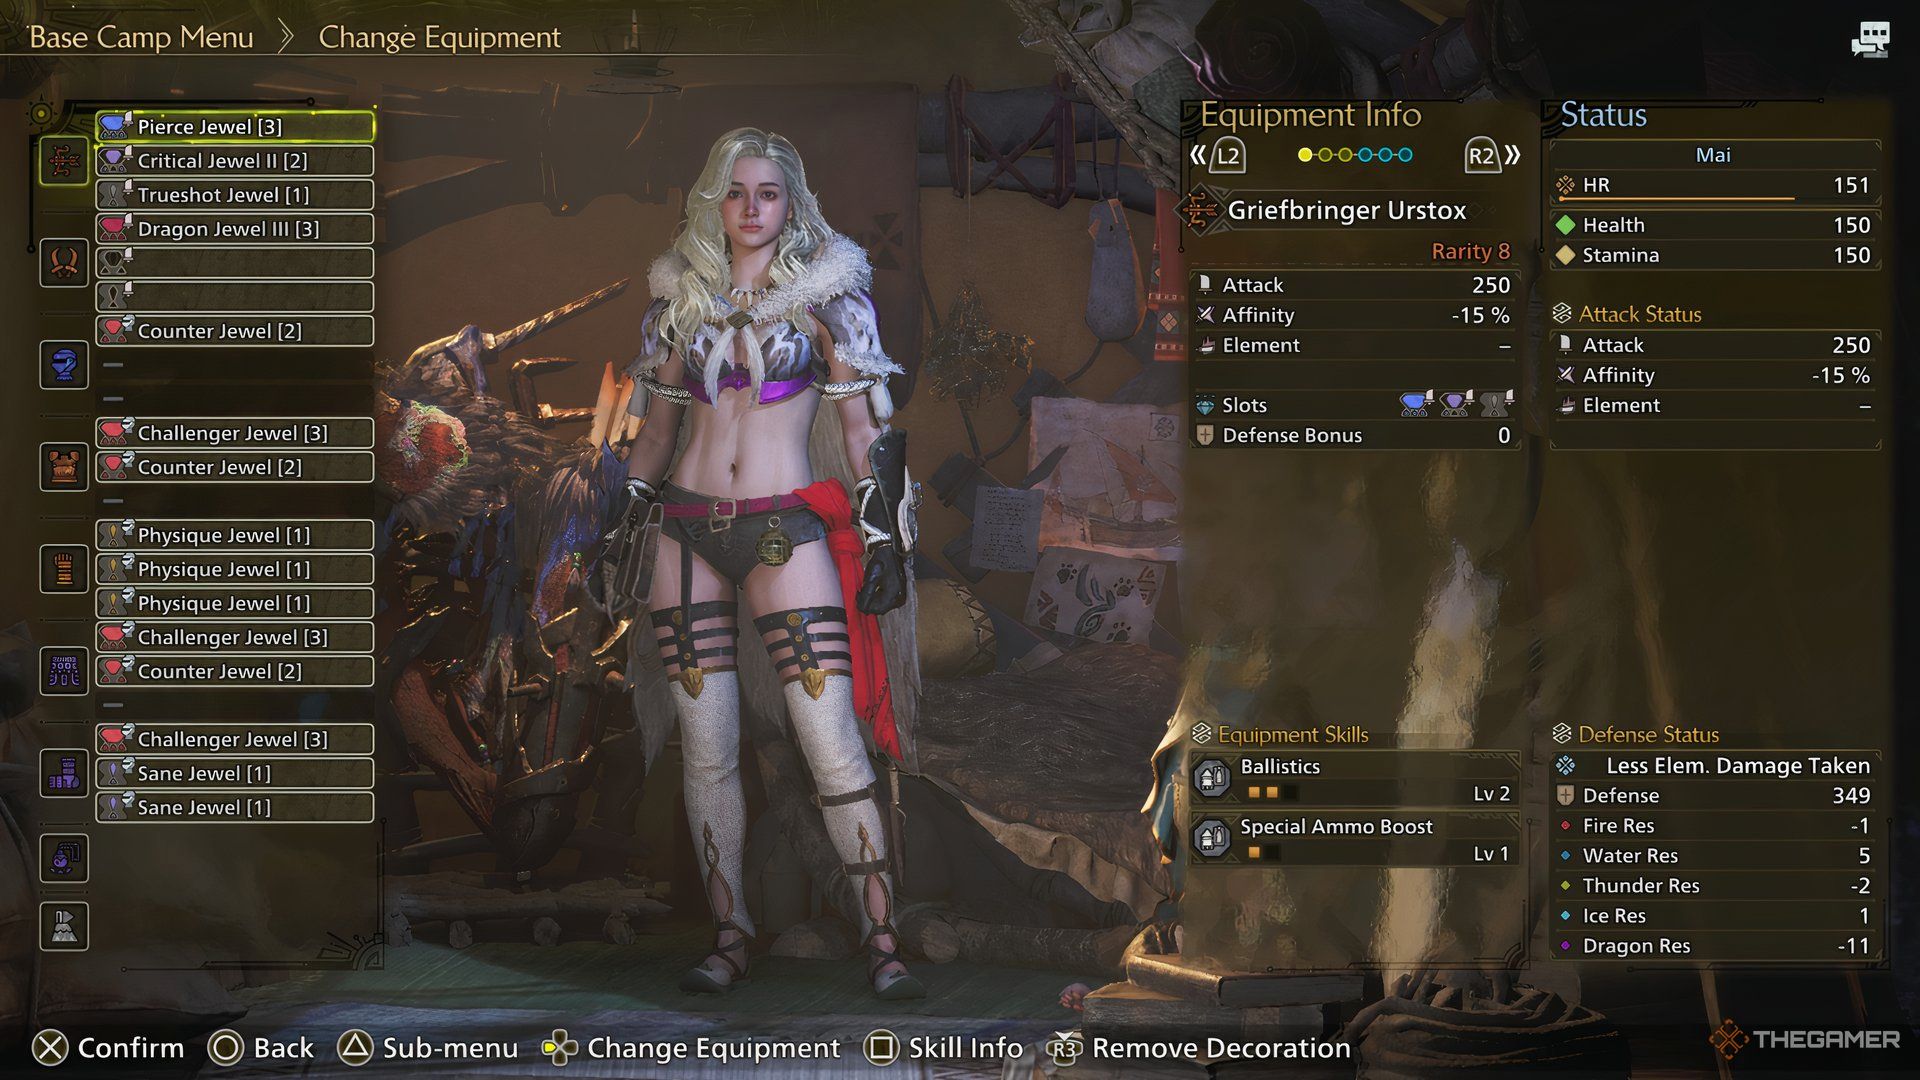
| Weapon | Griefbringer Urstox | Pierce Jewel (3), Critical Jewel (3), Trueshot Jewel (1) |
| Head | G. Fulgar Helm Beta (Fulgar Anjanath Gear) | Counter Jewel (2) |
| Chest | Arkvulcan Mail Beta (Arkveld Gear) | Challenger Jewel (3), Counter Jewel (2) |
| Arms | G. Arkveld Vambracers Beta (Guardian Arkveld Gear) | Physique Jewel (1) x3 |
| Waist | Gore Coil Beta (Gore Magala Gear) | Challenger Jewel (3), Counter Jewel (2) |
| Legs | Gore Greaves Beta (Gore Magala Gear) | Challenger Jewel (3), Sane Jewel (1) x2 |
| Charm | Exploiter Charm 2 | – |
The key weapon here is the Griefbringer Urstox. Although it has negative Affinity, its base damage is exceptionally high, making it ideal for Dragon Piercer builds. You’ll need Pierce Jewel Three for the Piercing Shots enhancement, Critical Jewel Three to boost your critical hits, and Trueshot Jewel One for increased special ammo effectiveness. While Artian Bows are also solid options, the Griefbringer Urstox’s damage output is hard to beat.
In the head slot, opt for the Guardian Fulgur Helm Beta, featuring a Level Two Jewel slot. Equip a Counter Jewel Level Two to gain the Counterstrike buff, which enhances your attack when hit by a monster. Alternatively, you can consider a Destroyer Jewel Level 2 to assist with breaking monster parts.
If you prefer less emphasis on Agitator, you might want to exchange the Challenger Jewel Level Three in the chest slot for a Counterattack Jewel Level Three. This will grant you an Adrenaline Rush buff that boosts your attack after a perfect dodge. Since dodging is crucial with the Bow, triggering this buff will be relatively straightforward.
For the chest slot, choose Arkvulcan Mail Beta, which features both a Level Three Jewel slot and a Level Two Jewel slot. Here, you will place a Challenger Jewel Level Three for the Agitator buff and a Counter Jewel Level Two for the Counterstrike buff. The Agitator buff augments your Attack and Affinity whenever the monster is enraged, leading to increased overall damage.

In the hand slot, equip Guardian Arkveld Vambracers Beta, which includes three Level One Jewel Slots. This piece provides Weakness Exploit Level Two. For the Jewel slots, you can go with either Physique Jewel or Brace Jewel. Physique Jewel enhances your stamina recovery, while Brace Jewel grants you Flinch Free, preventing interruptions during your attacks.
Both Constitution and Flinch Free offer unique benefits in this build. Constitution ensures you maintain stamina, allowing for more frequent Charged Sidesteps. On the other hand, Flinch Free stops you from being disrupted by minor monster hits when you’re using the Dragon Piercer.
For the waist slot, go for Gore Coil Beta, equipping a Challenger Jewel Level Three and a Counter Jewel Level Two here as well. This setup mirrors your chest slot, providing both the Agitator and Counterstrike buffs. Again, you can swap Counterstrike with Destroyer Jewel Level 2 for additional effectiveness in breaking parts.
Finally, in the legs slot, use Gore Greaves Beta, attaching a Challenger Jewel Level Three and two Level One Sane Jewels. The Sane Jewels grant the Antivirus buff, improving your Affinity against Frenzy. This Frenzy debuff can be triggered by the two-piece Gore Magala gear set.
For the Charm slot, select the Exploiter Charm Level 2, which confers Weakness Exploit Level Two, crucial for maximizing your damage output.
Overview of Skills
This is what your skills should look like once the build is completed:
- Critical Boost Level 2
- Ballistics Level 2
- Special Ammo Boost Level 2
- Piercing Shots Level 1
- Weakness Exploit Level 5
- Constitution Level 5
- Agitator Level 5
- Counterstrike Level 3
- Antivirus Level 3
Tips for Playing This Bow Build

Utilizing the Bow Build can be challenging for newcomers, as frequent perfect dodges are necessary. Aggressive monsters like Arkveld and Gore Magala demand that you consistently execute multiple perfect dodges to avoid being carted.
It’s worth noting that Bow users—and other ranged attackers—tend to take more damage from boss attacks compared to melee users. This highlights the importance of performing perfect dodges; failing to do so can quickly lead to mission failures.
Once you become familiar with monster patterns, your role will simplify. You can create openings to unleash your Dragon Piercer attacks on the monster. The more you do this, the more wounds will appear, enabling you to break them for additional Dragon Piercer shots.
Eventually, you’ll knock the monster down, providing a prime opportunity to unleash your Dragon Piercer until it regains consciousness, at which point you’ll need to dodge again. If executed correctly, the monster should go down quickly, provided you don’t spend too long healing or running away.