Select Language:
Metroid Prime 4: Beyond is packed with challenging bosses, and these alien monsters can really put your skills to the test. Unlike most Nintendo first-party games, you’ll need a good grasp of Samus Aran’s movement and fighting techniques to stay alive and win each battle.
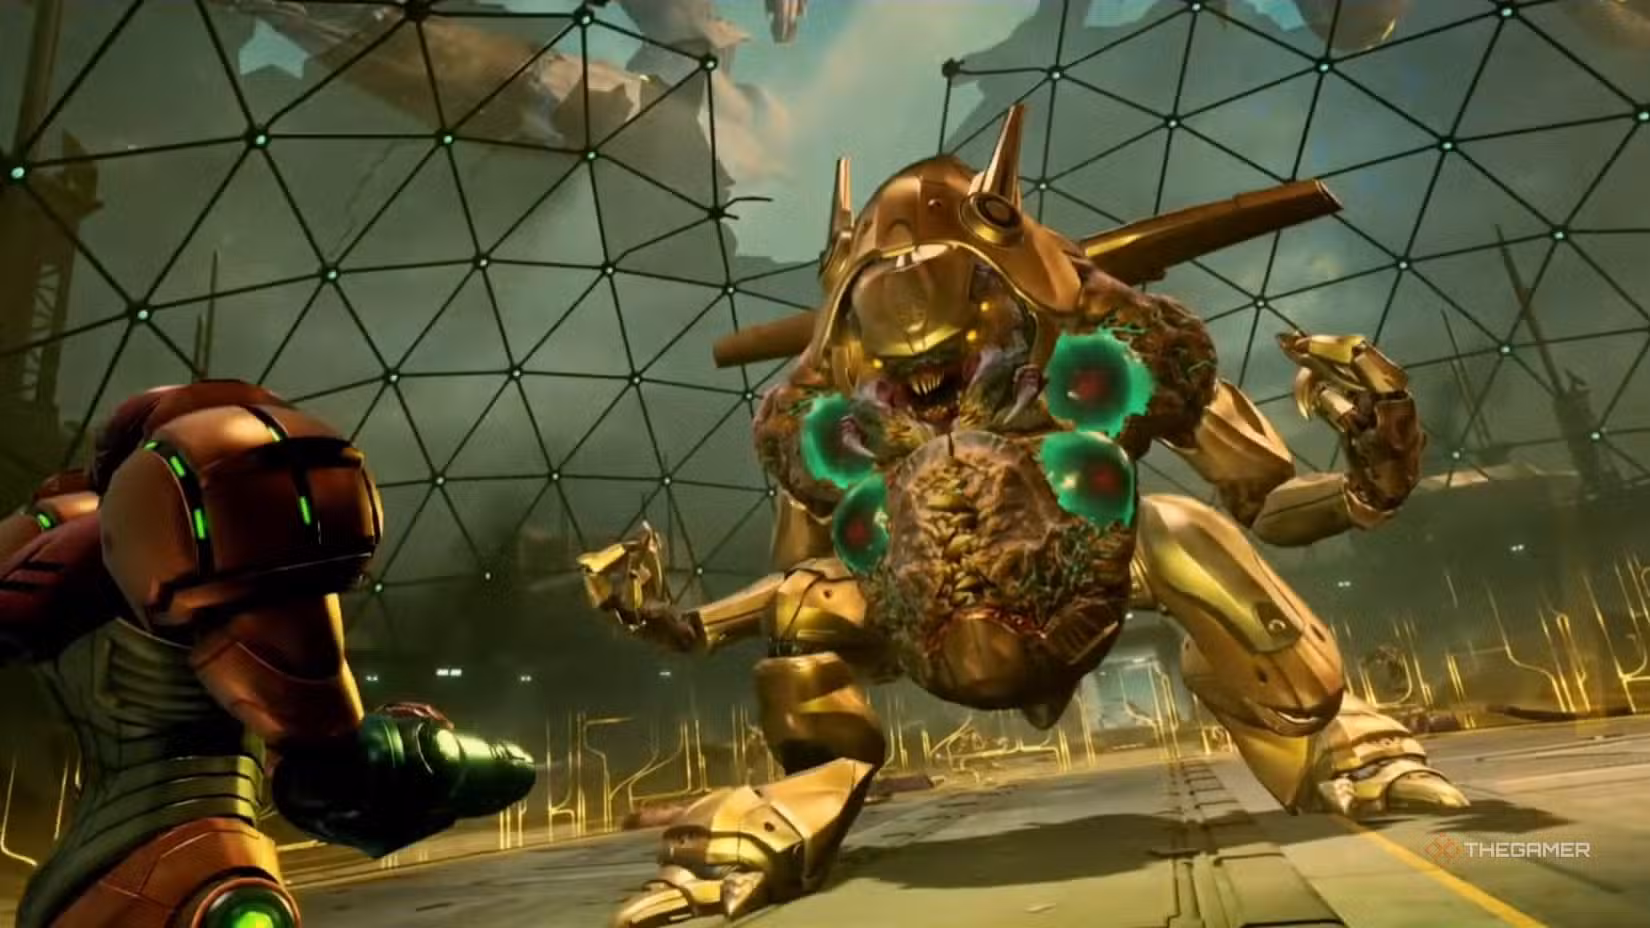
This is especially true when facing Aberax, the very first boss. This ugly bug-like alien works for Sylux and ambushes Samus on the planet Tanamaar while you’re helping the Galactic Federation. Although he’s easier than the other bosses on Viewros, Aberax is still a tough opponent. Here’s how to defeat him.
How to Defeat Aberax
The fight starts with Aberax shooting a barrage of yellow plasma shots from his dual shoulder cannons. These shots don’t do much damage, and dodging them is simple—just lock on and strafe to the sides.
Weak Points
After the initial salvo, Aberax uses yellow shields on his arms to protect green glowing weak spots across his upper body. To hit him effectively, you’ll need to destroy these shields first. Focus on damaging the shields, which aren’t easy to hit — you’ll need to constantly aim precisely using free aim mode to land your shots. Once the shields are down, you can start chipping away at his health. Destroying all shields only takes a few shots, and then you can attack his exposed belly to deal significant damage.
Aberax will continually reposition his shields as you attack, so switch between weak points often to keep up the pressure.
Strategy
In the early phase, Aberax fires glowing green orbs that you can shoot to earn extra rockets and health pickups. These are easy to dodge, but grabbing the pickups can be tricky at times. Once you reveal his stomach weak point, he’ll start using new attacks:
- A fast beam emanating from his belly.
- An area-of-effect jump attack that you must dodge by either jumping or activating Morph Ball mode.
Keep strafing and attacking his weak spot with shots and rockets. Before draining a quarter of his health, Aberax will spawn three more Metroids within his body. Focus on damaging the weak point quickly—shoot a few shots, then send a rocket or two to maximize damage. Once his health is reduced, he’ll enter the second phase, spawning more weak points.
Second and Third Phases
Aberax will start a large area attack, which requires jumping at the right moment to avoid. Missing these dodges can mean instant death, so timing is critical. During these phases, he will also send out a quicker, more varied attack pattern, and you’ll need to keep dodging, firing at his weak points, and collecting any ammo or health orbs on the field.
In the final stage, you’ll need to destroy four separate weak points while avoiding a faster flow of attacks. The core approach remains the same: dodge carefully, maintain pressure, and collect pickups whenever possible. Holding down the fire button helps gather nearby health or ammo pickups automatically, which is a big help in tougher difficulties.
Aberax also occasionally throws up golden barriers over his weak points that can be destroyed with standard shots or rockets. Doing so gives you extra ammo or health orbs, aiding your fight.
During the last phase, Aberax will occasionally grab Samus. To escape, mash the ‘A’ button repeatedly until you break free, then resume attacking. He also develops a habit of grabbing during this phase, so always be ready to mash to free yourself.
Eventually, if you survive long enough, Aberax will fall. The fight ends just as Sylux bursts in, attempting to steal the ancient Lamorn artifact.