Select Language:
If you help Uncle Sunan in Indiana Jones And The Great Circle, he has some fascinating stories and myths about Sukhothai to share. One such story involves a golden fishhook that went missing in a cave located to the northwest. As you might suspect, finding this treasure is not going to be straightforward, but the challenges you’ll face in this Fieldwork mission are unique.
Locating the fishhook entails embarking on a kind of vision quest—one that will challenge both your memory and puzzle-solving abilities. If you find yourself Lost In The Past, this guide will help you navigate back to the present.
How to Start the Lost In The Past Fieldwork Mission
You can begin the Lost In The Past mission after completing The Kid Who Vanished. After you inform Uncle Sunan that Aran is safe, he’ll invite you to listen to a story. Simply talk to him to trigger a cutscene where he shares the tale of the golden fishhook.
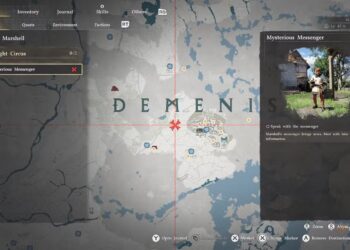
The cave where the hook is supposedly hidden is found at Wat Sa Si, northwest of the village. Instead of docking at the main area on the south side of the island, you should head to the northeastern end to locate a secondary pier. From this spot, use your whip to climb over the wall located at the back of the enemy camp guarding the ruins.
Once in the camp, turn right and proceed toward the stone wall on the edge. You’ll find a tiny hole at the base that you can crawl through, and there are no enemies waiting on the other side. Once through, you can enter the temple ruins that lie ahead.
Make sure to take the note from the crate on your left as you enter, and then head down the stairs. Use a nearby sledgehammer to break through the blocked doorway at the back, revealing a secret Nephilim shrine. On your way through, remember to take a picture of the giant skeleton you see on your right.
Squeeze into the narrow passage at the end of the corridor to access the Prayer Wheel chamber. Start by taking the right passage to find an Ancient Relic. After that, go back and interact with the Prayer Wheel, which will transport you back to Marshall College.
How To Solve The Lecture Hall Dream Puzzle
In this version of the college, you’ll find yourself in an endless loop; continue walking the hallway in a counter-clockwise direction until you reach your office door. Enter and talk to Marcus, who will provide you with a Message From The Past. Make a note of the arrangement of the items in the picture he shows you, and then return to the hallway.
Again, follow the corridor counter-clockwise until a lecture hall door opens on your right. Step inside and rearrange the items from your earlier adventures according to the photo you received from Marcus:
| Item | Starting Position | Correct Spot On Desk |
|---|---|---|
| Marion’s Medallion | Corner of the desk | Right |
| Golden Idol | Across from the desk | Center |
| Cat Mummy | By the window | Left |
Once you’ve positioned all three items correctly, the blackboard behind the desk will display the Adamic word "Heh-zam-eesh." Be sure to take a picture of it, and then Marcus will move aside to let you leave the room.
How To Find Room 11
Continue moving through the hallway in a counter-clockwise manner, and speak with Nawal each time she appears. After the third encounter, the door to the Infirmary will unlock. Inside, pick up the phone and collect the paper on the desk that bears the Adamic inscription "Gira’ahn-matu," and then exit the room.
Once outside, you can now travel clockwise through the halls. Keep going until you encounter a dead end, then turn around. Upon rounding the corner, you’ll find a pedestal with a note instructing you to locate Room 11. Follow the corridor, engaging with Marcus and reviewing notes as they come up, until you reach the storeroom door revealing the Sacred Wounds puzzle from the Vatican.
How To Solve The Cross Puzzle In The Dream
Grab the wine bottle next to Antonio and pour it into the basin in front of the fresco. Use the same solution as before: set the levers to 2 for each hand, 3 for the chest and the left foot, and 4 for the right foot.
Enter the room behind the mural and take the Journal. This will flip the room upside down; follow the path back out and speak to Marcus once you re-enter the hallway.
How To Get The Golden Fishhook
Return to the Prayer Wheel Shrine, where you can now rotate the wheels to align them with the glyphs you observed in the dream. Turn each wheel until Indy vocalizes the Adamic word. To achieve the right combination quickly:
- Turn the top wheel once to the right.
- Turn the middle wheel twice in either direction.
- Turn the bottom wheel once to the left.
Once positioned correctly, the monument will sink into the ground, revealing the Golden Fishhook resting on top. Exit the shrine the way you came in and return to the village. Presenting the fishhook to Uncle Sunan grants you a generous reward of 800 Adventure Points.