Select Language:
Are you having trouble with your webcam not working on your computer? It’s frustrating, but don’t worry! We’ll help you figure out what could be going wrong and guide you to a solution. Here’s a simple, step-by-step process you can follow to troubleshoot the problem.
Start by checking if it’s a hardware issue or a software setting in Windows. Here’s how:
-
Run Diagnostics: First, turn on your computer and immediately press the ESC key. Tap it about once a second until you see the keyboard LEDs flash. When the startup menu appears, press F2 to run diagnostics.
- If you don’t see any webcam tests, you might need to update your diagnostics. HP regularly releases new UEFI diagnostics. When you press F2, make sure to look for an updated diagnostics package by visiting HP Hardware Diagnostics. Follow the prompts to download and install the latest version.
-
Enable the Camera: Sometimes, the camera might be disabled in Windows settings. Here’s how to check:
- Open Settings, then go to Privacy, and select Camera.
- Ensure that “Camera access for this device is on.” If it’s turned off, click “Change” and turn it on.
- Check that “Allow apps to access your camera” is also enabled.
- Lastly, look under “Choose which apps can access your camera” and make sure the apps you want are allowed to use it.
-
Update Your System: Make sure you have the latest Windows updates installed. You can do this by going to the Windows Update section in Settings. Running the HP Support Assistant can also help you check for necessary updates.
-
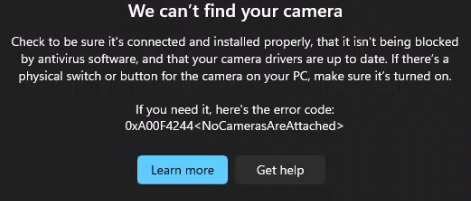
Check for Error Messages: If you’ve completed the diagnostics and everything seems to be in order, search for “camera” in the Windows search box. If any error message appears, click on “Get Help.” If that option doesn’t show up, consider checking the HP support article for further guidance.
-
Check for Camera Function Keys: Look at the function keys on your keyboard. Some may have a camera icon. If you find one, press it to see if that activates your camera. Additionally, check if there’s a physical switch or cover that might be blocking your camera.
-
Repair Windows System Files: If the issue still persists, you might need to repair your Windows system files. You can do this using the SFC tool. Open the command prompt as an administrator and type in the command for SFC (System File Checker).
Follow this guide on how to use SFC or DISM to fix any corrupted files. If SFC reports that there were issues it couldn’t fix, only then should you proceed with DISM to repair them.
If after going through all these steps your webcam is still not working, it may be an issue with the hardware. You can check your warranty status on HP’s website or contact HP support for assistance.
Following these steps should help you diagnose and fix your webcam issues effectively. Don’t hesitate to reach out for help if you need it!