
Select Language:
When drive C’s storage is nearly full, every gigabyte is valuable. Windows typically consumes over 25 GB for updates, restore points, caching, and more. Additional pre-installed unnecessary software further drains memory resources. On laptops with 128 GB SSDs or devices with soldered RAM, freeing space becomes urgent. Even high-performance systems benefit from decluttering Windows to achieve smoother operation, faster boot times, and reduced CPU activity.
Warning: Not all cleanup steps are without risk. Overzealous removal of system files or libraries might destabilize Windows, cause update failures, or impede certain applications. Always create a restore point, back up your system beforehand, and proceed cautiously. Some adjustments can be reverted immediately, while others may necessitate a complete reinstall.
Quick Guide: Remove Temporary Files and Update Residues
Begin with Windows’ built-in “Disk Cleanup” tool, selecting “Clean up system files” afterward. Launch it through “cleanmgr” via the command prompt or via the C drive’s properties menu. Check all available options including “Update Cleanup”. Be careful around the “Downloads” folder if you actively use it, but feel free to empty the “Recycle Bin” without hesitation.
Thomas Joos
Next, access “Settings” → “System” → “Memory” → “Memory Optimization” and activate automatic cleanup. Additional control over other drives is available via “Advanced Storage Settings”. Implementing these measures often frees several gigabytes swiftly.

Sam Singleton
Remove Search Index and Update Buffer
The Windows Search Index, although not widely known, can grow to multiple gigabytes. The “Windows.edb” file (located at “%ProgramData%\Microsoft\Search\Data\Applications\Windows”) enlarges over time. If you use “Everything” or similar tools, you can disable the Windows Search service and delete this file.
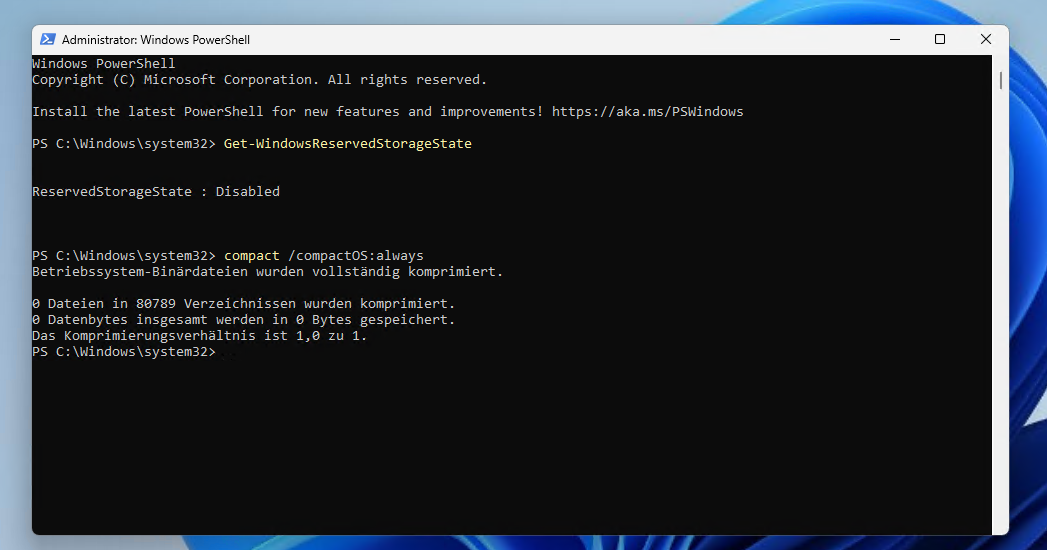
Windows allocates up to 7 GB for upcoming feature updates by default. To reclaim this space, open PowerShell with administrator rights and run: “Set-WindowsReservedStorageState -State Disabled -Online”. This command takes effect only when no maintenance processes are active. If errors occur, wait until all updates have concluded.
Thomas Joos
Future Windows updates depend on sufficient free space on active drives, even if the search index is cleared.
Compress System Files Using CompactOS
The command “compact /compactOS:always” allows Windows to compress system files without impairing functionality, saving between 2 and 6 GB. Available from Windows 10 onward, it can be reversed with “compact /compactOS:never”. To verify if compression is active, execute “compact /compactOS:query”.
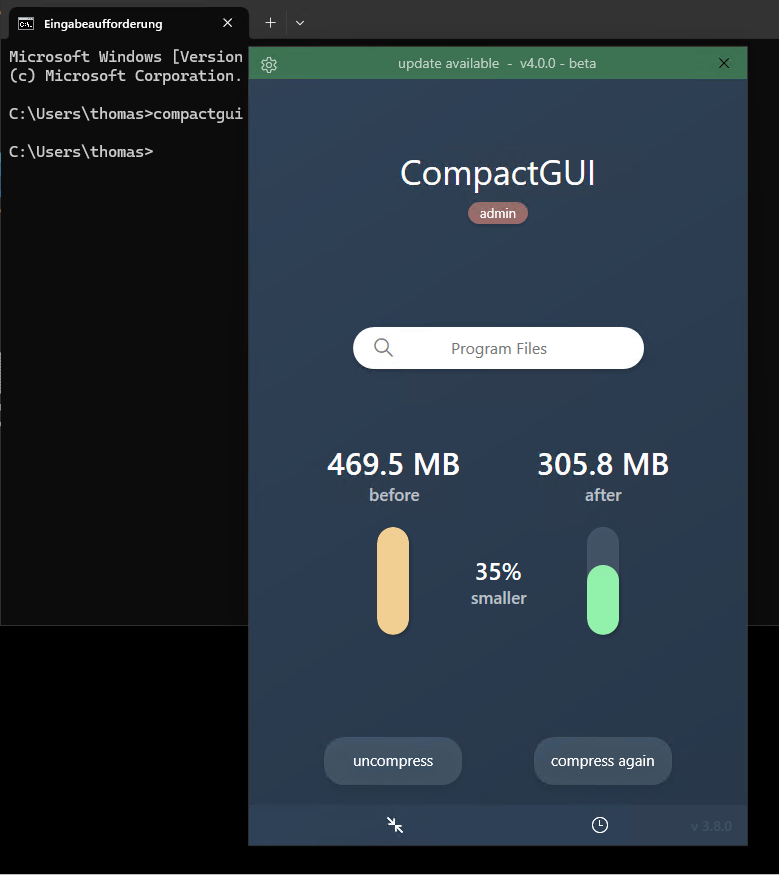
For targeted folder compression, utilize tools like CompactGUI or Compactor. These support algorithms such as LZX or Xpress16K and handle large directories reliably.
Thomas Joos
Tools like CompactGUI use the traditional “compact.exe” backend and integrate into Explorer seamlessly. Conversely, Compactor directly interfaces with the Windows API, offering advanced features such as analyzing data blocks before compression to avoid pointless operations on incompressible files. A database tracks these cases to speed subsequent processes, and real-time feedback on storage savings is provided, including pause and resume options during compression.
Both programs support various algorithms—XPRESS4K provides quick compression, while LZX achieves better space reduction, especially with large software like games, Visual Studio, Adobe suites, or SDKs, often yielding 40-60% savings. The results are documented by the developers on GitHub, demonstrating examples like halving the size of game directories or reducing Visual Studio from 9.6 GB to 4.7 GB.
Compression remains transparent; files remain fully usable without uncompressing. Nonetheless, formats such as databases or virtual machines may not compress well and could lead to problems. For reliable operation, exclude critical folders (Windows system folders are ignored automatically) and verify software integrity after initial compression.
Both Portable and easy to use, CompactGUI and Compactor require no installation. We recommend using the 64-bit version of Compactor from GitHub for optimal performance on all systems, including older hardware. It performs rapid, low-CPU load compression with high reliability.
Using Tiny11 for a lean Windows 11 without ballast
Tiny11 is a stripped-down Windows 11 version that omits TPM, online account requirement, and pre-installed bloatware. The latest build based on Windows 11 24H2 uses only 3.5 GB with LZX compression—less than a DVD. Download options include the Internet Archive or creating your own ISO with Tiny11 Builder. The process involves creating a directory, downloading source code from GitHub, mounting the ISO, running PowerShell commands, selecting Windows 11 Pro, and generating a custom ISO, which can then be written to a USB stick. Remember to disable all Windows setup options related to user experience and choose offline installation for creating a local account.
- Create a directory like “C:\t11”.
- Download the “Source code (zip)” from GitHub.
- Mount the Windows ISO image.
- Open PowerShell as administrator.
- Run: “Set-ExecutionPolicy unrestricted”.
- Navigate to the directory with “cd \t11”.
- Execute: “.\tiny11maker.ps1”.
- Enter the drive letter (e.g., “E”).
- Select “Windows 11 Pro” (e.g., option 5).
- Find the ISO at “C:\t11\tiny11.iso”.
Copy the ISO to a USB device via Rufus, ensuring all setup options are turned off. Install offline to create a system with a local account, free of cloud dependencies.
Preconfigured Windows Images with WinUtil
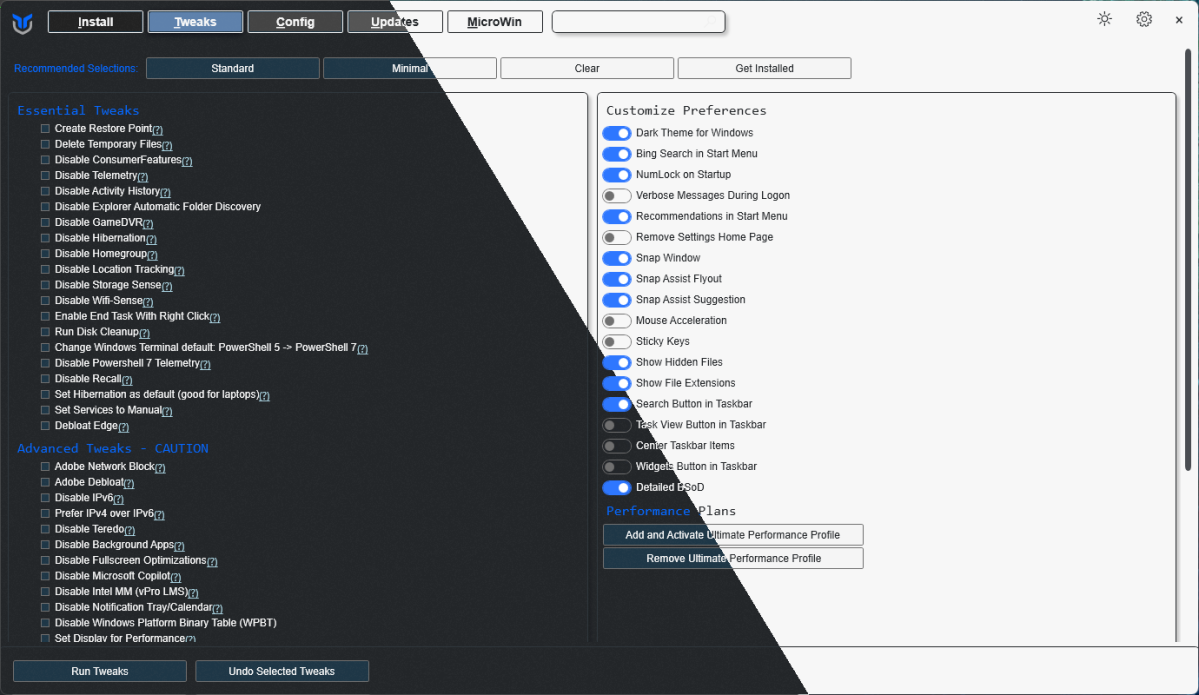
For a ready-to-go Windows setup, WinUtil by Chris Titus offers fully preconfigured images. These include a local account, no TPM verification, no need for internet connection, and only half the typical memory use. It automates system creation and setup, making deployment straightforward and quick.
Thomas Joos
Extremely Minimal: Tiny11 Core and Slim VHD Installations
The Tiny11 Core version eliminates Defender, Windows Update, and recovery mode, offering an ultra-lightweight system. Activate with “.\tiny11coremaker.ps1”, but note it cannot be upgraded later. Alternatively, create a bootable Windows on a Virtual Hard Disk (VHD) using WinNTSetup, suitable for testing environments.
Additional options include using WinDebloat to remove apps like Xbox, OneDrive, Cortana, and Edge. For further reduction, Win Reduce can drastically shrink system folders like “WinSxS” or “System32”, but beware—system updates may no longer work afterward. Configuration involves editing text files with “remove-” and “keep-” directives. This approach is recommended only for experienced users or testing scenarios.
Create Minimal Windows with Win10XPE and PEbakery
Win10XPE enables building a highly portable, minimal Windows version that runs entirely in RAM, ideal for emergency booting or aging hardware. This setup is configured through the PEBakery tool, resulting in an ISO image that boots directly into memory and requires no installation process.

Thomas Joos
For a portable Windows experience, place essential applications such as Firefox or LibreOffice inside “Custom\x64\IsoRoot\Programs”. Optionally, mount the folder as drive Y using “CDUsb.y”. You can then test the ISO in VirtualBox or write it to a USB stick with Rufus.
Reinstall Windows Cleanly and Legally
If a completely unmodified Windows installation is preferred, utilize NTLite. This tool allows you to load the ISO, remove unwanted applications, disable services, and add updates or drivers before creating a new, legal ISO. It’s an effective method for tailored Windows setups.
WinScript provides a graphical interface to debloat Windows, allowing removal of apps like Candy Crush, Xbox, or Feedback Hub, and can deactivate telemetry and privacy-related features. It creates a restore point before making changes, ensuring safety during customization.
Additional Practical Tips
- Disable hibernation with “powercfg -h off” to free up approximately 4 GB.
- Relocate the swap file to another drive via “sysdm.cpl ,3”.
- Adjust system restore’s reserved memory through “sysdm.cpl ,4” → “Configure”.
- Prevent Windows Update from deduplicating data by disabling transfer optimization under “Settings” → “Update & Security” → “Advanced Options”.