Select Language:
If you’re looking to add an extra fan to your OMEN 25L GT150482NO gaming PC, you’re not alone! Many gamers want to improve airflow to keep their systems cool. Here’s a straightforward guide to help you identify if you can use a 4-pin PWM connector for your new fan.
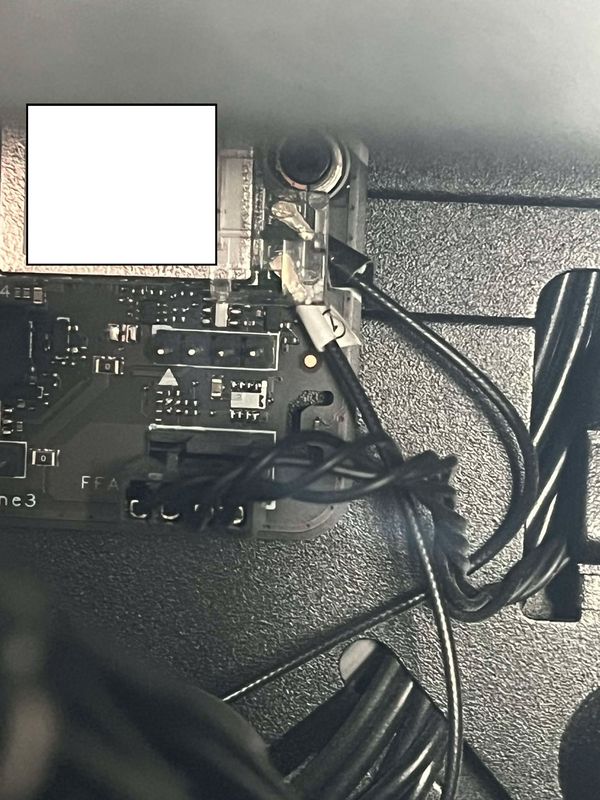
Step 1: Understanding Your Motherboard Connections
First, take a close look at your motherboard. It sounds like you have a connector that isn’t clearly labeled, but there’s a white arrow pointing to the first pin. This can be confusing, especially if it’s right next to another connector (in your case, FFAN1) that’s currently in use.
Step 2: Identifying the Connector Type
For many modern motherboards, a connector that matches yours — often referred to as a "fan header" — should support a 4-pin PWM fan. Here’s how you can confirm:
-
Check the Manual: Your motherboard should have a manual that illustrates the connection types and their functions. Look for diagrams that explain the ports.
-
Online Resources: Search online for your specific motherboard model, either "BlizzardL 894A" or "BlizzardL 894B", along with the term "fan header". Chances are, others may have the same question and someone might have already answered it on forums.
- Contact Support: If you can’t find the needed information online, consider reaching out to HP support. They can provide clarity and assure you whether that port is suitable for an additional fan.
Step 3: Installing Your New Fan
Once you’ve confirmed that the connector is indeed a fan header compatible with a 4-pin PWM fan, follow these simple steps to install it:
-
Power Down Your PC: Always ensure your computer is completely powered off and unplugged to avoid any electrical issues.
-
Open the Case: Carefully remove the side panel of your case to access the internal components.
-
Connect the Fan: Locate your newly purchased fan and connect its 4-pin PWM connector to the identified header on the motherboard.
-
Secure the Fan: Make sure the fan is securely mounted in the area you choose, ideally towards the bottom of the case for optimal airflow.
-
Close the Case: After everything is connected, replace the side panel and ensure all screws are tight.
- Power Up and Test: Plug your computer back in and power it on. Check to see that the new fan is operational.
Conclusion
Adding an additional fan can significantly enhance your gaming experience by maintaining optimal temperatures. By following these steps and ensuring you have the correct information about your motherboard’s connections, you can enjoy improved airflow with your new fan!
Good luck with your upgrade, and feel free to reach out if you have any more questions!