Select Language:
Sometimes Windows users feel as though the operating system has a will of its own, resisting any attempts to modify or override certain restrictions.
Many of these restrictions are put in place to safeguard the system’s security, which is understandable. Regular updates, for instance, are essential. Yet, most users prefer the option to control what gets installed and precisely when.
In certain situations, these restrictions can be bypassed with built-in tools, and sometimes more conveniently with third-party solutions that we’ll introduce here.
Manage Windows Updates
Updates aim to enhance security and fix bugs, but occasionally they cause issues like system freezes or loss of functionality.
Microsoft mitigates this by releasing updates in phases, allowing for withdrawal if problems surface.
Mark Hachman / IDG
After a restart, Windows updates can be frustratingly slow or disturb your workflow with progress bars and restart prompts.
Limit updates using built-in tools: Windows provides options to pause updates, but these need activation beforehand. Access “Windows Update” in “Settings” (Win+I).
In Windows 10, click “Pause updates for 7 days” or select “Advanced options” to set an end date for the pause under “Pause until.”
Another method involves setting your network as a metered connection in “Network & internet,” which reduces data consumption and delays updates. You must specify this under “Ethernet” or “Wi-Fi” settings, particularly in Windows 10.
Note that these measures mainly reduce, not entirely stop, updates—especially critical security patches will still be installed, but total data transfer decreases.
Hidden Settings to Extend Update Pauses
To prolong pause durations, modify the registry: create the key
HKEY_LOCAL_MACHINE\Software\Microsoft\WindowsUpdate\UX\Settingsand add a DWORD (32-bit) value named FlightSettingsMaxPauseDays with the hex value 00001c84 (which equals 7300 days, or 20 years).
To disable automatic updates altogether, create the key
HKEY_LOCAL_MACHINE\Software\Policies\Microsoft\Windows\WindowsUpdateand add a DWORD named NoAutoUpdate with the value 1. Windows then selectively downloads updates unless manually triggered via “Check for updates.”

Limit update downloads by setting your internet connection as “Metered.”
Foundry
Total Windows Update Deactivation: Use third-party tools like Windows Update Blocker. Select “Disable updates” and click “Apply now.” This method turns off all update services, preventing reactivation. Only disable updates if strictly necessary—and ensure you install any pending updates afterward.
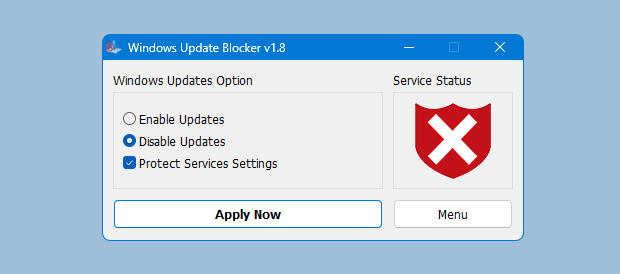
Block all updates temporarily: Use Windows Update Blocker to prevent unwanted disruptions.
Windows Update Blocker
Disable Microsoft Defender
Antivirus programs can sometimes generate false alarms, especially when encountering unknown files. Defender notifies users about potentially dangerous software, often categorized based on download source or reputation.
While this protects most users, advanced users may find Defender’s restrictions burdensome.
Partially disable Defender: Only proceed if confident, and verify files through online services like VirusTotal before disabling protection.

IDG
Open “Privacy & security” in “Settings,” then select “Windows Security,” and click “Virus & threat protection.”
Click “Manage settings” under “Virus & threat protection settings” and add specific files or folders to “Exclusions” to prevent Defender from scanning them. This is useful for development environments or trusted download folders.

IDG
Streamlined Defender Configuration
The default “Windows Security” interface can be confusing. The free Defender Control tool simplifies management by providing a clearer overview.
Launch it and select your language. Usually, “Recommended” security profiles suffice. Clicking the “i” icon offers explanations for each setting. The “DefenderGuard” tab allows you to specify reactivation timeframes before “Real-time protection” resumes.
Use the Defender Exclusion Tool for quick exceptions—just add folders or files to skip from scanning.

Simplify Defender setup: The user-friendly UI lets you quickly access key settings without hassle.
Defender UI
While Defender Control can deactivate Windows Defender entirely, Microsoft restricts this to prevent misuse. It’s recommended to add the program folder to exclusions. Remember to manually disable real-time protection and turn off “Tamper Protection” in Settings, otherwise system defenses will restore safeguards.

Defender Exclusion Tool
After success, add “Menu > Add Defender Control to the white list” to make the program ignored during real-time scans. Use “Disable Windows Defender” to turn off protection entirely, and “Enable Windows Defender” to restore it.
Adjust Smartscreen and Attachment Settings
Smartscreen protects against malicious websites and downloads by checking the reputation of content. Blocked sites or unknown files will prevent access or execution.
If you prefer to disable it, go to “Settings” > “Privacy & security” > “Windows Security” > “App & browser control” > “Reputation-based protection settings” and turn off the options.
Note that downloads may still be blocked unless real-time protection is turned off or exclusions are set. Windows may also embed a hidden stream in downloaded files marking their origin, which can be removed by unchecking “Mark as downloaded from another computer” in file properties or by creating specific registry entries.
Bypass Windows 11 Upgrade Restrictions
Windows 11 demands specific hardware configurations, but these requirements are often more about Microsoft’s policies than technical necessity. Many compatible systems run it smoothly without performance issues.
You can attempt to install Windows 11 on unsupported hardware by bypassing checks. This involves creating a bootable USB with Rufus, selecting your ISO, and customizing the setup to ignore hardware requirements by removing specific checks.
Tools like Win11 Bypass can generate a modified ISO, allowing installation on systems that don’t meet official criteria. Always back up your data before proceeding, as future updates or Microsoft policies might prevent unsupported upgrades.
To prepare your installation media, use Rufus to write the ISO to a USB, optionally select “Remove requirements for 4GB RAM, Secure Boot, and TPM 2.0,” then proceed with setup. You may also consider using multi-ISO tools like Ventoy to boot multiple images from a single stick.
Add Pro Features to Windows Home
The Home edition lacks certain features like Group Policy Editor, but these can sometimes be mimicked with free tools such as Policy Plus. This enables adjusting advanced settings without upgrading to Pro, which often isn’t necessary for casual or semi-professional users.
For example, you can configure user rights and policies using Policy Plus, saving the settings directly into the registry. Always back up your registry before making major changes to avoid potential system issues.
Enhanced Repair Systems
Windows includes a recovery environment with limited tools to restore or troubleshoot. For advanced repair, boot from installation media and select “Repair your PC” (Windows 11) or “Advanced startup options” (Windows 10).
Developers and enthusiasts have long created enhanced recovery environments based on Windows PE, with additional functionalities and network support. These are often third-party solutions like Hiren’s BootCD PE, providing a comprehensive toolbox for recovery and maintenance.
Creating a custom PE environment offers greater control, but requires technical knowledge and may involve licensing considerations. It’s safest to assemble your own tailored repair system, ensuring legality and security.