
Select Language:
A typical Windows PC generally boots from its internal hard drive, aligning with the common understanding of a “Windows PC.” This is because the Microsoft operating system isn’t embedded directly into hardware but resides on your storage device, ready to load during startup.
Nonetheless, under suitable conditions, a computer can be started via alternative methods: from a CD or DVD, over a network, or from external media like USB drives. Since USB flash drives are primarily used for external booting, this article concentrates on that method.
These instructions are broadly applicable to other storage devices connected externally, such as larger USB external drives, internal drives accessible through USB cables or adapters, and SD or micro SD cards inserted into the system.
Reasons to boot Windows from a USB flash drive
If your PC typically boots Windows from its hard drive, you might wonder why booting from a USB stick could be beneficial.
There are valid scenarios for this. For instance, if the computer was purchased without Windows, installing the OS can be efficiently carried out using a customized bootable USB. It’s also practical for reinstalling Windows if the system no longer starts normally, even in safe mode.
Initially, it’s wise to attempt repairing the OS with a bootable rescue system. This approach applies also to malware infections or accidental data deletion, offering a way to access files that might be hidden or protected when Windows doesn’t boot properly.
Using a live system from an external USB allows access to files that Windows or malware may hide. Unlike Windows, a live system does not overwrite empty hard drive sectors unintentionally, which is crucial for data recovery efforts.
Booting from a USB also facilitates system operations like partitioning your hard drive or cloning your current setup onto a new device or larger SSD.
Moreover, live systems enable risk-free experimentation—without the need to dual-boot or partition the drive—great for testing other operating systems like Linux without complex setup procedures.
Essential knowledge for successful booting
The Microsoft Media Creation Tool simplifies the process of creating bootable Windows 10 and 11 install media. It prompts you with default settings, requiring minimal input—just a few confirmations—and then handles the setup automatically.
Despite this simplicity, understanding how Windows gets installed on the USB is important, as it influences the system’s stability and compatibility, especially concerning Uefi and partition style.
Modern computers predominantly use the Uefi firmware interface, a successor to the traditional BIOS, which ensures smooth hardware communication. Key advantages include integrated security features like Secure Boot and support for the GPT partitioning scheme, which are important for secure and efficient system booting.
Since Uefi menus vary across different motherboard manufacturers, with options sometimes labeled as “CSM” (Compatibility Support Module) or “Legacy BIOS,” configuration can be complex. Some systems may switch boot modes automatically if Uefi boot fails, adding to the complexity.
After creating a bootable Windows media with the Media Creation Tool, you may find it difficult to confirm whether the system will boot in Uefi mode or legacy BIOS mode without additional inspection. The status often depends on the system’s current Uefi settings and partition layout.
Using Rufus for enhanced control during creation
Rufus provides comprehensive options for customizing your Windows installation USB. To use it, insert a USB drive of at least 8GB, then run Rufus—no installation needed.
In Rufus, select your USB drive under “Device.” Check if the “Selection” area shows a small arrow; if not, enable the “Check for new version” setting from the preferences, then restart Rufus.
Click on “Download” within Rufus to obtain the Windows ISO file directly. Choose your desired Windows version, language, and architecture options, then initiate the download. Once complete, review the partition scheme—select “GPT” along with “Uefi (without CSM)” for true Uefi operation.
Finally, click “Start” and confirm to create your bootable media. This process ensures your stick is configured for authentic Uefi booting, compatible with newer systems.
On newer machines, simply plug in the bootable stick, reboot, and press the boot menu key (often F12 or similar). From there, select your USB device, and the Windows setup will begin.
Additional tips include accessing the Uefi firmware directly from Windows: navigate to Settings > Recovery > Advanced Startup > Restart Now > Troubleshoot > Advanced Options > UEFI Firmware Settings, then restart into the Uefi menu.
Keep in mind that not all systems support Uefi equally; some may require booting in a legacy or CSM mode. If a Uefi boot isn’t available, switch the mode in your Uefi firmware settings accordingly.
Troubleshooting boot failures from USB
If your USB boot stick works on some computers but not others, verify that USB booting is enabled in the Uefi settings, sometimes requiring activation per USB port.
If issues persist, try different ports, including both front and rear sockets—note that some ports or hubs may not support booting properly. Avoid.pass-through devices like USB docks that can interfere with boot processes.
If the current Uefi settings don’t match the stick’s configuration, such as switching between Uefi and Legacy modes, adjusting these might resolve the problem. Sometimes, creating a different boot stick can help, especially if the current one isn’t recognized correctly under different modes.
Different USB ports may support booting inconsistently; testing each port can help identify compatibility.
IDG
If booting still fails, switch Uefi boot mode between “Uefi” and “Legacy” settings in the firmware. Some systems support dual modes, in which case switching mode might reveal or hide the bootable device.
Creating boot sticks with different tools requires an ISO file—obtained from official sources or a quick online search. Remember, some ISO images are protected by licensing restrictions and are not freely available.
For Windows PE (Preinstallation Environment) systems, the ISO must be generated after installing the software. This typically involves using Windows tools under “Tools” or “Rescue Media” settings, which download necessary components automatically and prepare the ISO file.
Once you have your ISO, you can finalize the boot stick creation with Rufus or similar tools.
Switching a PC from CSM to Uefi mode
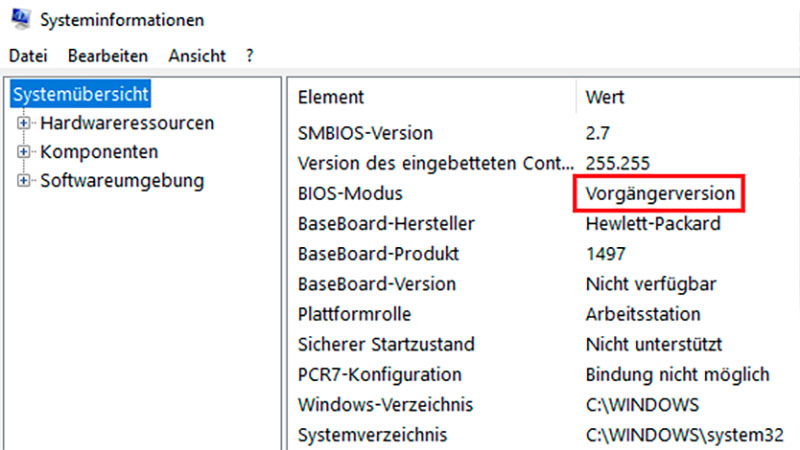
Many devices upgraded from Windows 7 or 8 may still run in CSM compatibility mode, even though they could operate with true Uefi. You can verify your system mode using the MSInfo utility: if “UEFI” appears under “BIOS Mode,” your system is already in Uefi mode.
If “Legacy” or “Previous version” shows up instead, it’s advisable to switch to Uefi for enhanced security and performance. This involves checking if the motherboard supports Uefi and adjusting the firmware settings accordingly.
To switch to full Uefi mode, the system drive should be converted to GPT using the MBR2GPT tool before changing firmware settings.
Conversion to Uefi mode requires ensuring support and performing disk layout changes with MBR2GPT.
Creating Multiboot USBs for multiple systems
Maintaining separate boot sticks for various live or install systems can be cumbersome and inefficient.
A more elegant solution is to create a multiboot setup, allowing you to select the desired system after boot. Ventoy simplifies this process significantly.
Use a large enough USB—preferably 16GB or more—to host multiple ISO images. After connecting the drive, launch Ventoy and click “Install” followed by “Yes” twice. This makes the drive bootable and partitions it into two parts.
The smaller partition may remain hidden in Windows Explorer, but the larger one appears as a normal drive. Simply copy your ISO files into this partition, and upon boot, Ventoy will present a menu listing all detected systems for easy selection.
While most file systems are compatible, Ventoy defaults to exFAT, which supports ISO files larger than 4GB, unlike FAT32.
Tip: To update your multiboot setup, just add or remove ISO files directly in the drive’s file explorer—the menu updates automatically upon next boot.