Select Language:
After the quick detour to Shu’s house through the center of Ebisugawa falls apart, Silent Hill f directs you to the local middle school, offering another route to the mountains and away from Ebisugaoka. Unfortunately, that route isn’t any smoother.
With a gate blocking the path to the mountains, Shu, Rinko, and Hinako must explore the school to find the mountain key. In reality, Hinako ends up doing most of the work, and the school is full of puzzles that require solving. Be prepared to do some thinking—these puzzles will challenge your wit.
Exploring the First Floor
Start by interacting with the map on the wall to get the complete layout of the school. From there, move into the main hallway. Walk down the short corridor beside the stairs into an outdoor area where you can save at the Hokora. You’ll also find an Origami of Rumours nearby and a Dried Carcass further ahead.
Back in the main hall, check all the cubbies; one contains Yokan. Then, head through the open door into the vice principal’s office. Here, you’ll find a locked key cabinet, along with a note stating that the vice principal lost the key to the second floor. In the story, it’s locked in his desk, but on harder difficulty, he may have dropped it somewhere else.
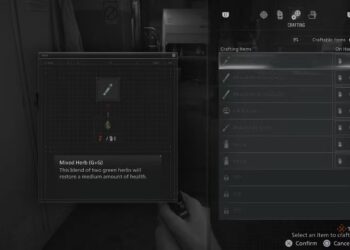
Continue down the hall to the locker room, where you’ll find a Bandage and a First Aid Kit in an open locker. Another locker can be interacted with but can’t be opened yet. Opposite, inside a classroom, find some Ramune and the School Founder’s Anecdote. In the story version, you’ll also see a note indicating that the desk in the office can be opened with a hairpin.
Climb the stairs nearby to find Arare in a cupboard, then head back down to climb out a window. Outside, you’ll find Divine Water and hear a shout afterward.
On harder difficulty, there’s a poster indicating the vice principal’s love for gardening and his care for the flowerbeds.
Finding Keys
The next step is to find the keys necessary for progression. The locations vary depending on difficulty but are generally similar.
In story mode, the journal updates after reading about opening the desk with a hairpin to show Sakuko dropped a hairpin in the yard’s rabbit hutch. Climb out the window, go to the bottom right of the map, and find the hairpin inside. With it, you can open the desk and retrieve the second floor key.
On hard mode, the instructions are less specific. The rabbit hutch is still there but irrelevant; instead, search along the flowerbed and find the dropped keys, battling enemies along the way. Once collected, you can open the stairwell to the second floor.
Outside, you can find useful items: a Dried Carcass in a shed, a Heavy Weapon — a Sledgehammer — to the far left, and Red Capsules and an Ema Plate further north. After acquiring the second floor key, you can access either side of the stairwell as you prefer.
Opening Rinko’s Mysterious Box
Once upstairs, every classroom except the current one is locked, so enter the unlocked room. As soon as you go in, the door locks behind you, trapping you. To escape, interact with desks to see memories of Hinako, then sit at Rinko’s desk to solve her puzzle box.
The notes you receive are the same in story and hard modes, but the solutions differ slightly, with more interactive elements at higher difficulty.
Stage 1
The first box’s key words are Sweet and Tart Fruit. Both modes use the same clues.
On story mode, reveal Strawberry and Cherries. On hard, you reveal Apple, Cherries, Orange, Grapes, Strawberry, and Pineapple.
Stage 2
The keyword here is Journals. In story mode, you reveal identical books and an extra journal. Hard mode requires revealing three books on one side and one on the other.
Stage 3
The final clues focus on Sakura In Full Bloom. In story mode, show only one Sakura branch. On hard, reveal the three Sakura branches, located on the bottom right and middle right of each side.
Once the box opens, you receive the Second Floor Classroom Key, which is used to open all other rooms.
Exploring the Second Floor
Before moving on, thoroughly explore the second floor. First, go to the classroom near where the puzzle was solved, and grab the Toolkit in the hallway. Inside, find a Bandage, the Annex Key, and a note mentioning that Asakura has the key to her locker. Then, go to the opposite room to find Arare, an Origami of Grievances with TT’s locker code (377), and Asakura’s Textbook, hinting at her locker password, along with a cryptic cipher note.
Head to the right classroom: there, you’ll find a Toolkit and another Note of Grievances. That completes the Annex. The school is now dominated by overgrown red kudzu, but few enemies remain if you keep your distance from the stationary Scarecrow Students, some of which have Red Capsules at their feet.
Opening the Lockers
Return to the locker room to unlock lockers with known passwords:
-
Aoi’s locker: Using the cipher notes, the password is AOI, which equals 401. Inside, find a note stating Suga’s password is a “cry for help,” which translates to SOS or 505. Inside the locker, you’ll find a School Bag to boost inventory space.
-
Suga’s locker: Password 505 yields a reward of a School Bag.
-
TT’s locker: Password 377 grants the Omamori — Wolf.
-
Asakura’s locker: On story mode, password 534; on hard, 864. Rewards include the Key Cabinet Key.
After opening all lockers, return to the office and open the key cabinet to finally get the Mountain Gate Key. With it, the school finally becomes accessible — at least for now.