Select Language:
Of all the optional fights in Hollow Knight: Silksong, the Great Conchflies stand out as a boss that would fit well into the first game. They’re fun, fair, and a little silly, making them a nice challenge on the summit of the Blasted Steps. You’re more likely to find them by accident than intentionally.
Even though fighting them is enjoyable, you definitely don’t want to lose. If you do, you’ll have to trek a long way back from the nearest bench—often quite far away. Winning is essential because the reward at stake is worth the effort.
How to Find the Great Conchflies
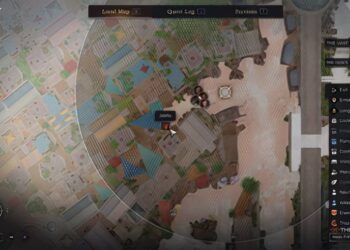
The conchflies are an optional boss that blocks your way to the nail art called Needle Strike. The nail art is taught by the Pinstress on the far west side of the Blasted Steps map, and the Great Conchflies are waiting in the arena before her.
To get to their arena, climb up the Blasted Steps from the Shellwood area:
– Head up where possible after entering Shellwood.
– Use the bench above as a checkpoint.
– Climb the room west of the bench to enter the central vertical chamber.
– Exit the chamber at the first left part when you’re halfway up.
– Jump left across several platforms guarded by smaller conchflies.
It’s a good idea to grab the map from Shakra in the room east of the vertical chamber on your first climb.
How to Defeat the Great Conchflies
The boss fight is simple but requires you to learn just two or possibly three moves. The fight won’t take long to learn once you get the hang of it. To avoid running back and forth between the arena and the bench, it’s best to do these two things:
1. Study the move table and compare it with a video guide.
2. Practice dodging projectiles by fighting the smaller conchflies around the area.
The most common attack they use is Pinburrow, where they turn to point their shells at the wall and drill into it. They disappear and reappear somewhere else in the arena, with dust and shell tips showing where they’ll next strike. Timing your dodges to side-step and avoiding corners is key.
They also perform Pin Shot: firing a small conch shell that ricochets off walls up to three times before being destroyed on the fourth hit. You can side-step these shells or hit and destroy them to bounce them back at the conchflies. Usually, the other conchfly won’t appear until after the shot has been fired. The firing conchfly then burrows, and they sometimes perform synchronized Pinburrows within a couple of attack cycles.
The fight is straightforward because the conchflies only have the Pinburrow and Pin Shot attacks, making it easy to understand and counter. Practice and understanding their attack patterns will make it quick to defeat them.
The main challenge is the long run between the arena and the bench, but the fight itself doesn’t have complex phases. To make things easier, review the move table carefully and practice against the smaller conchflies to handle projectiles better.
The most frequent attack is Pinburrow, which can appear on either side of the arena, so stay alert at every wall. When dodging, keep your dashes precise and don’t spend too much time in the air, using jumps only when necessary. Setting traps early in the fight can also help, especially using items like Sting Shard paired with the Pollip Pouch for extra effectiveness.
The other attack is the Pin Shot: a bouncing shell you can side-step or destroy. After firing, one conchfly typically burrows, and both perform synchronized Pinburrows in quick succession.
Keep facing the two flies, defeating at least one to make the boss retreat. There’s no reward for defeating the boss here unless you continue further left in this area to meet the Pinstress for the hidden nail art. Be cautious with the platforming to the left, as it involves strong winds and sand worms that double damage. If your health is low or you’re nervous about platforming, it’s wise to lure some small conchflies to the right to fight for silk before proceeding.