Select Language:
Quick Links
In Hello Kitty Island Adventure, each area has its distinct environment, filled with unique characters. Retsuko lives in Mount Hothead, a volcanic island known for its remarkable feature—the Ancient Ruins Gate. This gate leads to a puzzle room, but getting past it will be a challenge.
There’s plenty to explore, including a series of interconnected puzzles scattered across multiple rooms. While tackling these challenges, Retsuko and Chococat will be there to lend a helping hand, keeping you cool in the heat of this volcanic setting. So, if you’re ready, let’s dive into those puzzles!
Where to Find Mount Hothead Puzzle Rooms
Unlike other regions, all of the puzzle areas in Mount Hothead are located in one central location: Red Hot Ruins. They are not dispersed in various locations. To enter them, you must strengthen your friendship with Retsuko.
Once you reach friendship level seven with her, you’ll unlock the Enraging Ruins quest. However, before you can proceed, you’ll need to gather three Red Power Crystals found throughout Mount Hothead:
Crystal Locations
-
The first crystal is situated south of Retsuko. Leap down and head left to find it next to visitor cabin #3.
-
The second one is an easy find; simply go right from Retsuko and stop near the fast travel mailbox. The crystal is to its left.
- The last crystal can be found in the Hot Springs area, which is northeast of Mount Hothead. Look to the left of the waterfalls by a small pool. If you’re having trouble finding it, go to the top of the waterfall, jump down from the zipline area, and head north.
After collecting all three Red Power Crystals, return to Retsuko and place them in the Ancient Ruins Door. This will give you access to the ruins, where all of Mount Hothead’s puzzle rooms are housed together in what is called Red Hot Ruins. Your initial task will be to locate Retsuko’s first suitcase to complete the first puzzle room.
The Mount Hothead Puzzle Room Solutions
Completing the First Room
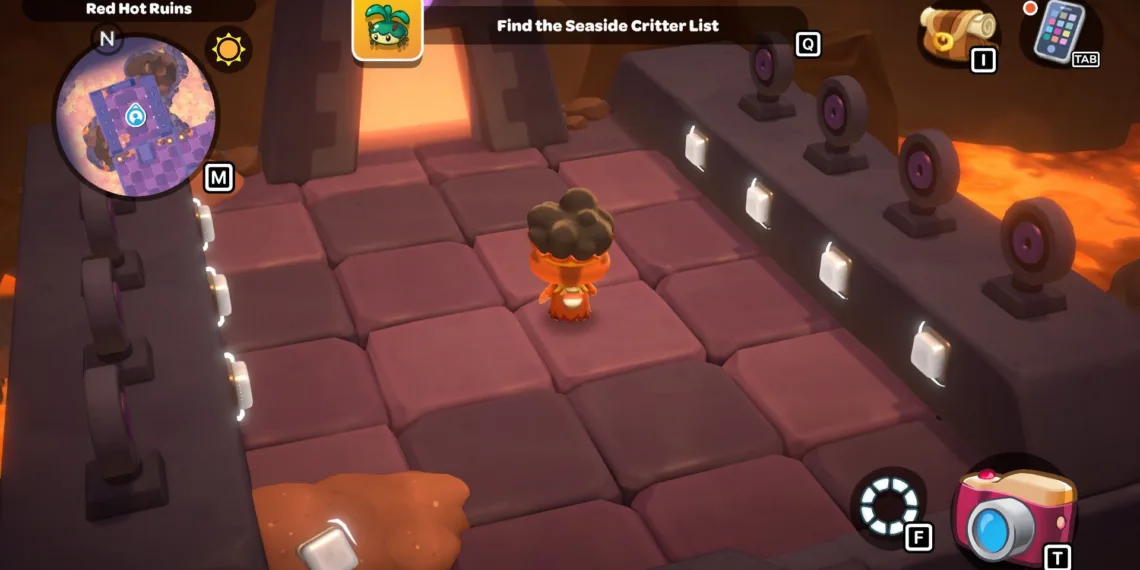
Upon entering the Ancient Ruins Door, climb the stairs to begin a straightforward sign puzzle. Each purple-marked sign has glowing buttons underneath. Your objective is to rotate the signs so the purple sections face each other. When aligned correctly, the door ahead will open.
Completing the Second Room
To get into this room, go through the door on the right side of the first room. Here, you won’t find a puzzle, but rather a parkour challenge. Use your balloon to jump onto the air currents that rise from the volcanic vents in the center. This will help you ascend.
Once you gain enough height, glide towards the climbing wall, where you will also see another volcanic vent nearby. The key to this room is to keep ascending until you reach the climbing wall on the south side of the room, where a wooden chest awaits.
Just below this chest, you will find another chest on a ledge. Carefully glide down using your balloon to grab it, knowing that these chests contain only cosmetic items. After collecting them, return to the first room since you cannot proceed to any other rooms from here.
Completing the Third Room
To enter this room, head north from the first room. You will descend into an area where you’ll see two sets of crystals—on the left, there are green, blue, red, and yellow crystals; on the right, blue, red, purple, and yellow ones. You can only interact with the left set, and your task is to match their colors to the right side in the exact order.
The correct sequence is yellow, purple, red, blue. Once arranged properly, the next door will unlock.
Continue forward to find Retsuko’s first suitcase on the right side of the room. However, her clothes will be missing. Fortunately, they’re just south of the same room, making it easy for you to retrieve them. After you return her clothes, Retsuko will ask you to find her second suitcase, which is located deeper in the ruins.
Completing the Fourth Room
Proceed through the next door to enter a large puzzle room. The first challenge involves placing a golden cube on one of the buttons. The central sign will indicate which button to pick, which in this instance is the top button. Putting the cube there will make stairs appear for you to ascend.
The following puzzle features five teal buttons and four signs. Two of these signs point to the same button at the bottom-right. Since it’s different from the others, place the golden cube there to cause another staircase to rise.
This process is similar for the next puzzle, just with green buttons—this time, the top-left button is the odd one out, so put the golden cube there. Finally, for the last puzzle with purple buttons, the center button must hold the golden cube to unlock the exit.
Continuing Through the Remaining Rooms
-
For the fifth room, enter through the rightmost door in the checkpoint area after the fourth room. While this room is also a parkour challenge, if your aim is solely to find Retsuko’s second suitcase quickly, you may skip it.
-
In the sixth room, you’ll find a stack of signs. Your goal is to rotate the symbols so all green-marked sections face north, unlocking the door that follows.
-
The seventh room presents a puzzle with symbols above a lava pool. To turn all the symbols into yellow stars, press specific buttons in sequence.
- The eighth room requires you to press colored buttons in a particular order based on a sequence displayed after pressing the white button.
As you explore and solve puzzles in the Red Hot Ruins, you will gather items and complete tasks that will lead you to Retsuko’s belongings, which in turn progresses your questline.
After finding all required items, including Retsuko’s laptop, you’ll conclude the Enraging Ruins quest. Make sure to enjoy the journey and the friendships you nurture along the way!

