Select Language:
The Monster Hunter series has seen the addition of numerous weapons over its iterations, especially leading up to Monster Hunter 4, where the variety became more pronounced. In Monster Hunter Wilds, players can still find the same 14 weapons as in recent titles, though there have been significant adjustments to adapt to the game’s new mechanics.
The Charge Blade remains one of the more intricate weapons in the game, and this holds true in Wilds as well. Like any weapon, it becomes easier to manage with practice. The Charge Blade allows you to deal massive damage when you time your attacks correctly, especially with the help of Focus Mode, which simplifies this process significantly.
For this guide, we will be using Xbox button prompts.
The Charge Blade
The Charge Blade is a balanced weapon that requires you to alternate between Sword and Shield mode and Axe mode. These modes cannot be used independently, so it’s crucial to understand the basics before diving in. Each mode has distinct advantages, which we’ll explore here.
Phials
Phials are essential to the function of the Charge Blade, and can initially be a bit confusing. Simply put, attacking with the Sword generates Phial Energy, which you store in the weapon, represented by the phials in the corner of the screen.
The process for accumulating Phial Energy includes the following stages:
- Empty – No energy stored.
- Yellow Energy – The sword shines orange-yellow, allowing you to fill up to three phials.
- Red Energy – The sword glows red, enabling you to fill all five phials.
- Overcharged – The sword glows bright red, and your attacks will bounce off the monster. This allows for the same energy storage as Red Energy for five phials.
Understanding how to manage the Charge Blade is crucial. Excess energy without being used will result in your attacks bouncing off without causing damage. To release this energy, press RT + B simultaneously, or hit B while blocking. This action transfers energy from your Sword to your phials.
Phials can also reach two filled stages:
- Filled – A filled phial can be used for Elemental Discharge, with more filled phials leading to more elemental attacks.
- Overfilled – Once all five phials are filled, they can be further charged, resulting in stronger elemental attacks that create aftershocks.
For the best results, use filled or overfilled phials rather than mixing them. In short, attack with your Sword until you gather red energy, then store that energy in the phials, and repeat the process.
Sword and Shield Mode
The Charge Blade has two modes, with the Sword and Shield Mode as the default. While it’s similar to a traditional Sword and Shield, it offers more charged attacks. This mode is ideal for its mobility and defensive capabilities, allowing you to block incoming attacks effectively.
Damage dealt in this mode is relatively low, but its advantage lies in mobility. You can chain moves quickly, transitioning from Shield Thrust to Fade Slash to Charged Rising Slash and back seamlessly. While the damage output isn’t high, it gives you the freedom to maneuver and defend.
This mode is also the only way to charge phials.
Axe Mode
Axe Mode is powerful but slow, dealing significant damage. It lacks a guard mechanism, although it offers some hyper armor during attacks, providing a level of protection.
However, if you lack filled phials or the necessary power boosts, Axe Mode can be limiting, so avoid relying on it without preparation. Accessing Axe Mode typically occurs through attacks. For example, blocking and pressing Y or using the combination Y + B after a Shield Thrust will get you there. This also triggers an Amped Elemental Discharge if you’re timed correctly, so exercise caution.
Powered-Up Mode
The Charge Blade’s name reflects its ability to charge up. You can fill phials to strengthen your elemental attacks while also boosting your Sword and Shield. Powering them up involves transferring energy instead of merely stocking it.
For Sword Energy, transfer it into the phials as usual, but hold B to power up the shield instead. After the shield is powered up, you can do the same with the Sword. To power up your Sword, engage in a condensed elemental slash—in other words, hold Y while transferring energy. Releasing at the correct time will enhance the Sword’s power.
Don’t worry—when doing a Condensed Elemental Slash, it doesn’t need to connect with an enemy to charge the weapon. If you happen to overcharge or undercharge, the energy will go to your phials.
The Axe powers up differently and can only be done in two specific ways—performing a Perfect Guard followed by a Savage Axe Slash, or using Double Rend on a wound.
Here’s what each weapon can do when powered up:
- Sword – Attacks become undetectable regardless of sharpness unless overcharged, dealing more damage overall.
- Shield – More powerful attacks can be blocked without taking damage, allowing Axe mode to use Super Amped Elemental Discharge.
- Axe – Hold the attack button for multiple hits in one swing. With overfilled phials, small explosions will erupt after each hit.
The powering-up process can be intricate. The Sword can only power up if the Shield is already powered, whereas the Power Axe can be activated independently. However, the Sword remains powered even if the Shield loses its charge, but it can only recharge once the Shield is powered again.
Charge Blade – Skills and Abilities
Now that we’ve covered the basics of the Charge Blade, let’s delve into some complex mechanics and how to combine the two modes effectively.
Charged Rising Slash
Charged Rising Slash is a fundamental move in Sword Mode and one of your most frequently used attacks. Hold B while standing still and release at the right moment, just as you would with a Condensed Elemental Slash. The color of your blade and the sound during the charge will guide you.
This is a powerful attack that charges Sword Energy quickly. With the right skills, two fully charged Rising Slashes can yield Red Sword Energy in no time.
Releasing too early or late leads to a less effective Charged Slash instead, which is weak and adds minimal Sword Energy.
Elemental Roundslash
This move accelerates the charging process for the Charge Blade. Begin an Amped Elemental Discharge, but cancel into the Elemental Roundslash by pressing RT. This quick attack switches you back to Sword Mode while transferring Sword Energy and stocked Phials into the Shield, powering it up without pausing your assault.
A great combo to practice is starting with Shield Thrust, transitioning into an Amped Elemental Discharge, and then immediately into an Elemental Roundslash once your Sword Energy is sufficient.
Fade Slash
While Axe Mode delivers significant damage in bursts, it’s essential to maintain some flexibility while using Sword Mode. Fade Slash is a valuable tool for this reason.
This maneuver may not inflict much damage, but it allows you to reposition quickly. You can execute it by pressing B while pushing the left stick in any direction, covering impressive distances—from in front of a monster to nearly behind it in one movement. This attack fits well into various combos, making it an effective dodging technique.
However, keep in mind that there are minimal invincibility frames during Fade Slash.
Super Amped Elemental Discharge
Charged Rising Slash is fundamental for Sword Mode, whereas Super Amped Elemental Discharge (SAED) is key for Axe Mode. This flashy move allows for tremendous damage, but requires careful setup.
SAED can only be performed with the Shield powered up. If it’s not, you’ll only be able to execute the Amped Elemental Discharge. When the Shield is ready, press Y + B to trigger SAED. You can follow up with an additional attack or leap straight into the final strike.
This move creates a massive slam for hefty damage even without phials, leaves explosive trails with filled phials, and causes aftershocks with overfilled phials. It takes a moment to execute, so it’s best reserved for monsters that are immobilized or staggered.
With Focus Mode, you can adjust your aim while executing SAED, minimizing the chances of missing your target.
Perfect Guard
A significant advantage of the Charge Blade is its strong defensive capabilities in Sword Mode. The Shield can absorb considerable damage, and executing a Perfect Guard takes this further.
If you block precisely as an enemy strikes, you’ll negate all damage, and with a high Guard skill, you won’t even flinch. Following a Perfect Guard, you have a short window to launch some counteractions:
- Savage Axe Slash – Enter Power Axe Mode, potentially extending the attack for greater damage.
- Super Amped Elemental Discharge – With charged phials and a powered Shield, you can quickly move to the final attack of SAED, especially if the monster is also staggered by the Perfect Guard.
In some cases, a Perfect Guard can initiate a Power Clash with the monster, requiring rapid Y presses to succeed. This results in stabbing with the Sword for added damage.
Double Rend
This is the Focus Attack of the Charge Blade, which you can perform in both Sword and Axe Modes. It covers a good distance, closing in on a wound from far away. Upon impact, it transitions to Power Axe Mode, starting to work on the wound’s damage. After Double Rend concludes, you’ll remain in Power Axe Mode.
Focus Mode can be utilized during Double Rend to adjust your attack’s target to damage other monster parts.
This approach helps you enter Power Axe Mode swiftly without the need for a Perfect Guard, letting you initiate high damage quickly.
Charge Blade – Tips and Tricks
With a solid understanding of the Charge Blade, you’re well-equipped for any hunting adventure. However, to truly excel, it’s important to master all its nuances, and the Charge Blade includes plenty of details to enhance your combat effectiveness. Let’s explore a few tips.
Use the Load Shells Skill
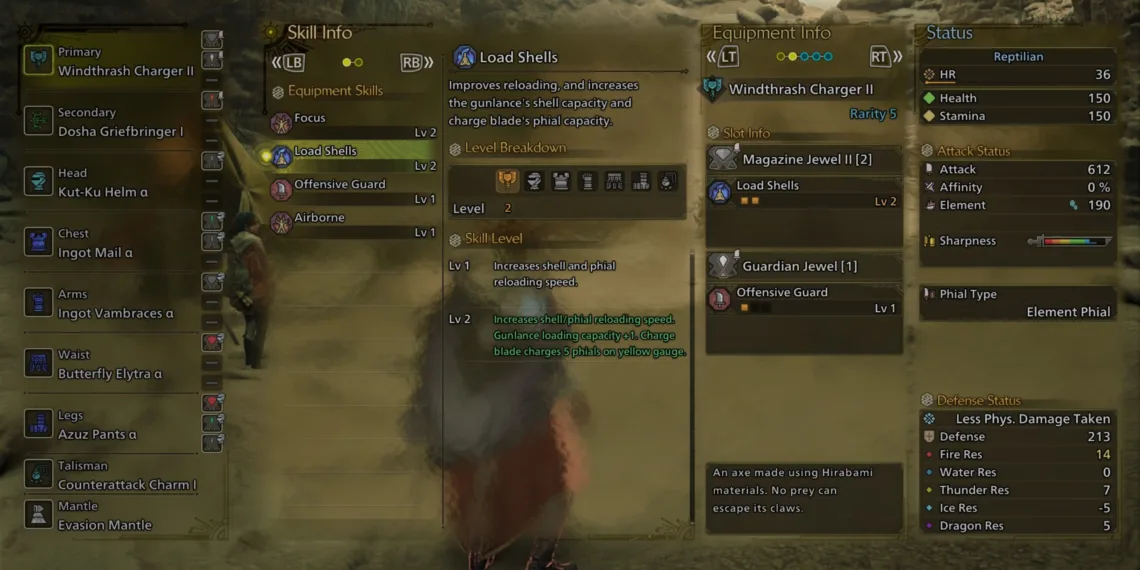
Filling phials is the core balancing act of the Charge Blade. Every SAED means you’ll need to fill your phials again, but what if you could speed this up? The Load Shells skill makes this possible.
At level one, it accelerates the Sword Energy charging process, leading to fewer hits needed to fill the phials. At level two, Yellow Energy can fill all five phials, and Red Energy will overfill them from empty. This dramatically enhances combat speed, enabling you to unleash greater damage more quickly.
Take Advantage of Guard Points
The Charge Blade, like other weapons with a blocking function, has Guard Points. These work similarly to blocks but allow you to execute them mid-attack, preventing interruptions while negating damage. However, they can be quite challenging to perform.
In essence, most animations where the Shield is positioned in front of you, akin to Elemental Boost, can serve as guards if timed correctly. These don’t function as Perfect Guards, but they still present a utility that maintains fluidity in combat.
Elemental and Impact Phials Work Differently
When you choose your Charge Blade, you’ll notice two types of phials: Impact Phials and Elemental Phials. Generally, they function similarly, but there are distinctions during certain Axe Mode attacks and SAED usage.
Impact Phials focus on stunning and exhausting monsters and enhance any ailment your weapon inflicts during attacks requiring phials. The same goes for Elemental Phials but corresponds to the associated element.
An additional key difference appears in the final attack of the SAED. For Impact Phials, the resulting explosion extends forward according to the number of stocked phials, increasing reach. Elemental Phials, on the other hand, explode outward, gaining width instead. It’s essential to select the type that best matches your gameplay and the enemy you’ll face.
Learn Your Shortcuts
What sets a Charge Blade novice apart from an expert is the knowledge of shortcuts. While you can achieve high damage and charge quickly using the basics, mastering shortcuts transforms the weapon into a powerhouse, enabling smooth exchanges between modes and rapid charging.
Got everything charged up? Just block an attack, and you can effortlessly transition into the final hit of SAED. Need to power-up the shield? Cancel into an Elemental Roundslash. With so many movements that can intertwine, memorizing effective combos will make you a formidable player.


