Select Language:
Quick Links
The Bow has been an essential weapon for hunters in the Monster Hunter series since the beginning, and in Monster Hunter Wilds, it has undergone significant enhancements. It still allows for long-range play while maintaining agility, but this version encourages a more aggressive approach.
In Wilds, the Bow serves more than just a stepping stone to Bowguns; it stands as a powerful weapon in its own right. Numerous updates create unique gameplay that differentiates it from previous versions, so let’s dive into a detailed look at this formidable ranged option.
For consistency, we will be using Xbox button prompts for our explanations.
The Bow
Each weapon in Monster Hunter has its own style, and the Bow allows players to maintain distance from foes while staying responsive during combat. Wilds enhances this weapon’s dynamic nature, urging players to engage more closely with monsters and remain in motion.
While much of the core moveset resembles previous iterations, there are notable changes. Let’s take a closer look at what’s new.
Charged Shots
The Bow’s primary function is to release arrows. The longer you hold back an arrow, the greater the damage it inflicts upon release, categorized into three distinct Charge Levels. The first level has no visual cue, the second level emits an orange glow, and the third level glows red.
To encourage active engagement, the Bow features a skill known as Charging Sidestep. This means if you dodge immediately after releasing an arrow, you’ll automatically advance to the next charge level instead of resetting. This enables a continuous barrage of arrows without manual charging.
Once you hit the highest Charge Level through Charging Sidestep, the Charge Level resets after your next arrow.
Your Charge Level isn’t limited to standard arrows; it applies to all arrow types. For example, you could shoot a regular arrow first, then follow with a charged Tracer Arrow, and finish with a fully charged Arc Shot.
Coatings
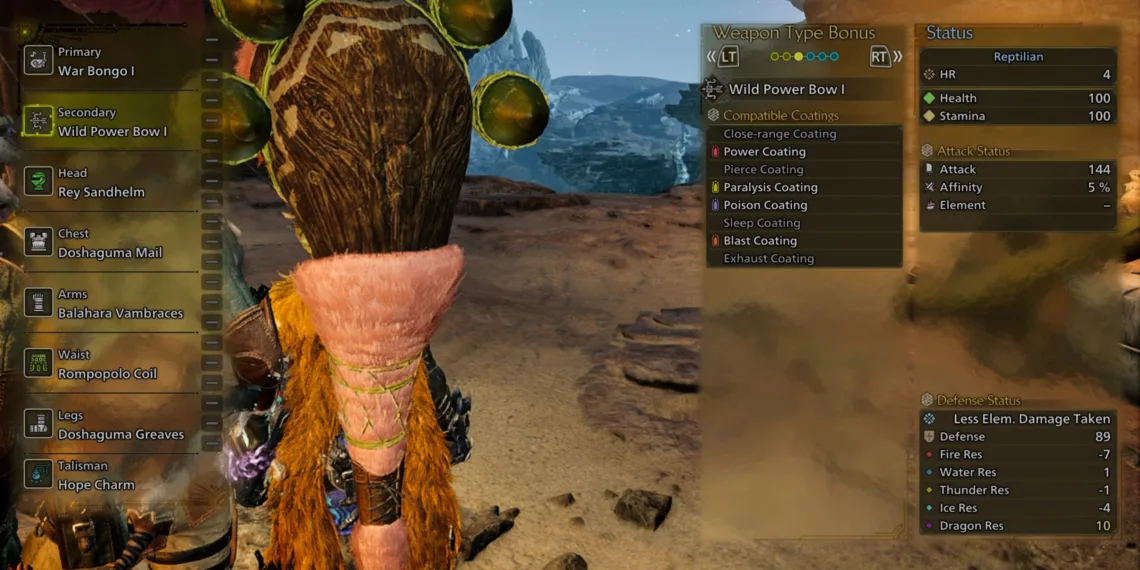
Unlike Bowguns, which utilize specific ammo types, Bows use Coatings. A key change in Wilds is that Coatings are now infinite and don’t require crafting. Instead, they draw from the Trick Gauge, allowing you to utilize them without the worry of running out.
There are eight unique types of Coatings, including:
- Close-Range Coating: Increases arrow damage but limits effective range to proximity.
- Power Coating: Boosts damage for all arrows.
- Pierce Coating: Lets arrows penetrate the monster when using the Dragon Piercer skill.
- Paralysis Coating: Builds up paralysis, immobilizing monsters.
- Poison Coating: Causes damage over time through poison buildup.
- Sleep Coating: Induces sleep when the effect is fully applied.
- Blast Coating: Triggers an explosion once fully charged.
- Exhaust Coating: Increases Stun and Exhaustion effects on the monster.
When a Coating is activated, it lasts for the next ten arrows you shoot. As long as you stay aggressive, the Trick Gauge fills up quickly, allowing for reapplication as needed.
However, each Bow has its specific set of applicable Coatings, so check your equipment menu to ensure the Bow you’re using has the right Coatings available before you craft it.
Trick Gauge
A new feature in Monster Hunter Wilds is the Trick Gauge, a meter that enables the use of special abilities, including Tracer Arrows and Coatings.
The Trick Gauge has three levels, with using a Tracer Arrow or applying a Coating consuming one level each. The meter refills either through dealing damage or executing a Discerning Dodge. The latter fully replenishes the gauge, while damage gradually fills it.
Keeping at least one level in the Trick Gauge is crucial, as Coatings are vital to the Bow’s playstyle, with Tracer Arrows allowing for more effective hits on agile monsters.
Fuse And Tracer Arrows
Two new arrow types in Monster Hunter Wilds are Tracer Arrows and Fuse Arrows, each functioning differently:
- Tracer Arrows: Consuming one level of the Trick Gauge, these arrows can hit any part of a monster, allowing subsequent shots (except Arc Shots) to strike the Tracer, maximizing damage on a specific area.
- Fuse Arrows: Triggered during Arc Shots, these arrows adhere to the monster upon impact, appearing randomly among the arrows that land during the attack.
Both Tracer and Fuse Arrows can be destroyed using Hailstorm, Dragon Piercer, and Thousand Dragons, causing a substantial explosive damage to the target, with Fuse Arrows dealing greater damage upon detonation.
Although Fuse Arrows resemble Tracer Arrows, they lack the tracking ability of the latter.
Bow – Skills And Abilities
Now that we’ve covered the Bow’s basic mechanics, let’s explore its capabilities further. The Bow excels in fluidity, enabling rapid movements and seamless integration of various attacks into your combos.
Thousand Dragons
Thousand Dragons is a new technique activated by pressing Y+B simultaneously while aiming and charging an arrow. This move locks you in place for a few seconds, allowing you to load multiple arrows and launch them in an arc ahead of you. It’s particularly effective when targeting a monster directly in front of you, especially when synchronized with a Tracer Arrow.
Dragon Piercer
A classic move, Dragon Piercer is initiated by pressing Y+B at any time, although it’s easier to execute while aiming for better control. This attack shoots a single arrow that penetrates the monster. For highest damage output, aim to maximize the travel path through the monster’s body.
Dragon Piercer can also be integrated into your combos for faster activation.
Arc Shot
Pressing B while aiming and charging activates Arc Shot, displaying a circular reticle that changes to an orange-red shade when aimed at an enemy. Upon release, arrows will rain down on the targeted area, including regular arrows and Fuse Arrows that stick to the enemy.
Arc Shots can also be charged to increase the quantity of arrows that fall during the assault.
Flying Swallow Shot
This move allows for quick repositioning. By pressing Y during a Charging Sidestep, you can dodge in your desired direction while firing an arrow. This move covers significant distance, enabling you to maneuver around monsters or create space between you and them.
Power Shot
After shooting a regular arrow, you can swiftly follow up by pressing B, unleashing a small volley of arrows aimed where you direct. By pressing B again immediately after a Power Shot, you can perform a Power Volley, an ideal way to wrap up combos. Additionally, there’s Quick Shot, launching one arrow without charging, although its practicality is limited.
Both Power Shot and Power Volley maintain the Charge Level of the last arrow you fired, making them effective for combo finishing.
Hailstorm
Hailstorm is the Bow’s Focus ability, activated by holding LB while aiming. It displays a substantial circle on-screen, allowing you to lock onto specific targets, including Tracer and Fuse Arrows, as well as Wounds.
The number of arrows launched through Hailstorm depends on the targets it can lock onto and the duration of the charge. Different from the regular Charge Level, each target locked onto fills the meter with three notches over time.
Hailstorm can target up to ten items simultaneously, firing volleys at each when fully charged for maximum effect. When shooting at Wounds, this attack deals exceptional damage, leading to a follow-up that destroys the wound and briefly stuns the monster.
However, Hailstorm will only lock onto targets that are in view and within the circle. If a wound is located on the opposite side of the monster, Hailstorm cannot access it.
Bow – Tips And Tricks
Discerning Dodge
Discerning Dodge is an impressive new feature that lets you evade attacks at the crucial moment, fully restoring your Trick Gauge. It also elevates your Charge Level to maximum, allowing for a rapid succession of attacks for magnificent damage.
There’s no cooldown for Discerning Dodge, making it beneficial to adopt an aggressive playing style with the Bow. If you’re skilled, stay near the monster, so you won’t have to stress about charging your Trick Gauge or arrows anymore.
Always Use Coatings
Since Coatings no longer require crafting, you should consistently use them. The advantages they provide are immense, and having an endless supply of Paralysis against a monster is valuable, so ensure that you keep Coatings applied at all times.
Regarding Poison and Paralysis Coatings, remember that monsters grow more resilient to ailments with repeated exposures.
Don’t Forget About Mounted Attacks
The Bow is primarily a ranged weapon, but it’s still possible to mount monsters with it using your Seikret. When you dismount, attack in the air with an arrow to initiate a chance to mount the creature. While mounted, inflict Wounds on the monster to kickstart your damage.
While mounted, you can use the Bow’s basic moveset, applying Coatings and firing regular arrows to build your Charge Level. This is handy when pursuing a monster across different areas.
Keep Distance In Mind
Every Bow has an optimal range for dealing maximum damage. If you’re too far away, your arrows won’t reach the target. If you’re too close, you might not achieve high damage. The reticle changes color to indicate your optimal damage range, filling with an orange circle. Always monitor this reticle to ensure you’re maximizing your damage output.


