Select Language:
The Mighty Knight serves as the sword master in The Slormancer, but his inventive fighting style might catch you off guard. Instead of relying solely on close-combat attacks, the Knight wields an array of formidable ranged abilities like the Throwing Sword and The Elder Lance, giving him a unique edge as a fighter.
The build system in The Slormancer is impressively complex, featuring numerous layers of mechanics. If you’re looking for guidance on creating the ideal Knight build, you’ve landed in the right spot. We’ll explore some great suggestions for Slorm Reapers, Skills, and key stats to focus on.
Slorm Reapers
Your choice of Slorm Reaper shapes your build, and with 120 options at your fingertips, it can be daunting to find just the right one. Fortunately, we have some solid recommendations for Slorm Reapers that excel across various builds to help you get started.
Big Fury Sword
The Big Fury Sword significantly boosts your Raw Damage. Additionally, it makes your Skill Damage Lucky, meaning each attack rolls its damage twice and takes the higher value, resulting in boosted overall damage.
This sword is excellent for nearly any build that emphasizes Raw Damage instead of Elemental Damage. However, keep in mind that it might not always be the top choice for every Slorm Reaper, so consider using it until you find something tailored to your build.
Sword Of Endless Transference
The Sword of Endless Transference enhances Indirect Damage, which includes any damage not directly dealt by you, such as Damage over Time effects like Bleed or Burn. This Slorm Reaper allows your Indirect Damage to Leech Life and Mana, significantly boosting the survivability of bleed-focused builds. It even stores overkill Indirect Damage for the next hit, ensuring your Bleed stacks aren’t wasted.
Sword Of Detonating Force
This Slorm Reaper is also suited for Damage over Time builds, offering a distinct option compared to the Sword of Endless Transference. The Sword of Detonating Force amplifies your Damage over Time effects while applying a Time Weakness debuff, which can stack up to 50. Each stack increases the Damage over Time you inflict on the targeted enemy, enhancing your DoT effects.
An interesting feature of this sword is its Ancestral Skill, Detonate, which triggers an explosion of all of a target’s Damage over Time effects. This ability is particularly effective against bosses, allowing you to quickly reduce their health.
Giant Sword Of The Giant Slayer
The Giant Sword of the Giant Slayer is a versatile Slorm Reaper that increases your damage against Elites. Its unique effect allows your attacks on Elites to also damage nearby enemies, making it easier to focus your strikes on tough foes.
Moreover, attacks made with this weapon inflict the Enfeeble debuff, causing enemies to take increased damage from all sources. Overall, the Giant Sword of the Giant Slayer is a fantastic option for amplifying DPS without needing to excessively modify your build, making it an ideal choice for testing out the Knight’s Skills.
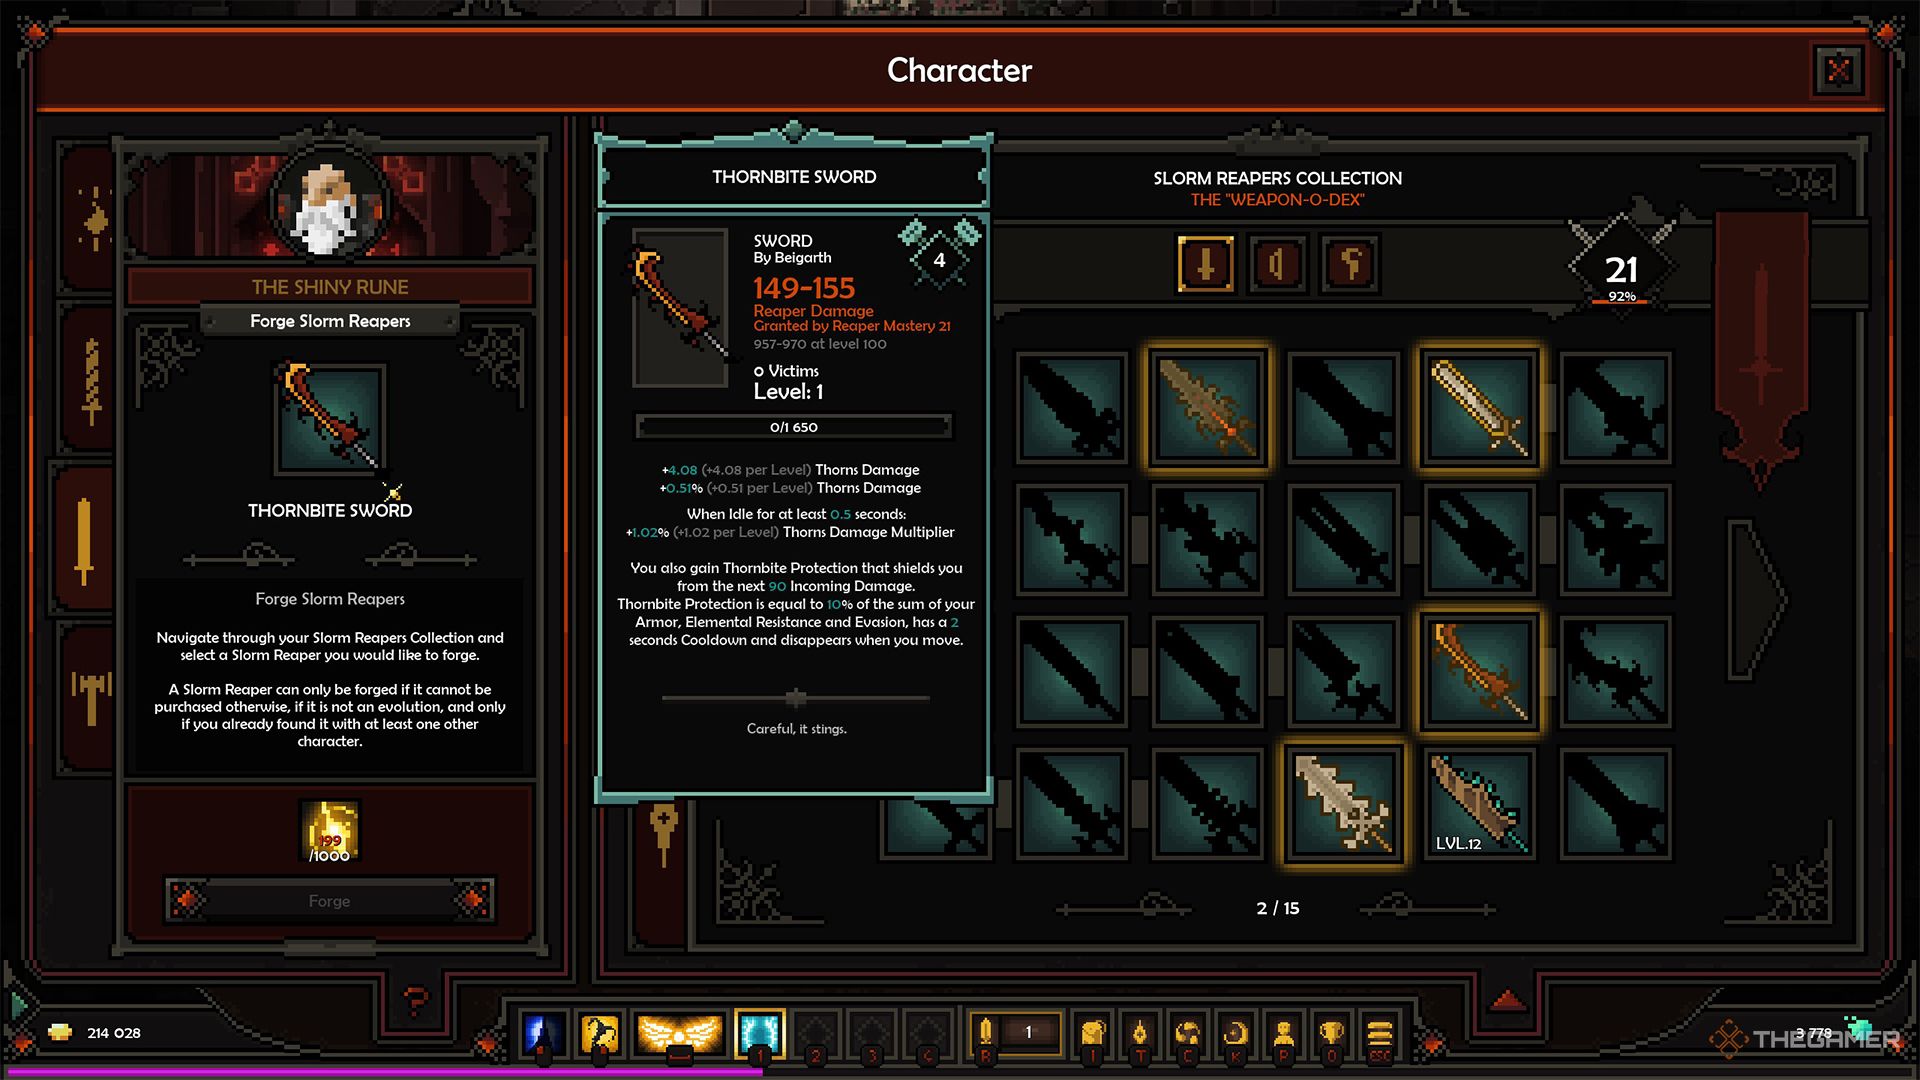
Thornbite Sword
A specific playstyle of the Knight revolves around Thorns, enabling you to deal damage by absorbing it. The Thornbite Sword boosts your Thorns Damage as you level up and enhances your Thorns Damage Multiplier if you remain stationary for half a second, alongside granting the Thornbite Protection buff, which shields you from incoming damage.
Thorns builds focus on maximizing your defenses, letting enemies inflict damage upon themselves as they attempt to breach your health. This build pairs nicely with the Enduring Protector Specialization, which emphasizes damage reflection, reduction, and Thorns damage.
Skills
The Knight possesses a diverse array of Skills that are enjoyable and potent, so experimenting with your favorites can yield the best outcomes. Here are some recommended starting points:
Whirlwind
Whirlwind delivers the classic spin-to-win experience essential in any ARPG. By channeling this Skill, you’ll spin in place, dealing continuous damage to nearby enemies.
A fun way to enhance Whirlwind is to combine it with Arcane Beam and Dancing Blades, giving each rotation a chance to inflict additional damage. As you upgrade these Mastery nodes, you’ll blanket the battlefield with extra damage effects while swirling with your weapon.
Whirlwind blends well with stats like Life Leech and Mana Leech due to its rapid number of hits per rotation. These stats will help sustain you during fights with large groups of enemies. Additionally, with sufficient Mana Leech, you can entirely cover the channel cost of Whirlwind, allowing you to equip powerful Auras to boost its effectiveness even further.
Grappling Hook
The Grappling Hook serves as a fantastic Secondary Skill for the Knight, offering various effects that complement attack-focused Skills like Mighty Swing or Whirlwind. When used, the Grappling Hook pulls you toward a targeted enemy or wall and inflicts damage along the way.
Its utility skyrockets with the Captain Hook Mastery node, allowing it to hit in all directions and pull enemies toward you instead. This feature is especially handy for grouping foes, making it easier to activate Whirlwind’s shorter range effectively.
The Long Chain Mastery upgrade enhances Captain Hook further by enabling you to pull enemies from longer distances. For melee-centric builds, Grappling Hook proves to be a valuable asset.
The Elder Lance
The Elder Lance stands out as one of the Knight’s most unique Skills. Initially, you throw a spear that doesn’t deal any damage, prompting the spirit of Bryan to throw his spear afterward for the actual damage.
This Skill can be upgraded with the Honorable Throw Mastery node, allowing the lance throw to inflict damage, which can then pair with Ancestral Training to deal twice the damage of Bryan’s spear, making the initial hit the attack’s primary damage source.
You can also scale the Elder Lance’s damage using the Align the Stars node, granting a Cosmic Stack for each cast that raises the damage of your Astral Meteors and Astral Retributions. If you unlock the Cosmic Power node, you can boost the base damage of the Elder Lance with no stack limit, making it particularly effective in scenarios like the Great Forge, where you can progressively build its power.
Stats
Just like any build in The Slormancer, your stats may vary widely based on your Slorm Reaper, Skills, Legendaries, and more. For instance, a Damage over Time build will prioritize different stats than one centered around damage reflection.
For builds that deal rapid hits, like Whirlwind, Life Leech and Mana Leech are nearly essential. Furthermore, these builds should focus on defensive stats like Max Life and Armor since they’ll be in close combat, making them vulnerable to melee damage.
If you’re using the Throwing Sword to inflict significant Bleed, try to enhance your Damage over Time stats, along with bonuses to projectiles, such as Pierce, Fork, or Rebound Chance, to maximize each sword throw’s potential.
Movement Speed is a universally beneficial stat to include, so consider stacking some on your gear.