Select Language:
If a ball has “Ball” in its name, it usually means there are many of that type. In Ball x Pit, you’ll find a wide variety of balls. You can upgrade your collection by fusing balls to gain new effects or combining two balls to create something different. As you progress in the game, you’ll unlock more options, but you don’t need the rarest balls right at the start to succeed.
This guide focuses on a mix of early-game and later-game balls, including both simple and evolved versions. We won’t cover basic fusions, since the emphasis is on unique balls. Now, let’s look at the top balls in Ball x Pit.
Remember to check your Encyclopedia in the options menu to review all the balls you’ve unlocked so far.
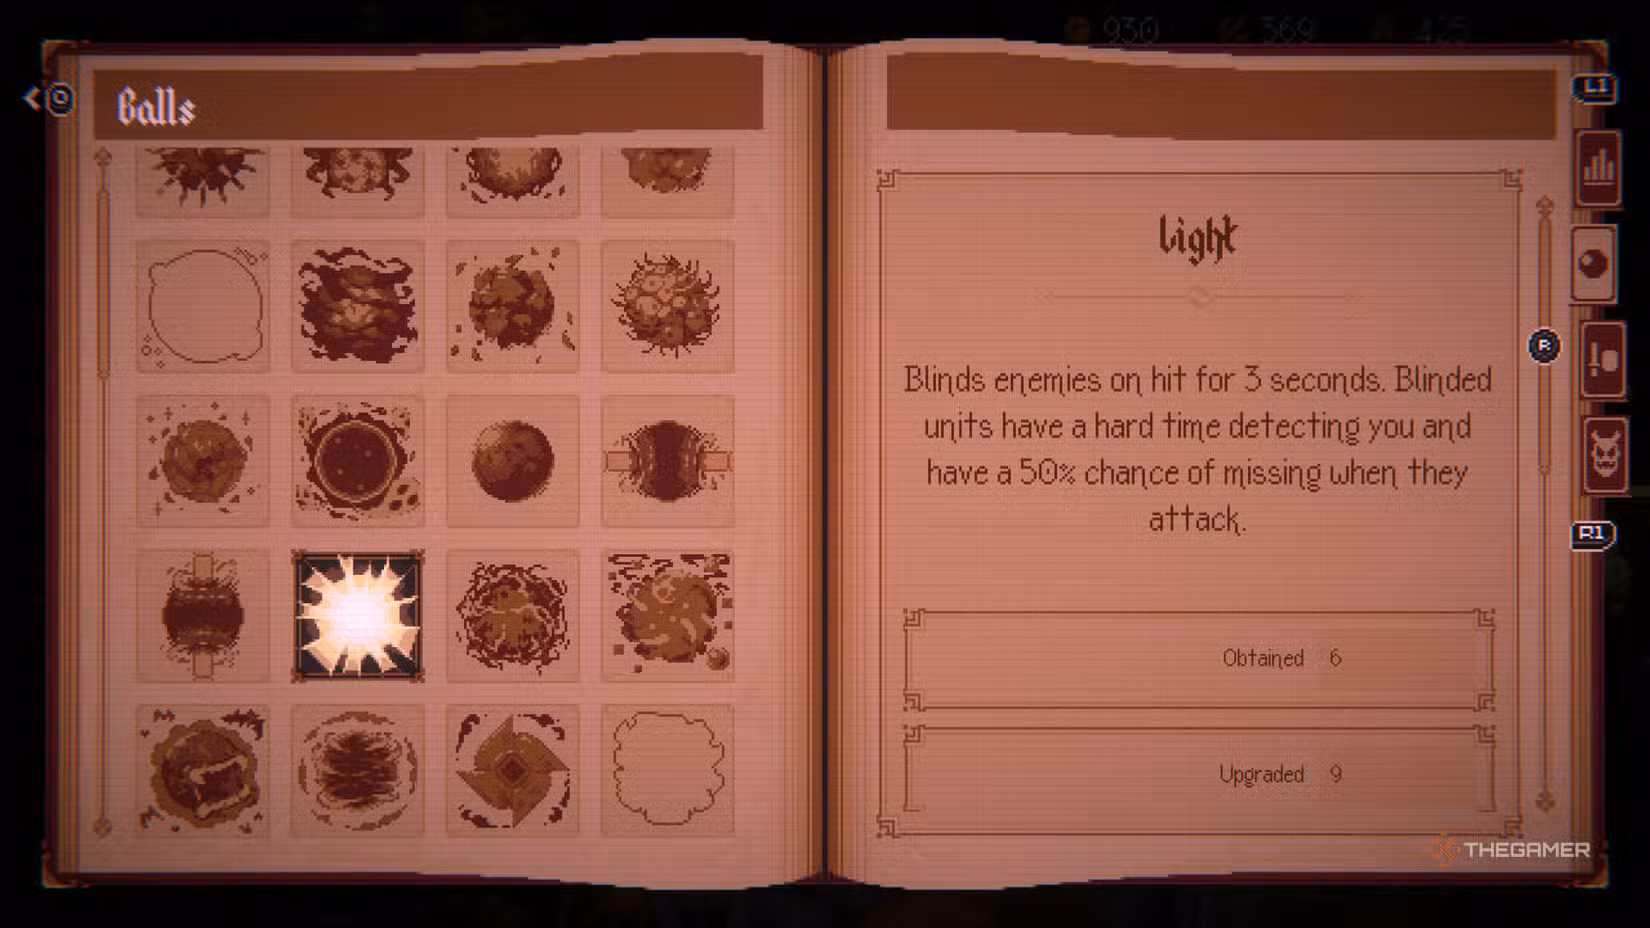
Light
Required Balls: None
Effect: Blinds enemies, giving a 50% chance they will miss their attack.
Starting with a simple, easy-to-unlock ball, Light appears after a few stages. No matter which character you use, you might want to always pick Light. Losing some damage power is a small price to pay for the high chance to avoid enemy melee attacks, which can be crucial in many situations.
Note: This effect can save you in tight situations where controlling movement space is difficult.
Flash
Required Balls: Light + Lightning
Effect: Damages and blinds all enemies by hitting just one of them.
One of the strongest mid-game evolutions, Flash damages every enemy it hits and blinds them, giving you a huge advantage. Blinding prevents enemies from performing melee attacks about half the time. The effect lasts around three seconds, but if the ball continuously hits enemies and bounces between them, the blind effect can trigger repeatedly, maintaining its benefits.
Tip: Use Flash in crowded fights to control groups and reduce damage taken.
Hemorrhage
Required Balls: Bleed + Iron
Effect: Each hit adds three stacks of bleeding. After 12 stacks, it deals 20% of an enemy’s current health as damage.
This ball works well with characters like The Shieldbearer. Position the shield blocking the target and bounce Hemorrhage to build up bleed stacks rapidly. Bosses tend to be the only enemies resistant enough to survive many hits, making Hemorrhage effective for quickly whittling down health.
Tip: Accelerate stacking by focusing on strong damage and positioning for maximum hits.
Bomb
Required Balls: Burn + Iron
Effect: Explodes upon hitting an enemy, causing massive area damage.
Bomb is very powerful but requires some setup—since it explodes immediately after a hit and takes a few seconds to return. It’s best when your inventory is full of balls. Its explosion can clear groups easily, and you can fuse it with other balls to extend its effects, increasing area damage and overall power.
Tip: Any element works, but Lightning complements Bomb’s effects well.
Magma
Required Balls: Burn + Earthquake
Effect: Spawns lava blobs that apply burn stacks over time, damaging enemies gradually.
Magma is great when you lack Iron. Its blobs slowly damage enemies by adding burn stacks, and every hit also causes earthquake damage, keeping enemies on fire. Combining Magma with other fire damage boosts can create a fiery zone on the battlefield.
Tip: Synchronize passive abilities that amplify fire effects for maximum damage.
Mosquito King
Required Balls: Brood Mother + Vampire
Effect: Spawns Mosquitoes that drain 1 health point from enemies.
While Vampire offers some health steal early on, it becomes less effective as enemies increase. Mosquito King improves on this, creating small Mosquitoes guaranteed to drain health without relying on chance. It also does decent damage and is useful for sustained damage over many enemies.
Note: It’s a reliable life-stealing option that can build into stronger effects.
Holy Laser
Required Balls: Laser (Horizontal) + Laser (Vertical)
Effect: Attacks all enemies in the same row and column.
A powerful mid-game evolution. Instead of choosing between horizontal or vertical attacks, you can use both lasers simultaneously. This helps clear multiple enemies from different directions. Combining Holy Laser with other elements can add extra effects for more versatility.
Tip: Perfect for targeting enemies buffing allies, especially in biomes like Fungal x Forest.
Virus
Required Balls: Ghost + Poison
Effect: Applies disease stacks that deal damage over six seconds and spread to other enemies upon death.
Virus isn’t my favorite overall, but it’s effective for crowd control. While Ghost can help target specific enemies, it’s less useful against bosses, since it can’t bounce. Virus, however, provides consistent damage over time and can help clear groups.
Tip: Use Virus when you want steady damage spread across many enemies.
Spider Queen
Required Balls: Brood Mother + Egg Sac
Effect: Spawns an Egg Sac with each hit on an enemy.
Egg Sacs can be tricky at the start since they are destroyed after hitting enemies, but Spider Queen keeps them alive longer, making their effect more useful. This creates many eggs on screen, which can be leveraged with characters like The Cohabitants and The Flagellant.
Tip: Combining Spider Queen with Vampire Lord and Mosquito King can lead to a powerful evolution called Nosferatu—though it takes luck and time.
Cell
Required Balls: None
Effect: Creates a clone up to two times after hitting an enemy, splitting itself into multiple balls.
Ideal if you play The Cohabitants, as Cell splits into three balls with its first hits, increasing bouncing and damage potential. It’s less damaging directly but excels at crowd control. Upgrading Cell and fusing it with another strong ball can cause those balls to also split upon contact—a great strategic choice.
Note: Only the original Cell can split; copies will merely deal damage.