Select Language:
Although the gameplay of Dead in Antares appears simple, it’s actually quite challenging. You have to constantly manage your crew’s health, keep your base intact during attacks, and juggle multiple tasks all at once.
If you know which tasks to prioritize and have a few strategies ready, the game becomes easier. Your main focus should be on survival, which means prioritizing essentials like food and water first, then developing a long-term plan.
### Maximize your water supply
Your crew can’t survive without food and water, but water is even more critical. Without enough water, you can’t go on expeditions to gather more resources, and your crew might become dehydrated. Dehydration affects their health the next day and could lead to death if left untreated.
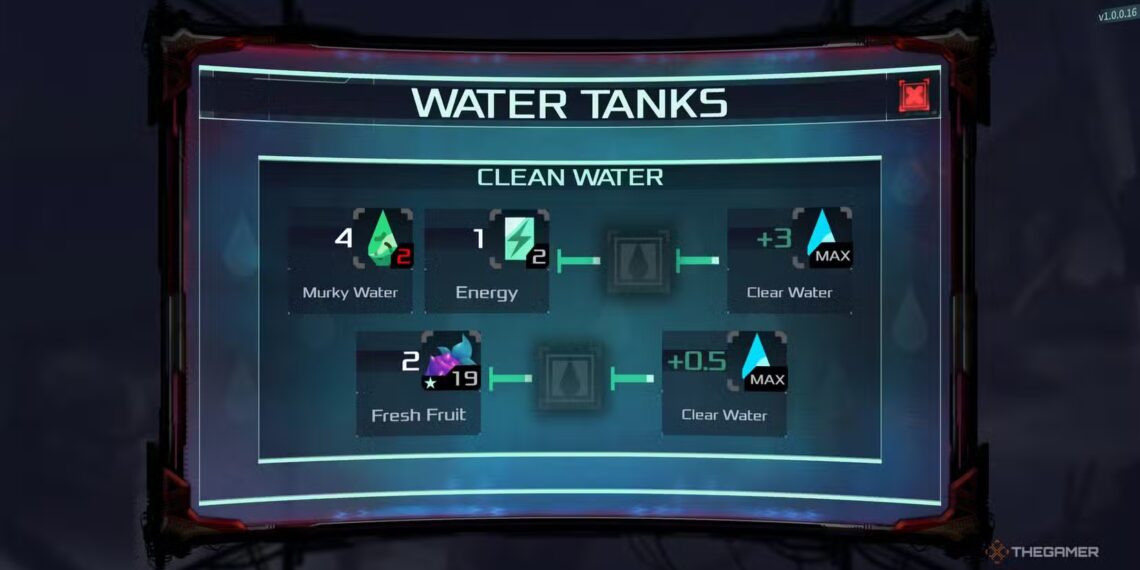
Once you start gathering enough materials to upgrade your stations, making your Water Station a priority is key. Focus on increasing both its maximum capacity and daily production. Ensure your water reserve is always full. Early in the game, with only three crew members, it might be easier to keep supplies high because your consumption is lower. Always have someone assigned to this station each day to maintain your water stockpile.
### Find an initial food source quickly
At the start, you’ll have a small supply of food, but as your crew grows, you’ll need new sources of food or your crew will starve. You can produce food by crafting ingredients that reduce hunger, or by building stations like the Gathering Camp, Hunting Camp, Fishing Camp, and Pro Cooker, which are unlocked at the Workshop using the right materials.
The Gathering Camp is usually the first one available, but all stations will help provide food for your crew. Until you can build the Pro Cooker, eating raw food can make your crew sick, but it’s worth it to prevent starvation.
Keep in mind, food collected can spoil if not used in time, so upgrade your Shelter to gain access to a freezer for storing extra supplies overnight.
### Assign crew members carefully
Every crew member has unique strengths and weaknesses, making them better suited for certain tasks. You can filter for the best person for each station by clicking on the station’s name, but you should also consider their current condition. For example, Liu is good at crafting, but he has penalties when working with others, so he might not always be the best choice. Even if he’s the best stat-wise, if he’s not performing well, it’s not worth assigning him, as his output will be lower.
Learn each crew member’s traits—the good and the bad—and keep track of the top three for each station. Reassess their roles whenever you get new members. During combat, use a mix of strong fighters to absorb damage and others to deal damage from behind. Maintaining a diverse squad during ambushes is important since stats don’t matter as much in those fights.
### Keep an eye on crew ailments
Managing your crew’s health is vital. Each day, track five main stats: Fatigue, Hunger, Sickness, Injury, and Stress. Early on, it’s manageable, but as your team grows, it becomes tougher. William, for instance, gains Stress each night if any crew member’s status exceeds 50%; aim to keep everyone, especially him, below this threshold.
When supplies are limited, prioritize treating ailments that are over 50, because any condition reaching 100 is fatal. While it’s not ideal to see crew hurt, injuries are better than losing them entirely, especially since health issues decrease station efficiency.
### Be cautious about confrontations
During expeditions, your team can encounter enemies. Your chance of run-ins increases each trip but resets when you face enemies. You can choose to sneak past or fight. Engaging in fights every time might seem tempting for the loot, but damage carries over, and without medicine or an infirmary, this can become dangerous early on.
If sneaking isn’t successful and fighting is your only option, then do so. If you can complete an expedition without combat, that’s often safer until you have more resources and a better crew.
### Upgrade your stations, especially the shelter
Building new stations is exciting, but don’t forget to upgrade existing ones. Upgrades made at the Workshop boost production, increase storage, and allow more crew members to work simultaneously. The shelter is the most important upgrade once you start waking people up, as it increases the maximum crew capacity. Without it, you’ll be limited in how many crew members can work at once, slowing down your progress.
Monitor station conditions regularly; if a station deteriorates, it causes penalties on crew performance. Upgrading the shelter helps fix this issue and prevents resource loss that comes with station downtimes.
### Use natural resources wisely
It’s tempting to continuously harvest resources from natural stations, but overusing them can backfire. When you gather resources, the station’s output drops by around six units, and if you don’t give it a rest, it can decline further, decreasing yields over time. To avoid this, skip some days and let stations recharge, which they do by restoring 25 units overnight if left unused.
Regularly check the Natural Resources tab to spot declining stations and make sure to pause their use temporarily to allow replenishment.
### Remember your objectives
Besides surviving, you have specific goals to complete. Sometimes, fulfilling these objectives can make your life easier. For example, if your camp faces frequent ambushes, an objective might be to locate the enemy hideout and put an end to the assaults. Doing this reduces the number of attacks over time, protecting your crew and resources.
While keeping everyone alive is the top priority, don’t ignore these goals—they often help reduce chaos and improve your situation in the long run.

