Select Language:
In Silksong, facing the Savage Beastfly boss in Hunter’s March can be quite a challenge if you encounter it too early in your journey. Unlike some of the earlier bosses in Hollow Knight Silksong, this one requires you to bait its multiple charging attacks while dealing with additional enemies it calls in during the fight. Initially, this fight might seem too overwhelming, but it becomes easier once you understand how this giant insect attacks.
Keep in mind, the Savage Beastfly in Hunter’s March is an optional boss. The rewards for beating it are mainly useful if you want to play Hornet more aggressively. If you’re having a hard time, it’s a good idea to come back after gaining more upgrades. Here’s everything you need to know to take down this big insect in Hunter’s March.
How to Prepare for the Savage Beastfly
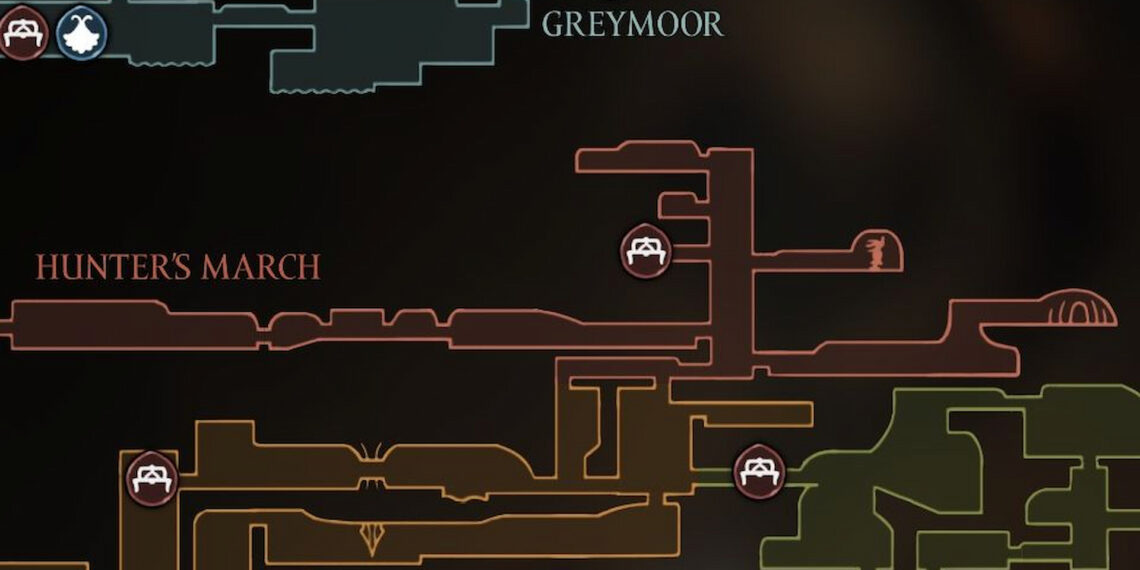
First, make sure you’ve unlocked the bench in Hunter’s March (see the picture above). If you’ve been there before but can’t find the bench, you probably got tricked by a trap that activates if you sit down for a break. To turn this trap into a normal save point, walk left through the wall and trip the switch on the roof of the secret room.
This is the closest save point to the boss, though you’ll still need to make a short trip back if you lose during the fight. Be cautious of the Skarr Stalker that guards the area ahead of the boss chamber; it’s waiting to trap you. Jump and dash over its trap (which is right beneath Hornet in the image below) to avoid damage, then quickly dash over the boss’s feet to dodge harm. It’s best not to fight this bug since it tends to make the fight more complicated.
As for your setup, make sure to have the Swift Step upgrade, which allows Hornet to dash—this is incredibly helpful! The Reaper Crest is valuable because the wide downward strike often hits multiple times. Lastly, the Thread Storm Silk Skill is especially useful for quickly dealing with the boss’s summoned minions.
Boss Attacks and Tips
When you first encounter the Savage Beastfly, it won’t immediately notice you. Use this chance to charge in and land a few hits before it reacts. Be careful—if it hits its head against the wall, it will stun and recoil, giving you a small window for damage.
While fighting, note that the Beastfly mainly uses two types of attacks: a horizontal charge and a vertical charge. The key is to wait for the boss to commit to one attack before you strike. Here’s how to handle these moves:
-
Horizontal Charge: When it moves to the sides of the arena, it’s preparing to lung forward. It will dash straight, either passing you or crashing into the wall. If it hits the wall, the attack ends immediately; otherwise, it repeats three times before switching to another move. To counter, stay close to the ground and bait it downward. When it dashes, jump over it and attack downward, or wait until it passes overhead and strike upward. If you’re midair when it charges, dash down to avoid getting hit.
-
Vertical Charge: Similar to the horizontal one, but the Beastfly flies above you, then crashes down. It’ll do this three times in a row. Move out of its way when it begins to charge downward, and attack right before it hits the ground for easy damage. After the third vertical charge, you’ll have a good moment to heal.
How to Handle Its Minions
As you damage the boss, it will eventually scream loudly, warning you of falling cages. Dust will fall from the ceiling, indicating one or two cages are about to drop. Move out of the way to avoid getting trapped, and once the cages hit the ground, additional enemies will appear from them.
This is when the fight gets hectic—more enemies come out as the savage fly resumes charging. Focus on eliminating these minions quickly, but don’t panic. Prioritize attacking the enemies while keeping watch for the boss’s attack pattern. Use Thread Storm to wipe out multiple minions efficiently. Keep in mind, the vertical charge can sometimes end up destroying its own summoned enemies, but don’t rely on friendly fire to clear the field intentionally. Your main goal is to clear the area to keep yourself safe.
During the chaos, stay aggressive and seize any opportunities to attack the boss. If you struggle with its attack patterns, consider staying in the first phase of the fight to practice dodging. The boss doesn’t summon minions until it’s taken enough damage, so get comfortable dodging its main moves before dealing with the added enemies. Once you’ve nailed its timing, it will be easier to handle the fight alongside its minions.
Rewards
Defeating the Savage Beastfly grants you the Beast Crest, a new upgrade for Hornet. This allows her to perform a quick, short-range attack and a downward spinning strike. The Crest has two default red slots for tools and two yellow slots that can be unlocked using Memory Lockets. Note, there are no blue slots here, so if you rely on the Druid’s Eye, keep that in mind.
Final Tips
Be sure to have the necessary upgrades like Swift Step, the Reaper Crest, and Thread Storm before taking on this fight. Being well-prepared makes a huge difference in handling the boss and managing the minions that appear.
Remember, this fight can be intense at first, but with patience and practice, you’ll learn the attack patterns and become more confident. Focus on dodging, attacking wisely, and clearing the minions quickly — soon enough, you’ll be victorious against the Savage Beastfly!


