Select Language:
Borderlands 4’s recruitment mission and elevator access can be unexpectedly challenging—not because you have to deal with Claptrap’s company. Once you finish the tutorial and break free, you’re thrown straight into gameplay with little guidance. Don’t worry, we’ve got you covered.
In this guide, we’ll walk you through every part of the Recruitment Drive mission, including how to defeat its boss and unlock the elevator. Ready to level up and earn some XP? Here’s everything you need to know.
And if you’re just starting out, be sure to pick up some Borderlands 4 Shift Codes to get good loot and a strong beginning.
1. Take Claptrap’s Tour and Find the Ripper Bases
After telling Claptrap about Arjay, he’ll brush off his sadness and show you around Crimson Resistance HQ. Then, you’ll get a side quest to try some hot dogs. Open the grill, but surprise—they’re not hot dogs. Still, pick up the “Hot Dog” item anyway. Claptrap will mention Rippers further along the beach.
Follow Claptrap to see a Ripper failing at flying. Nearby is a Ripper base that you’ll need to clear out. The fight isn’t too tough, but there might be a tougher enemy. Loot containers inside and outside the elevator before heading up.
The elevator is broken, so you’ll need a Glide Pack to reach the top. Rippers have the pack, so head back down the ramp, go east toward the waypoint, and deal with some Manglers and a Kratch for extra XP. Climb a rusty wall to enter the base, taking out any enemies on the way. Loot the area, and you’re set.
2. Clear the Second Base
Once you’ve finished the first area, follow duckboards to the second zone. Clear it, loot what you find, then go upstairs to the east. You’ll see a grappling point to cross the chasm ahead. Be prepared for ambushes from enemies both on the ground and above on the cliffs.
Climb the wall, defeat remaining foes, then use the nearby vendor to sell junk and stock up. Cross the bridge, jump over the collapsed part, and prepare for the next challenge—Splashzone.
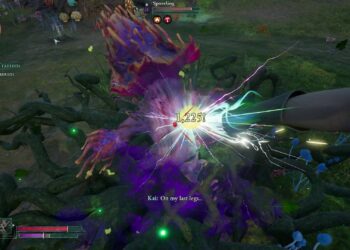
3. Defeat Splashzone
Splashzone is a tricky boss for many. Armed with a hammer, he’s easy to underestimate but hits hard. Since he has no shield or armor, incendiary weapons are your best bet—they’ll burn through his health quickly. If you don’t have one, use a fire barrel in the arena’s corner to kite Splashzone towards you, letting you attack with incendiary damage.
Focus on him while watching out for his minions, which can do ranged damage. After defeating him, he’ll drop plenty of loot and a Ripper Chest key. Use the key on Splashzone’s chest to get a Glide Pack, then test it out by holding the jump button to glide. Return to Claptrap, loot a nearby red chest, and make your way back to the Broadcast Tower.
4. Get Elevator Clearance
To access the elevator, use your Glide Pack to reach the Broadcast Tower. Climb the wall in front and deal with Manglers. Circumvent the tower, then use your grappling hook to climb another wall. The elevator won’t work until you get clearance left on a dead Order soldier—the clue is that the elevator button looks like a bolt.
Interact with a soldier’s neck bolt to make it glow, grab it, then attach it to the elevator button. Claptrap will alert you when the process is complete.
Finally, for the last step, Claptrap will try to open a door but panic. Hit him or punch him to help him out, then follow him inside. On your left is the datapad with the codes needed. Collect it, activate the console to capture the outpost, and start Claptrap’s broadcast.
Once finished chatting with Claptrap, the Recruitment Drive mission is complete!
While this can be a tough mission, many challenges lie ahead in Borderlands 4. For more help, check out our tips on succeeding in the game.
© GamesRadar+. Reproduction without permission is not allowed.