Select Language:
After years of waiting and excitement, Hollow Knight: Silksong is finally here. Players can now explore a new world as Hornet, facing tough boss battles and platforming challenges. The game delivers the charm and quality you’d expect from Team Cherry.
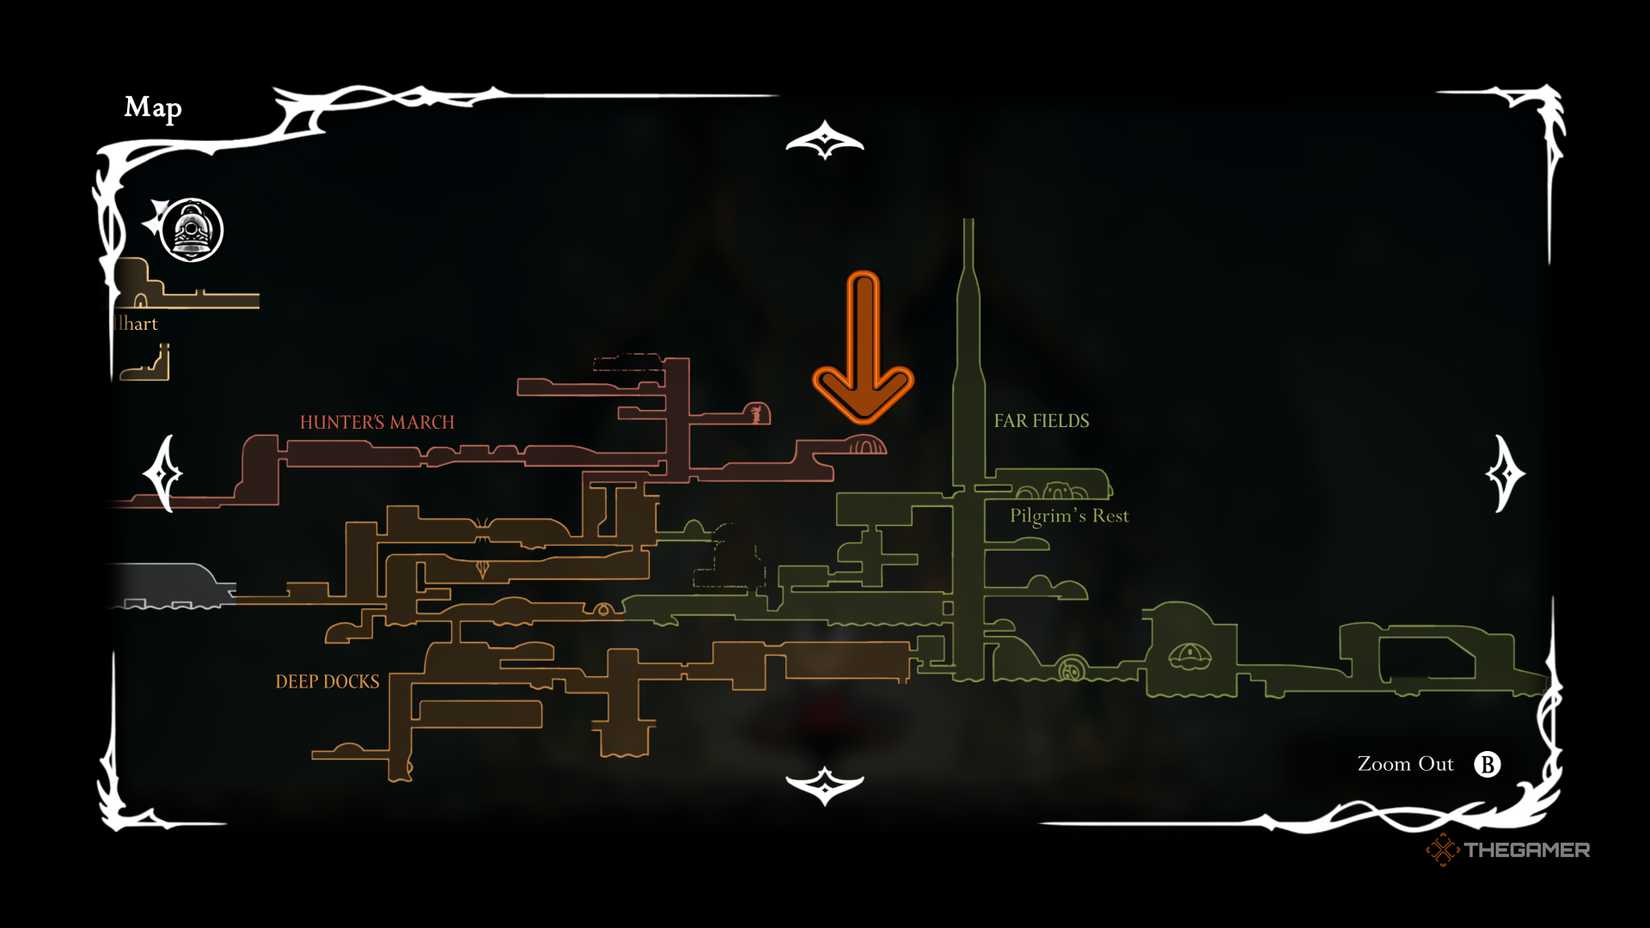
Deep in the Chapel of the Beast, located in the Hunter’s March area, you’ll encounter the Savage Beastfly—an optional boss that’s tough early on. While it’s a difficult fight, learning its attack patterns and staying patient will help you defeat it.
Where To Find The Savage Beastfly
To find the Savage Beastfly, head to the Hunter’s March and go east. You’ll need to master Hornet’s Dive Attack to bounce across a series of red flowers—an easier-than-it-sounds challenge. Once there, a bench sits near the top left of the area, with the Chapel of the Beast along the bottom right path. Rest at the bench, enter the chapel, solve its platforming puzzles, activate the shortcut, and then face the Savage Beastfly.
Despite being optional, defeating it grants you the Crest of Beast, a powerful item that significantly changes your playstyle. It’s highly recommended to get it.
How To Defeat The Savage Beastfly
The boss doesn’t have many attacks, but they are fierce, frequent, and have high health. Its unpredictability and agility, despite its size, make it challenging. Patience, wise attacks, and keeping calm when mistakes happen are key.
Low Dash
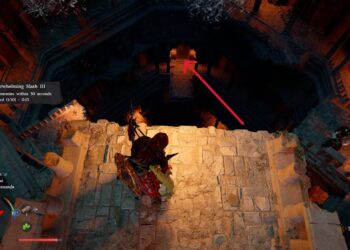
At the fight’s start, the Beastfly will usually perform a Low Dash—charging rapidly across the arena’s bottom. It’s well-telegraphed: it floats down before charging, giving you time to dodge. To counter it, perform a high jump and land a Dive Attack just as it begins its dash, damaging it and avoiding damage yourself. Timing is tricky but crucial; hitting just before it reaches you is ideal.
Phase One: Mid Dash & Ground Pound
The mid dash attack is similar: it flies to the center, then charges forward, possibly catching jumpers off guard. Stay grounded and perform an upward slash when it passes overhead to deal damage while avoiding damage.
The Ground Pound involves the boss slamming downward three times in a row after reorienting itself vertically. It’s well-signaled; move out of the way after it positions itself. Attack immediately after each slam with a leaping slash to deal major damage. Jumping immediately after the slam helps you avoid contact and set up your next strike.
Phase One: Stunned
Landing enough hits stuns the Beastfly, giving you a window to attack freely. You can use Silk Skills here but saving them for later phases is wise. This phase is straightforward and should be easy with patience.
Phase Two: Screeching and Summoning
Once recovered from stun, the boss enters a more chaotic second phase. It still performs its previous attacks but can now also screech, summoning a random enemy, such as a lesser Beastfly, a Kilik, or a Vicious Caranid. Prioritize eliminating the summoned enemy, especially during its Low or Mid Dash, to minimize threats. Focus on the summoned foe first to prevent it from disrupting your rhythm.
Summoned Enemies:
- Beastfly: simple to evade; charges left or right.
- Kilik: ground-moving with spike attacks.
- Vicious Caranid: aggressive flying bug with rapid slashes—least preferred.
Like before, stunning the boss after enough damage lets you unleash a big attack.
Second Stun
Repeated damage again stuns the boss, opening another damage window. Its attacks, combined with summoned enemies, make this phase more hectic but still manageable with focus.
Phase Three: More Chaos & Multiple Enemies
The third phase ramps up the chaos. The Beastfly can now summon up to three enemies at once, with random combinations each time, making it unpredictable. It still performs its basic attacks but with added complexity.
Focus on targeting regular enemies: use Ground Pound to kill summoned Vicious Caranids quickly, as it hits all enemies on impact. Wait for the boss to recover or perform Mid Dash before attacking the summoned foes. Precision and movement are essential—use Dive Attacks to chain from enemy to enemy, staying mobile.
Avoid hiding in corners, as enemies will close in. Heal only when there is at least one additional enemy on the screen to avoid being overwhelmed. Silk Skills can help clear enemies when confident.
After enough damage, the boss is stunned again, ready for a final assault.
Phase Four: The Final Hectic Battle
In the last phase, the Savage Beastfly can summon up to three enemies, with possible combinations including multiple Vicious Caranids. This is the hardest stage—RNG (random number generation) influences which enemies appear, so preparation is vital.
Use Ground Pound to target and kill Vicious Caranids swiftly. Prioritize weaker enemies, attacking mainly when the boss is recovering or in Mid Dash. Movement needs to be precise: jump with intent, chain your Dive Attacks, and avoid cornering yourself. Don’t hesitate to use Silk Skills to eliminate enemies, but only if you’re confident you can stay safe and have enough Silk to heal afterward.
Final Blow & Rewards
Landing the finishing hit on the Savage Beastfly is satisfying, especially after dodging its attacks and clearing the summons. Sometimes, the boss will get stunned again, requiring you to repeat the last phase briefly. Keep at it—mastering the evasion and attack patterns will lead to victory.
After defeating the boss, approach the area to the left of its arena. Interact with the corpse surrounded by candles to obtain the Crest of Beast, which enhances your attack style and grants sudden health regeneration with successful hits. Well done on overcoming this tough fight!