Select Language:
As you go through the different biomes in Hollow Knight: Silksong, you’ll often come across bosses that seem easy the first time. However, there’s a chance you’ll face a tougher version of these bosses later on. The Great Conchflies are one such example.
You can find the second version of this boss in the Sands of Karak area, called the Raging Conchfly. While this fight features only one Conchfly, it’s much more challenging because of its relentless attacks and speed.
Where to Find Raging Conchfly
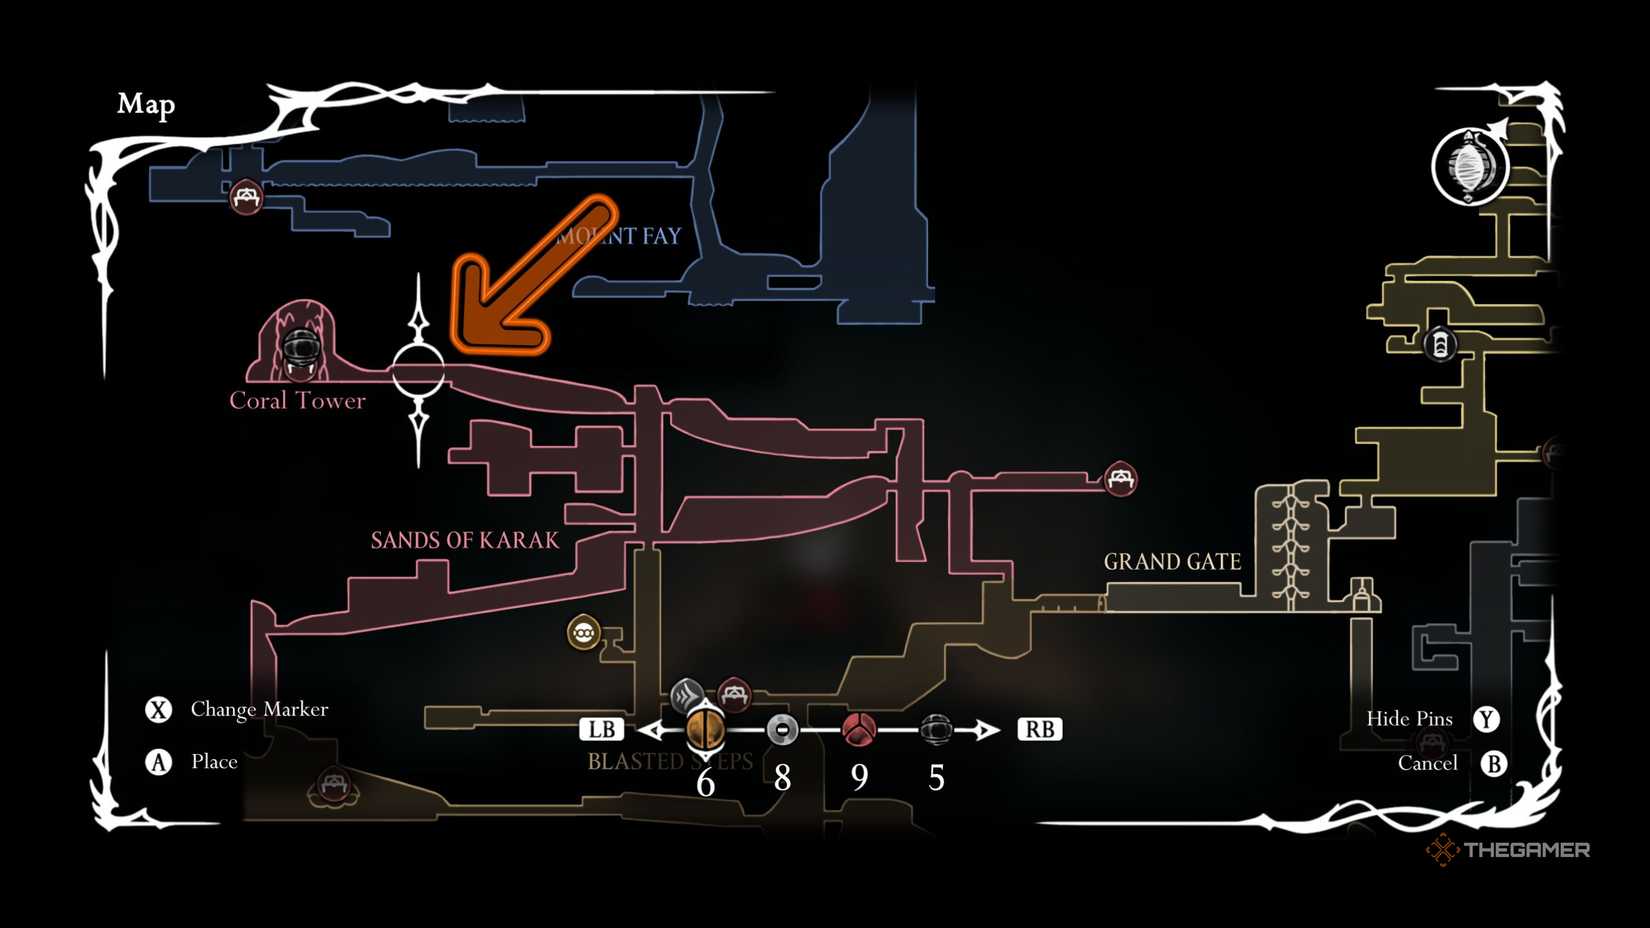
Before you can track down the Raging Conchfly, you need to reach the Sands of Karak through a hidden pathway in the Blasted Steps. This becomes accessible after you get the Clawline ability and identify a conch-shaped icon on the map in the top left of the Blasted Steps biome.
From there, you use Clawline on the rings to climb higher toward the top left and enter the Sands of Karak. This area is tougher than Blasted Steps, featuring stronger enemies and platforms that only appear temporarily after hitting an orb on a tree bark.
Steps to Reach Raging Conchfly:
- After entering, go through the first large room on the right to reach a central area where you can return to Blasted Steps and unlock the path to the bench near the Bellway.
- Proceed to the right through another large room, then go up and take the left path. Before advancing further, it’s wise to activate the bench on the far right of Sands of Karak as a save point.
- Continue through two larger rooms until you find the Raging Conchfly. After defeating it, you can reopen the path downward and use the bench near the Bellway in Blasted Steps as a checkpoint for the fight.
While the Bench in Blasted Steps might seem distant from the boss, it helps you avoid a difficult room during your return.
You’ll encounter the Raging Conchfly blocking your way just before reaching the Coral Tower, and it will fight fiercely.
Raging Conchfly First Phase Guide
This boss is one of the toughest in the game due to its quick attacks and movement restrictions. It also gains new moves during different phases, with a phase change occurring after about 40% of its health is depleted.
Initial attacks include:
-
Burrow Attack: The boss spins in a direction beforehand, then comes out of a wall and burrows into another. It quickly dashes toward a spot and burrows into the wall, repeating this several times. To counter, learn the timing of the dash and avoid its path, which allows you to land hits.
-
Projectile Attack: The boss opens its mouth, and a projectile appears before it throws a bouncing Conchcutter at the ground. Dodge by positioning yourself directly under the boss when it opens its mouth to hit or parry the projectile for a chance to counterattack.
Avoid jumping away during projectile attacks, as this will guarantee a hit.
This phase mainly involves these two attacks. Although they seem simple, the rapid succession and the boss’s spinning dash can easily throw you off. The key is to stay patient and use your movement abilities only when necessary. The best moments to strike are during its attack animations, especially right after dodging a burrow or other moves to heal safely.
Raging Conchfly Second Phase Guide
The second phase begins with a roar and introduces two new attacks, along with more frequent burrow attacks. The boss now can perform multiple burrows in quick succession.
New attacks include:
-
Roar Attack: The boss roars constantly, summoning minions to perform burrow attacks at different spots. It then uses a horizontal spin attack to move across the field. Dodging requires precise timing—find a safe spot during the minions’ burrows and jump at the right moment to evade the spin.
-
Multi Burrow: When spawning on one side with three minions in front, the boss spawns them to spin horizontally in random order and then moves through the field itself. Using items like the Faydown Cloak helps, allowing you to jump over the minions and avoid their spin moves.
During this phase, patience remains vital. Don’t rush the boss; instead, wait for openings between its attacks. Getting close to the boss after dodging certain moves can let you deal damage, particularly during its roar or after avoiding burrows.
Once you hit the boss enough times, the fight ends, allowing you entry into the Coral Tower, where you gain the Conchcutter tool and a secret bench on the right side.