Select Language:
Most photo rallies in Like A Dragon: Pirate Yakuza In Hawaii take place in Honolulu, but Madlantis also offers one of these exciting challenges. When you’re not busy with thrilling ship combat or enjoying drinks with fellow pirates, you can explore this incredible fortress in search of important landmarks.
What sets Madlantis apart in terms of photo rallies is that several objectives are locked behind story milestones, meaning you won’t have access until you reach certain points in the game. This guide will outline every location and explain when they become accessible, ensuring you’re equipped with everything you need to transform into a zombie lookalike in no time.
1. Bar District – Big Anchor
“Square In Front Of Bar”
Make your way to the Bar District located in the northeast corner of the Madlantis map. Here, you’ll find a large anchor positioned centrally, nestled between the Batting Center and the Dunghill bar. This is your first landmark!
2. Bar District – A Small Steering Wheel
“Inside The Bar”
The golden ship’s wheel can be found on the left side of the Dunghill bar, also in the northeast corner of Madlantis. After disembarking from your ship, take a left, and you’ll spot it right away.
3. Bar District – Dunghill
“Bar Sign”
The sign for the Dunghill bar is located above its entrance, which is tucked away in the northeastern part of Madlantis.
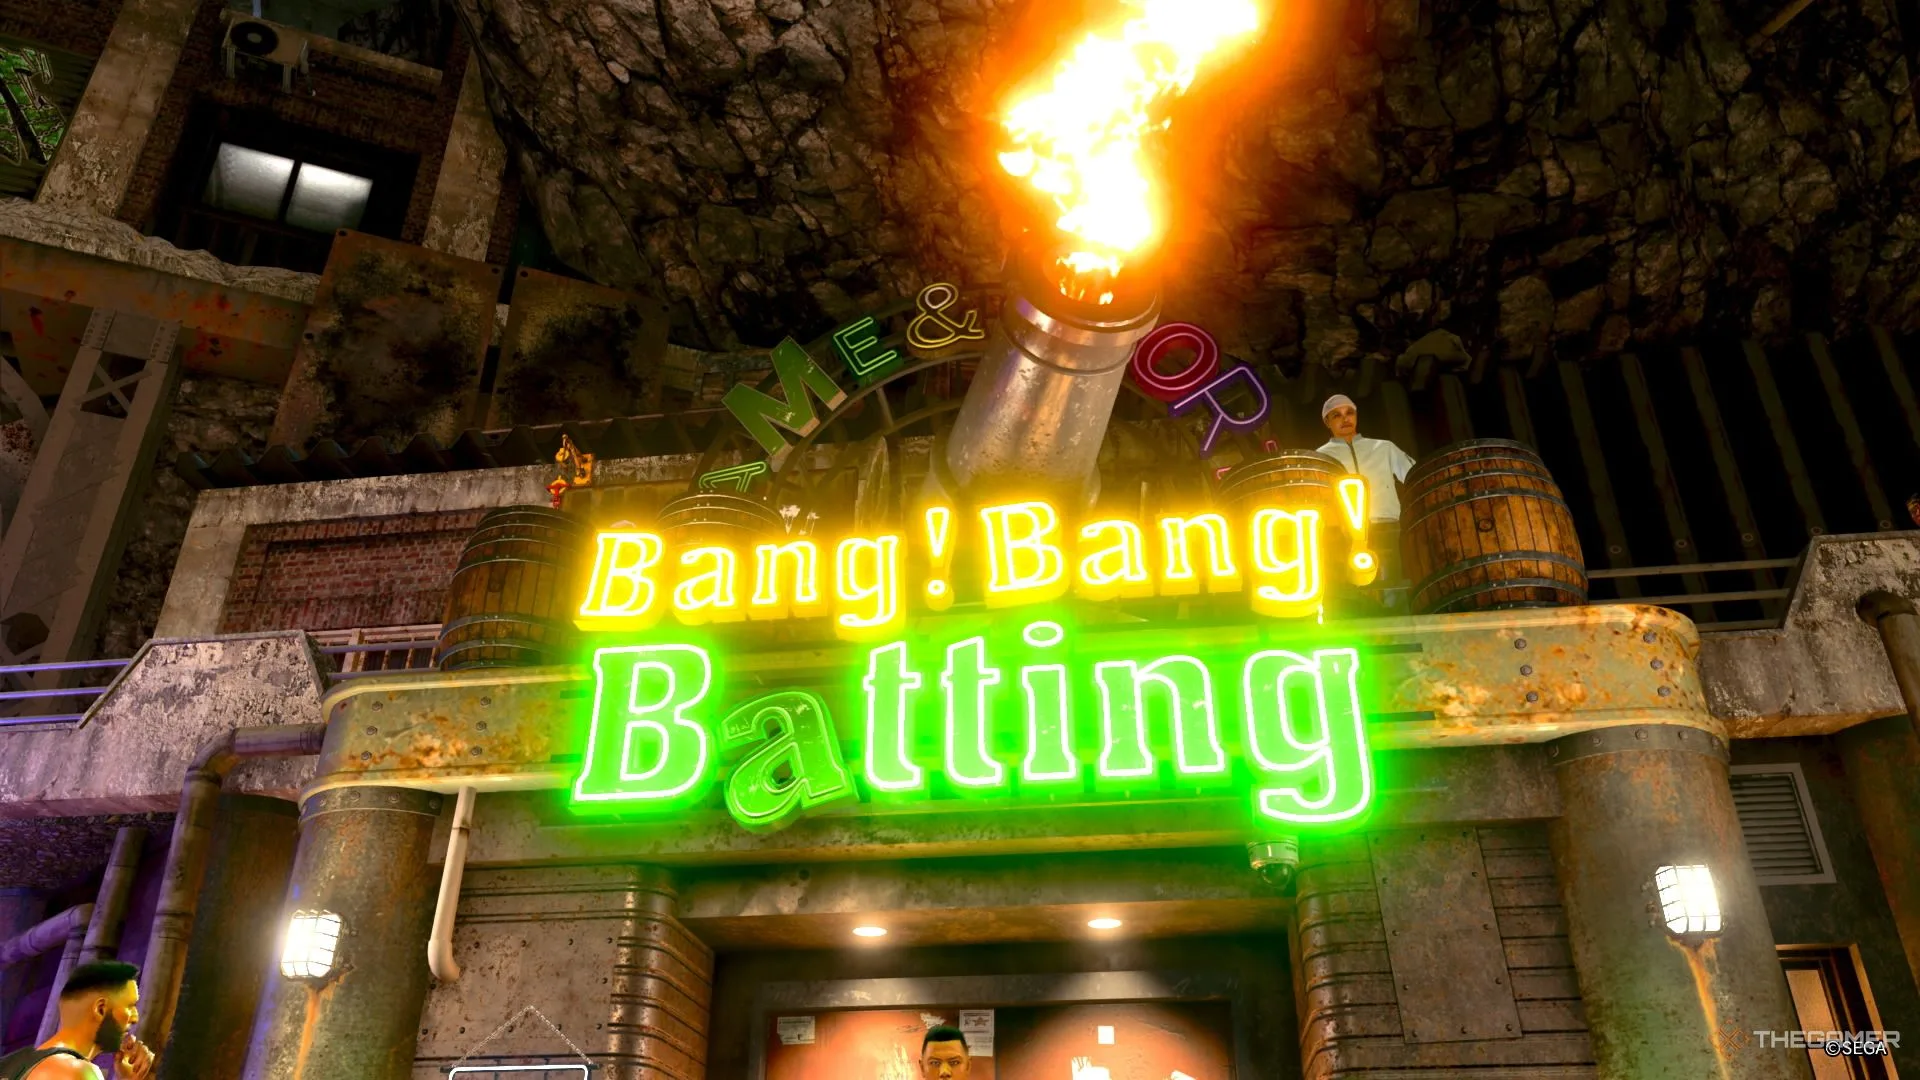
4. Bar District – Bang Bang Battling Center
“Battling Center Sign”
The Battling Center is in the same area as the Dunghill bar. You’ll find it on your right, just before you reach the anchor.
5. Docks – Traffic Light
“Look Up At The Pier”
This traffic light is located on the main path that connects the Bar District and the Coliseum. It can be found to the east of your ship, the Goromaru.
6. Coliseum Grounds – A Lost Kappa
“The Walls Of The Coliseum”
This photo is definitely one of the trickiest to find. As you enter the coliseum area, look up and to your left. It will be situated just above you as you move from the path into the opening. You’ll see a woman in a pirate hat pulling on a man’s shirt on a balcony nearby, with the Kappa statue located to the right of them.
7. Docks – Signboard
“In Front Of The Pier”
When departing from your ship (the Goromaru), you’ll spot the MCU sign against the wall in front of you but a bit to the left. Just head straight from your ship, and it should be easy to find as you reach the main path that runs around Madlantis.
8. Bar District – A Sexy Signboard
“Bar District Entrance”
This signboard can be found as you enter the Bar District. It’s located on the wall to your right as you ascend the stairs leading into the area. You might have to look up to see it, or you might walk right past it like I did!
9. Coliseum Grounds – Pirate’s Coliseum
“Coliseum Signboard”
Just make your way to the Pirate’s Coliseum reception desk. This sign is positioned above the Coliseum Receptionist’s head.
“Near The Coliseum”
The small figure made of coconuts is located in the same spot as the Coliseum signboard. However, instead of being above the receptionist, this one is to their right.
11. Gaming Hall – Death Wheel
“Gaming Hall Square”
You won’t be able to enter the Gaming Hall until you’ve completed your first coliseum battle. Be sure to do that before you try to locate locations 11, 12, and 13.
This sign is located north of the Golf in Madlantis center. You’ll need to direct your gaze upward to see it. However, a little trick here is that the sign won’t be facing toward the entrance. To get a good look, head as far north as you can (near the Gaming Hall boat), turn around, and then look up.
12. Gaming Hall – Golf In Madlantis
“Logo Of A Golf Center”
Make a beeline for the Golf in Madlantis center. As you walk into the Gaming Hall, you will find this on your left.
13. Gaming Hall – A Lost Ukulele Boy And Ukulele Girl
“Shop At The Gaming Hall”
This pair of ukulele figures is placed beside the clown in the tent located north of the Golf in Madlantis center. Look for the stall directly east of the Gaming Hall sign and right above Bacchus’s Barrel restaurant.
14. The Queen’s Castle – Suspicious Man
“Cache For Cash”
Head to the Wooden Whale, the shop situated near the dock at the northeast corner of The Queen’s Castle. From there, move northwest along the path surrounding The Queen’s Castle. You’ll see the sign hanging above this path.
15. Luxury Palace Hotel – Chimera Statue
“Inside The Hotel”
Upon entering the hotel, this statue will be immediately on your left. It’s very hard to miss. However, the real challenge is that you must clear the first Tournament of Captains before you can enter the hotel.