Select Language:
The Slormancer is an action role-playing game (ARPG) that takes the grindy aspects of the genre to new heights, featuring intricate progression systems layered upon one another. With numerous options for building characters, dedicating hundreds of hours to a single class is not out of the question.
If you’re feeling daunted by the complexity of the builds, there’s no need to worry. The game eases you into its various systems gradually as you advance through the story, which functions like an introductory tutorial for diving into the real challenges of the endgame grind. If you’re looking for some guidance during your initial hours, you’ve landed on the right page.
Explore Each Class
In The Slormancer, you can choose from three distinct classes: the Mighty Knight, Mischievous Mage, and Fierce Huntress. Each class comes with three unique Specialization options that allow for different play styles. Fortunately, you can unlock the other two classes within the same save file by completing their respective quests in The Graveyard shortly after you start.
This unlocks the ability to switch between classes in town so you can test their play styles at your leisure, all while accumulating Goldus and items for your save file. We suggest leveling each class up to level 10 to experiment with their Specializations before committing to one for the long haul.
Once unlocked, villagers are accessible to all characters in the same save file, so you won’t have to replay the campaign to access their services.
Discover and Experiment with New Slorm Reapers

Slorm Reapers serve as the weapons for your class, each providing unique effects that can influence your build. With a total of 120 Slorm Reapers for each class, the possibilities for customization are substantial just from the weapon descriptions alone.
However, unlocking Slorm Reapers can be quite challenging. They primarily drop from closing Breaches located on campaign maps or during Expeditions, making these tasks worthwhile for collection. Keep in mind, though, that the Slorm Reaper you receive is random, so you might need a bit of luck to find one that matches your preferred play style. This makes experimenting crucial whenever you acquire a new Slorm Reaper.
Some Slorm Reapers can even evolve into upgraded versions with enhanced effects. If a Slorm Reaper is capable of evolving, you’ll see a grey line connecting it to the next one in the Weapon-O-Dex. They evolve once they reach maximum level, but you won’t know that level until you get there, so keep grinding!
Level Up with Expeditions
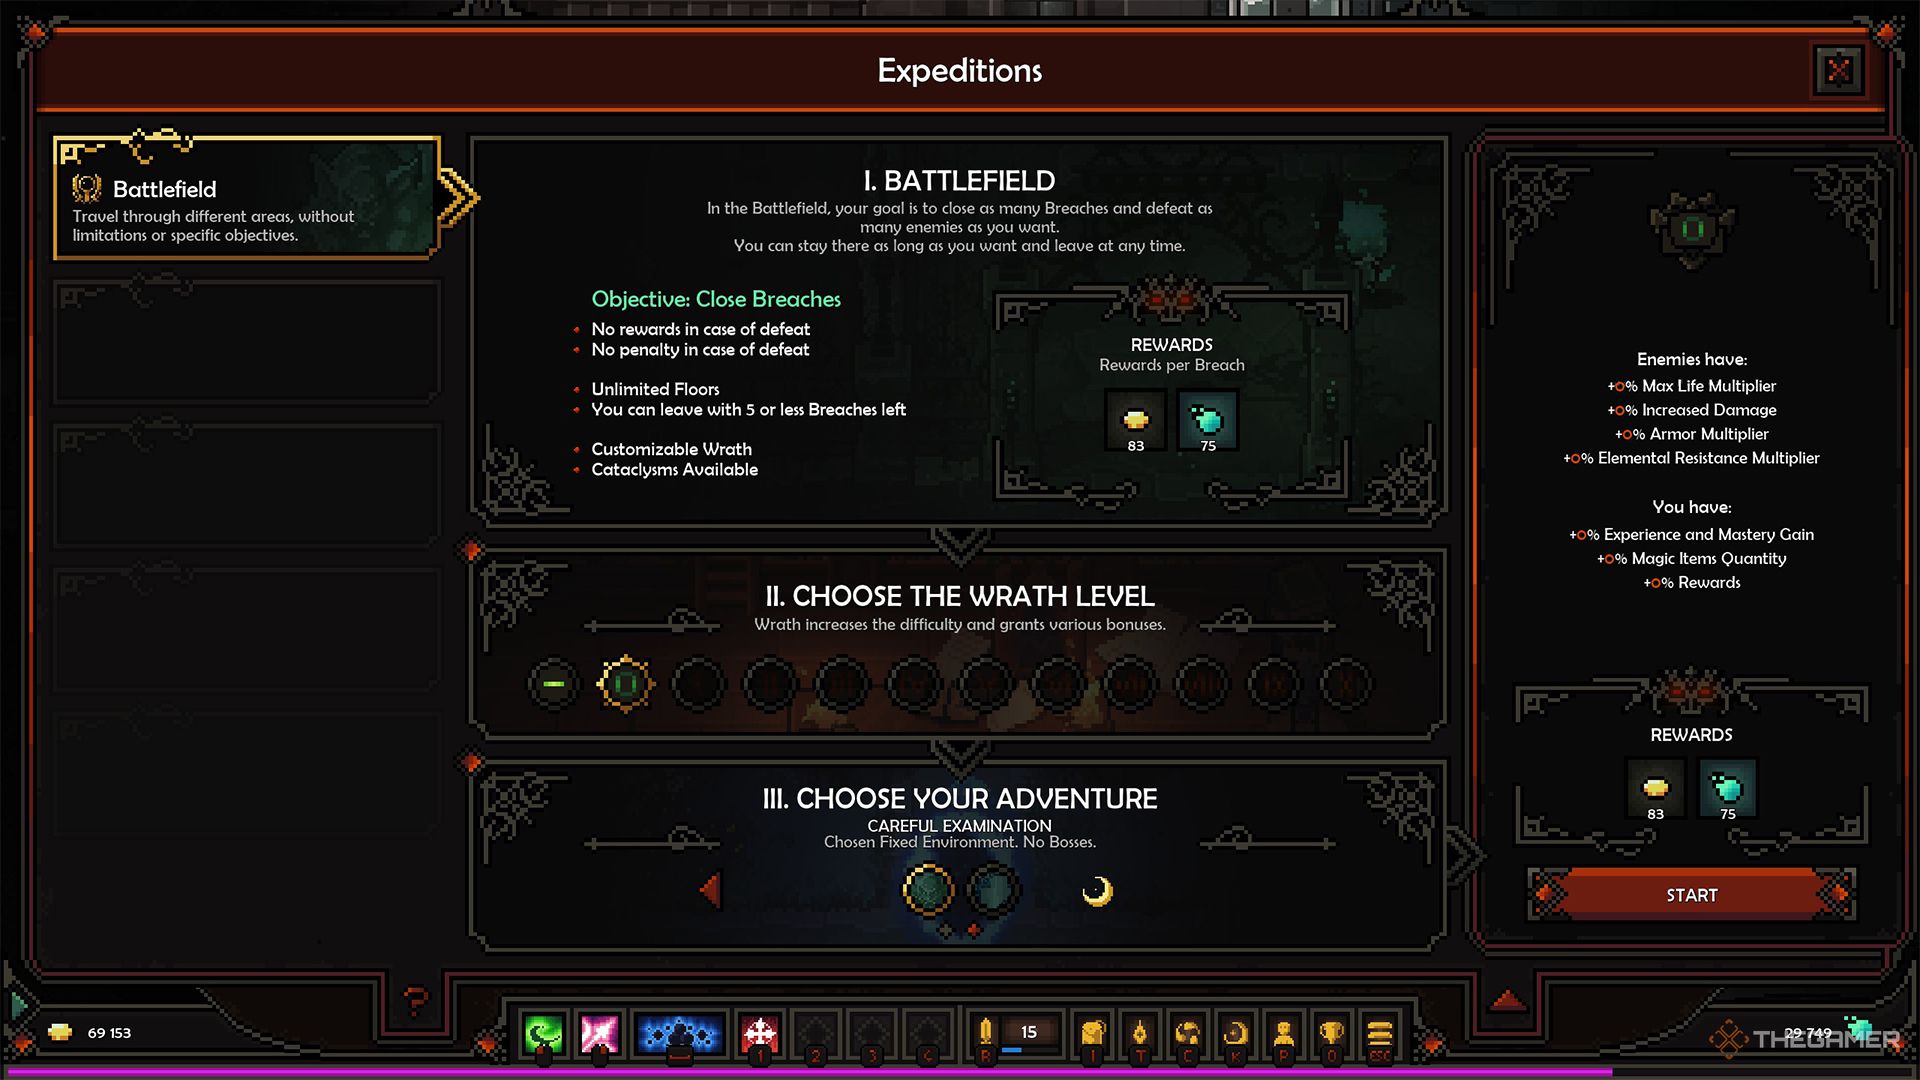
Expeditions are not only a fantastic way to discover new Slorm Reapers, but they also provide a great source of Goldus, Slorm, and experience points (EXP), especially in the early stages. If you find a story mission too challenging, try leveling up your character through an Expedition.
Every Breach you close in an Expedition rewards you with a bonus of Goldus and Slorm upon exiting, but be cautious—if you die, you’ll lose this bonus. If the challenge becomes too great, consider leaving the Expedition to secure your rewards.
As you move further in the campaign, you’ll unlock new types of Expeditions and additional Wrath Difficulties, which boost enemy strength and improve reward quality. So, if you’re ready for a greater challenge, feel free to take it on!
Embrace Experimentation
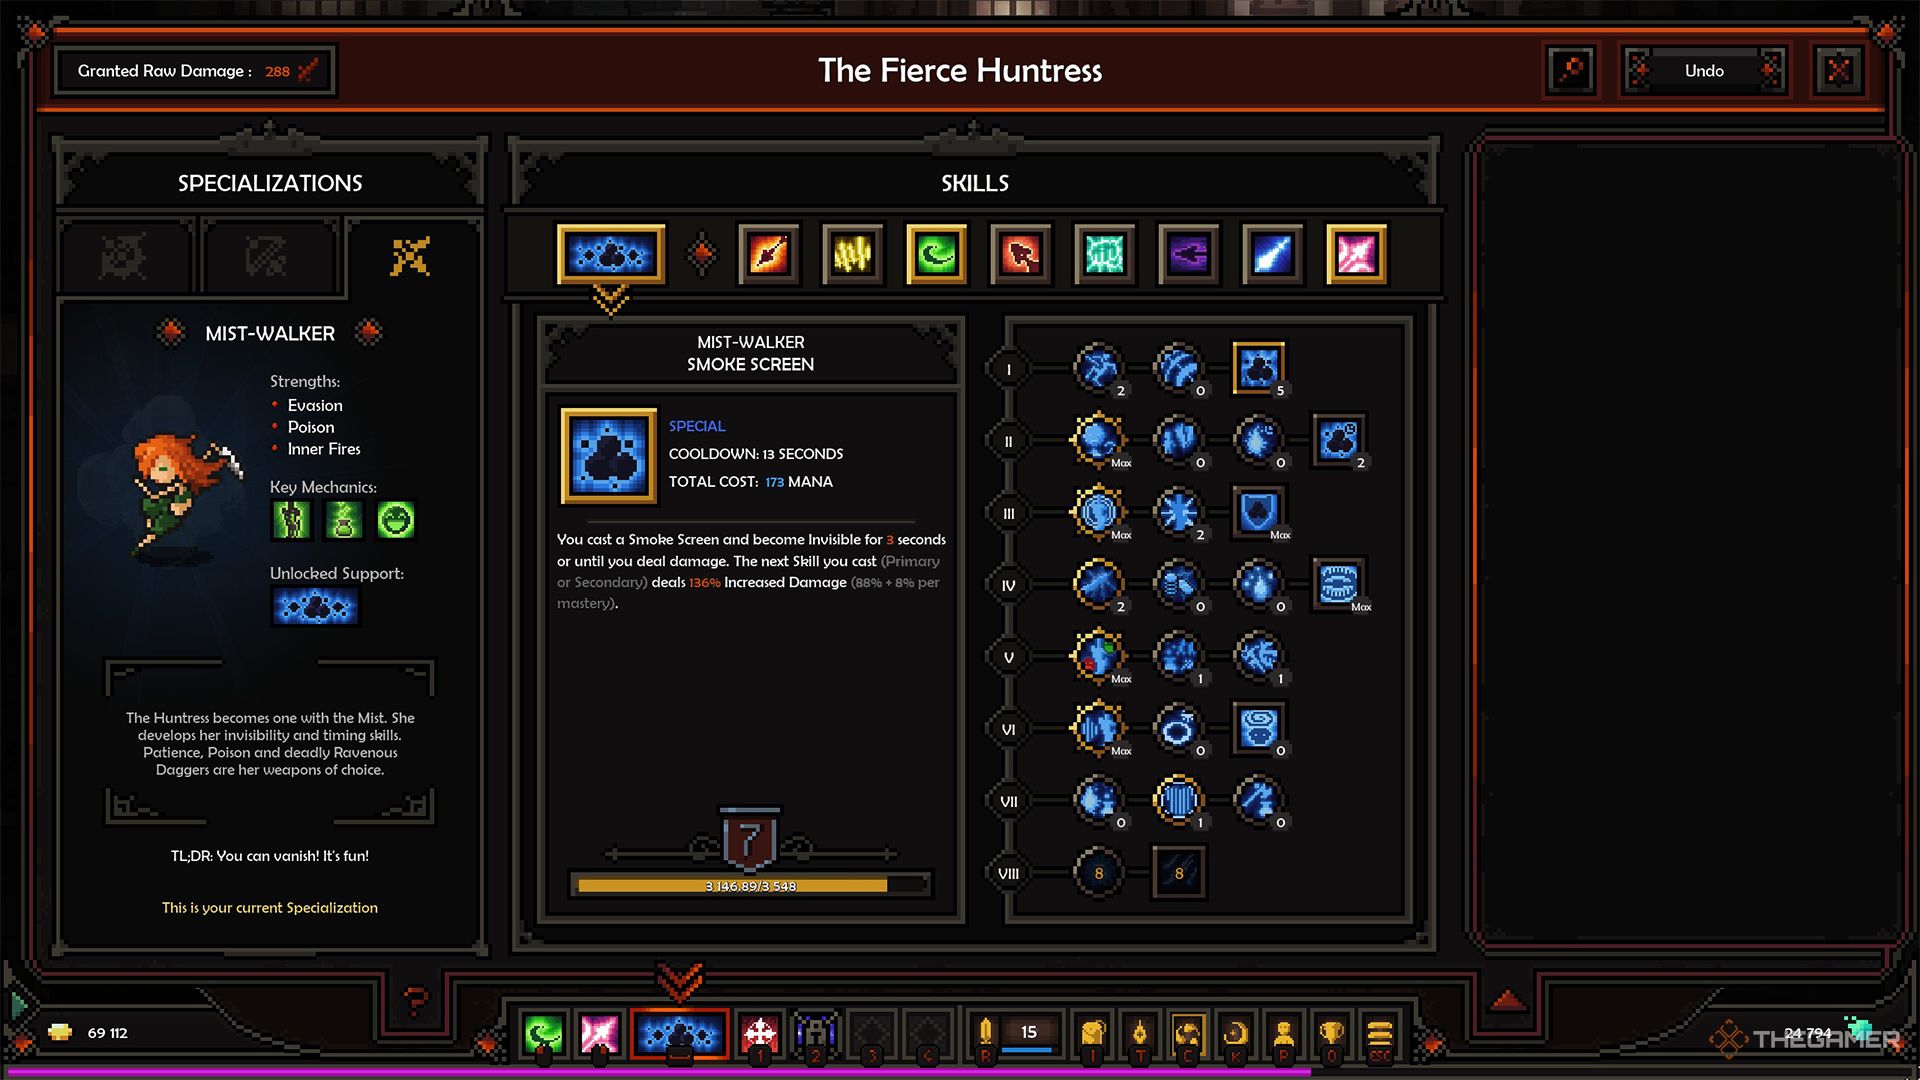
Experimentation is key in The Slormancer. With an array of options for Slorm Reapers, Skills, Attribute Points, Ancestral Legacy nodes, and gear, there’s no need to stick to one build.
Respeccing is easy and free, allowing you to readily explore new Skills, Legendary items, or Slorm Reapers as you acquire them.
You can withdraw any Slorm invested in skills using the red down arrow, or completely re-spec by talking to Ormos, who is located near the Expedition board in town.

The Slormancer involves tracking numerous effects, buffs, triggers, skills, and other crucial terms. Thankfully, hovering over almost anything with a key term will show you a tooltip with the necessary information. Utilize this feature to refine your build and understand how specific effects work. Also, take advantage of the search function when browsing skills to find where specific effects are used. For instance, searching “Ravenous Daggers” will highlight every skill and skill tree node that references it.
The in-game Codex, found in the main menu, is another useful tool for understanding different systems, so don’t hesitate to refer to it if you feel lost!
Utilize Crafting
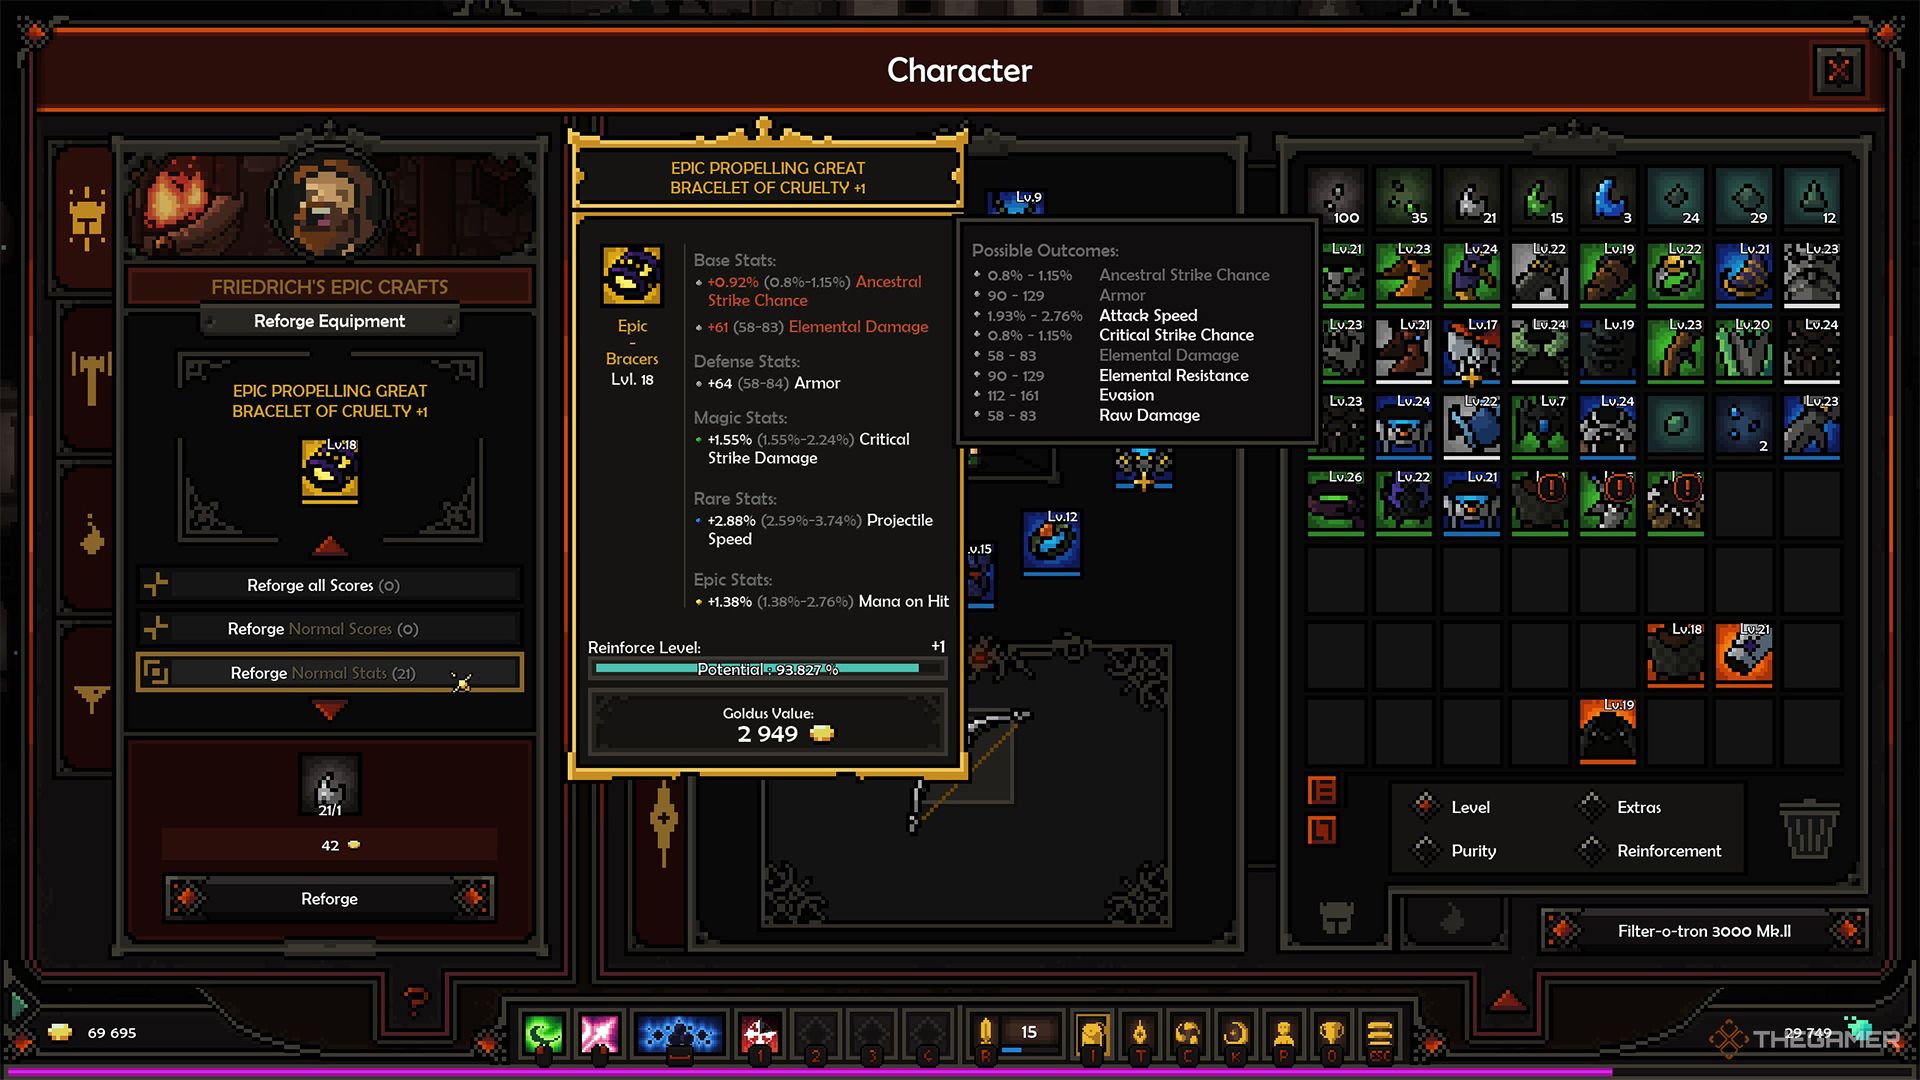
After clearing a Breach in The Guard Room within the Prison, you unlock the Blacksmith, enabling you to use Crafting to reforge your items. Crafting is a powerful system that allows you to fine-tune any item by choosing the stats to reroll and add.
Crafting allows you to create the perfect piece of gear with the exact stats you want, provided you have enough Slormeline.
Legendary items play a crucial role in your build, even if they seem limited at first. At the Blacksmith, you can add stats to a Legendary item to make it on par with the rest of your gear. You can also incorporate a random Legendary effect into any piece of equipment.
Crafting operates on a soft-pity system where each roll is crossed off from a list of potential outcomes. As you roll, you’ll not repeat outcomes until you’ve gone through all options, ensuring you’ll eventually secure the exact stat you want for any gear slot.
Implement a Loot Filter

As you progress through the game, you’ll soon find yourself overwhelmed with items, particularly Normal (grey) and Magic (green) quality items that may no longer be relevant. Thankfully, after unlocking the Blacksmith, you can establish a loot filter to completely hide these items from your view.
Once the loot filter feature is unlocked, you can change it from anywhere, not just at the Blacksmith.
This not only reduces clutter on your screen but also allows hidden items to be automatically converted into Fragments or Goldus at 75 percent of their standard value. Since you may be ignoring these items anyway, this lets you accumulate extra currency just through drops.
However, to maximize the utility of crafting, it might be wise not to hide certain items entirely. Given the rarity of Pure Stats, consider leaving items with Pure Stats displayed in the loot filter to help you craft them into higher-quality gear later.