Select Language:
Deltarune Overview
Deltarune is a retro-style RPG that follows Kris and Susie as they explore a Dark World filled with captivating characters and various challenges. Along the way, they receive assistance from their Darkner friend, Ralsei. Their adventure involves engaging in battles, solving puzzles, and piecing together an intriguing narrative.
Like previous chapters, Chapter Three of Deltarune offers secrets that can be unlocked by overcoming tough challenges. One notable aspect is a minigame found in a hidden room that rewards players with a valuable piece of armor upon completion.
Finding and Unlocking the Third Minigame
In this chapter, players meet a talking TV named Tenna, who invites them to participate in his game show, “It’s TV Time.” The game consists of multiple rounds featuring a variety of challenges that earn you points. After each round, your points are totaled, and you are given a ranking. The highest rank, S-rank, offers the best rewards.
Achieving S-rank allows you to access a special room designated for high achievers. This room is located next to Ramb’s store and marked with a prominent letter "S." Once inside, head to the west to find a console game to play.
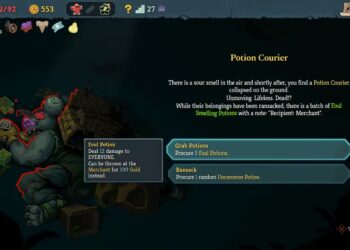
You can purchase S-rank for one round through an NPC located south of the Green Room.
At the end of each round in Tenna’s game show, you’ll have access to different minigames. There are three minigames in total that you can engage with. To unlock everything, aim to achieve S-rank in both the first and second rounds while successfully completing each minigame to earn special items.
Once you finish the second minigame, the story continues into a bonus round. During this round, you’ll notice several of Tenna’s employees leave him. When he’s alone, you can go back to the Green Room, which may be empty, but you’ll still have access to the S-rank room.
Approach the console again to start the third minigame.
Leveling Up in the Third Minigame
As in the first two minigames, your objective is to find a sword to level up. This time, Susie and Ralsei will join you. Head south and take a right at the intersection until you come across an area with a blocked path heading east. Continue south until you reach the bottom, then proceed east until you discover a staircase leading underground.
In the next room, you’ll find the sword. Picking it up will transport you back to the barrier area. Here, you won’t encounter any enemies, so you’ll need to attack Ralsei and Susie instead to level up. After doing so, you’ll be powerful enough to break the barriers.
Keep heading east until you find a manhole. Jump in to enter the next area, which will feature enemies in various rooms. Defeat all the enemies to reach the maximum level and move past the trees blocking the eastern path.
If you die during this section, you will respawn at the beginning of this segment, not from the start of the minigame.
Some enemies drop candies that restore health, and you’ll likely find them when your health is low. There’s also a room with stationary enemies that may drop green candies—it’s wise to save these for when you’re low on health rather than using them at full health.
Defeating the Shadow Mantle
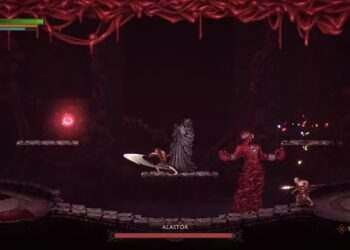
After eliminating all enemies, you’ll be strong enough to clear the trees in the southeast. Moving east, you’ll find Tenna talking to himself, and you must confront him to proceed. Continuing along the path will trigger a boss fight against the Shadow Mantle.
This battle features four phases, requiring you to attack the Shadow Mantle while dodging its various attacks.
To transition to the next phase more quickly, focus on attacking as much as possible during each phase, which can help you get through challenging moments faster.
Shadow Mantle Fight Phase One
In the first phase, the Shadow Mantle executes two moves. First, it plants three bombs in various parts of the arena, each set to explode at different times, targeting areas directly to the north, south, east, or west of them. It’s best to avoid tight spots during this phase.
When the bombs are planted, try to get close to the Shadow Mantle for easier dodging and more opportunities to land hits.
The second move involves the Shadow Mantle shooting three small flaming rocks that orbit around it. Keeping a distance during this time makes it easier to dodge.
Shadow Mantle Fight Phase Two
In the second phase, the Shadow Mantle again uses two moves. First, it will drop down in meteor form, which you must dodge four times to trigger its next attack.
After dodging, the Shadow Mantle will settle in the arena and start laughing. This is your chance to hit it repeatedly. During this time, it will summon cats that chase you; some will drop health-restoring candy, which you can collect by defeating them.
Shadow Mantle Fight Phase Three
The third phase revisits attacks from the first phase but steps up the difficulty. Expect four bombs and five flaming rocks instead of three, and be prepared for cats to reappear.
In this phase, the Shadow Mantle may also execute the meteor attack if you haven’t yet defeated it.
Shadow Mantle Fight Phase Four
The final phase introduces two new moves. The Shadow Mantle will perform a spinning fire attack, creating three lines of flames extending to the arena’s edges. Move in the direction of the flames to avoid damage.
Then, it will transition into a meteor attack again, but this time it’ll be faster. You cannot attack it while it’s white; wait for it to turn black during the meteor descent for your chance to strike. After a few solid hits, you’ll defeat the Shadow Mantle.
After winning, you’ll find a chest in the next room. Have your sprite exit the game through the right path and switch places with Kris. Kris can then open the chest and claim the powerful Shadow Mantle armor, which helps withstand attacks from the Roaring Knight.