Select Language:
In the game Like A Dragon: Pirate Yakuza in Hawaii, players can undertake various side quests, one of which is the Alo-Happy Photo Rally. This mission is given to Goro Majima by the staff at Alo-Happy Tours, who are looking to improve a struggling promotional campaign. The task involves capturing photographs of landmarks and unique moments throughout the game’s world, spanning popular tourist spots and distinctive locales in Honolulu, Rich Island, and Madlantis.
This side quest starts during Chapter Two, when Majima visits Alo-Happy Tours on his way to a primary quest. As you explore the area, watch for a camera icon that appears, indicating a location where you can collect a Photo Rally stamp. You can track your progress and receive hints for the remaining photos through the Photo Rally app on Majima’s phone, accessible from the pause menu. For those who need extra guidance, here’s a list of every Photo Rally location in Pirate Yakuza‘s rendition of Honolulu.
Locations for the Photo Rally in Little Japan
Kametaro
You’ll find this cheerful sculpture right next to Tony’s Lemonade Stand, a key spot in a previous Infinite Wealth substory. To locate it, head east from Tony’s and look for an apartment building with bright yellow staircases. The statue sits atop the outer wall.
Ukulele Boy and Ukulele Girl
This photo op is on the short Momo Street, close to the Tropical taxi stand on West Sakura Street. Next to a planter, there’s a store called Captain’s Trophies, where two ukuleles with eyes and arms are prominently displayed in the rightmost window. Snap a photo to collect this stamp.
Lots of Charms
As the name suggests, this spot is right next to the shrine where you can exchange fortunes for prizes with Kamulop, conveniently situated near the Shrine taxi stand. Just west of the shrine, you’ll find a small parking lot with a bulletin board on one of the surrounding walls next to a dog (assuming you’ve yet to recruit it). Photograph this board for your next stamp.
Matsumoto Shave Ice
This is a straightforward one; just head to Matsumoto Shave Ice in the Little Japan area and take a picture of the mural behind the counter, to the left of the menu board. It’s possible to collect this and the next three stamps in one visit since they are all clustered on the same block.
Red Telephone Box
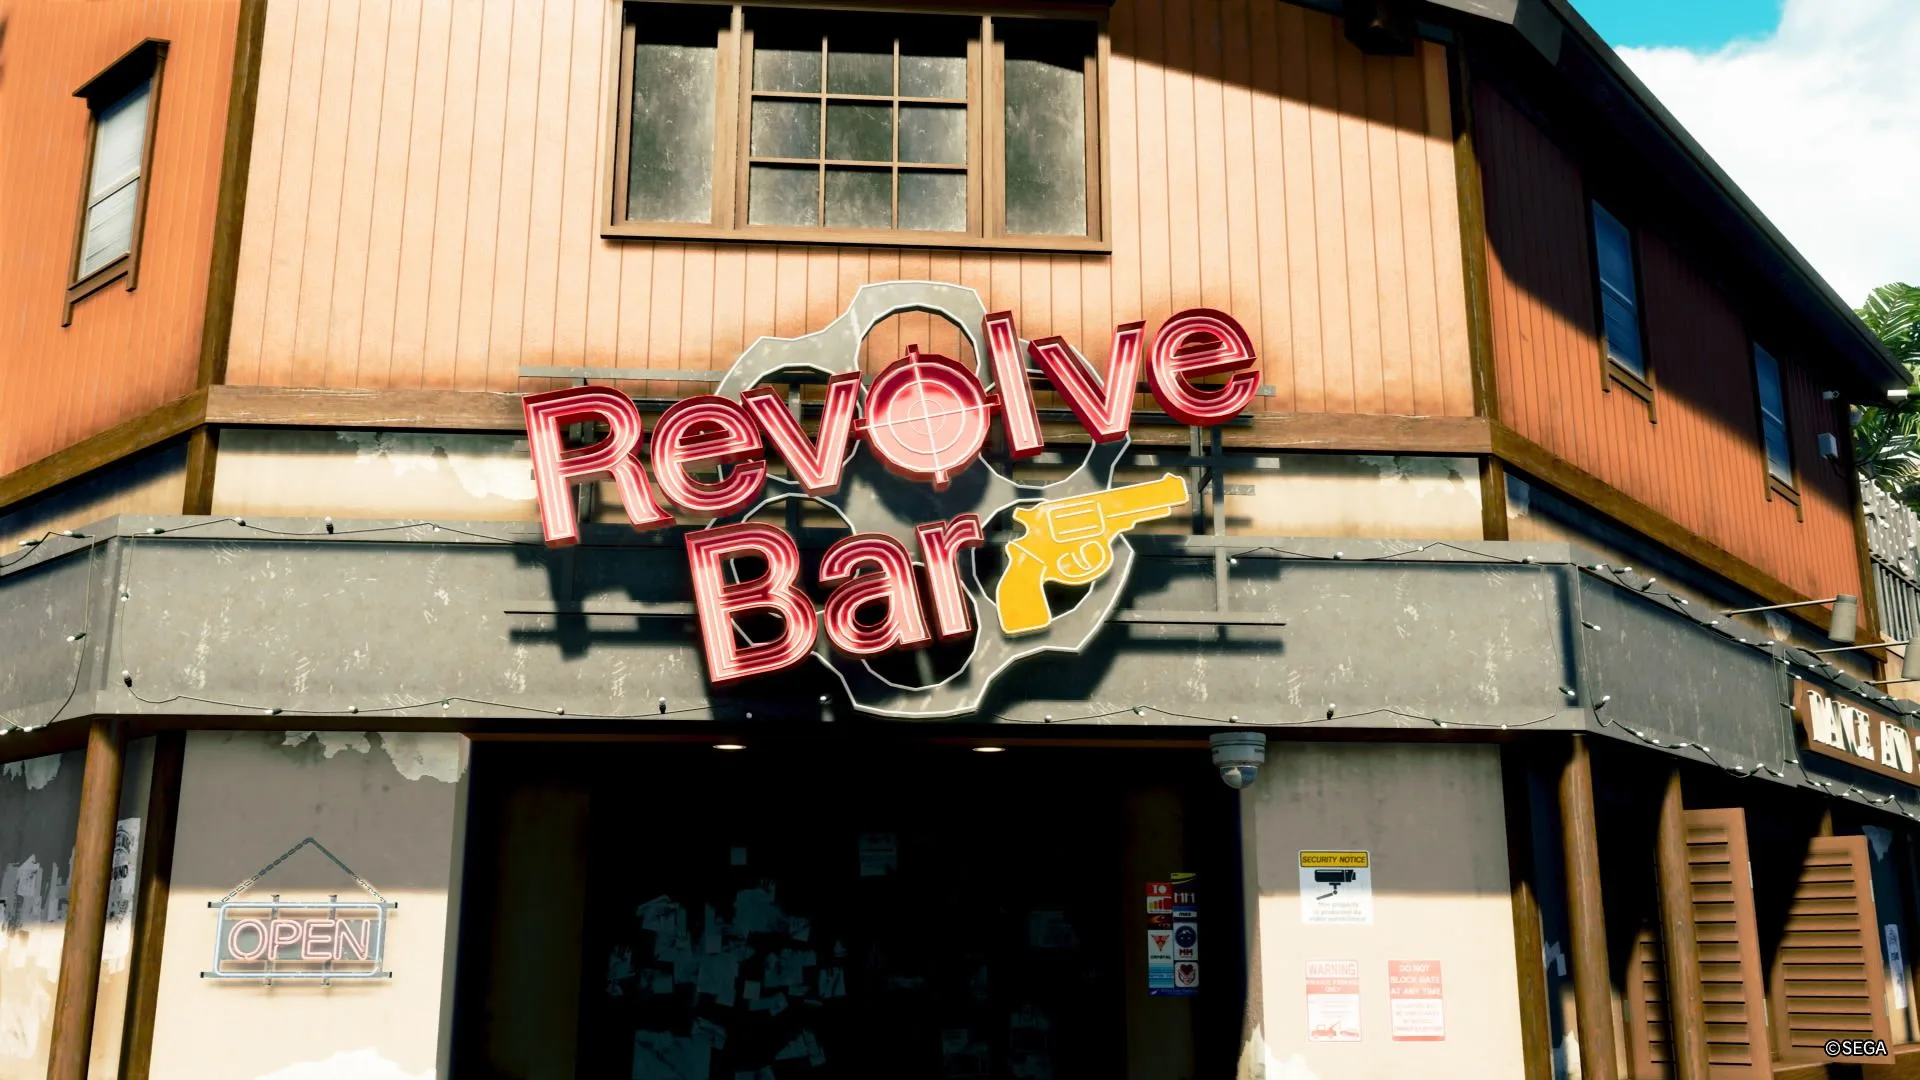
You might have already spotted this one. Inside Revolve, there is a red phone booth located to the left of the entrance behind other booths.
Wabi-Sabi Omusubi
This one is a bit trickier but still within the same vicinity. From Revolve, travel south until you find a pagoda-style building. Capture a picture of the sign that reads "Wabi-sabi Omusubi" to complete this task.
Mt. Fuji Planter
One door down from the restaurant, you’ll find a residential building with a gray mailbox. Be sure to photograph the potted plant on top of it.
Toba
Head down the alley across from Revolve, where a gambling hall filled with classic Yakuza mini-games awaits. Inside, there’s a giant lucky cat that you won’t miss.
Note: You might not gain access to the Gambling Hall until you’ve progressed far enough in the story for a bounty to be placed on Majima.
Matcha Graffiti
In that same alley, head further north to find a mural for the nearby Café Umaine featuring three samurai holding matcha containers.
Shinobi Sushi
Travel to Shinobi Sushi in the northeast, where a ninja clings to the wall to the left of the counter. Look up to spot a purple-clad shinobi peeking out from above—take a picture to move on.
Ramen Store Painting
This unmarked ramen shop is located right next to Ganryujima Armory, around the corner from Revolve. Capture an image of the sumo wrestler painting to snag another stamp.
Samurai Window Display
This point is conveniently located right next door, outside Ganryujima Armory. Photograph the samurai display for your next stamp.
Place to Learn Jiu-Jitsu
Continue along Fuji Street, bypassing most of the grassy area at the northeast border of the map. Keep an eye out for a banner that reads "Mifune Jiu-Jitsu" on the south side of the street. To the left, you’ll come across a blue flag showcasing an image of a black belt. Snap a shot of this for your rally spot.
Wall Near Trolley Waiting Area
As you return to Tony’s Lemonade, stay close to the stand. Behind Tony to the left is a mural featuring a blue whale.
Karaoke Bar Sign
This is your final Photo Rally location in Little Japan. Simply take a picture of the Revolve bar sign outside to finalize your stamp collection and return to Alo-Happy for your well-earned Daruma Figurehead for your ship.
Locations for the Photo Rally in Waikiki
Alo-Happy Tours
You won’t be able to miss this one. The Alo-Happy employees will guide you to take this photo as part of the side quest tutorial. It features a cardboard cutout of their mascot standing right outside the building.
Tropical Window Display
Next, head over to Seaworthy Treasures on Waikiki Street. For this stamp, just snap a photo of the mannequins in the window.
Champagne Tower
Located between Arque Dangerous III and the abandoned cat (if you haven’t recruited it yet), there’s a jewelry store called Minatoku Tokyo. Take a picture of the champagne tower displayed in the window.
Dolphin Statue
This statue can be found right next to the Waikiki Oka Charger and close to the Seaside Avenue taxi stand.
Look Up on Aloha Street
Follow the clues to head down Aloha Street near Vincenti and Julia’s Brilliant Design. Look skyward at the Space Needle-like structure and photograph it from below; you may need to stand in the street for this shot.
Shopping Center Entrance
Look slightly down and to the left from the previous Photo Rally location, observing the sign that reads "Plaza." This is your next stamp.
Streetside Window Display
Travel to the northwest corner of the large shopping area and stand on Waikiki Street next to Crêpes for Me. Snap a picture of the stuffed dog in the window to proceed.
No Surf No Life
This particular photo opportunity requires you to unlock the chain hook, which gives you access to hidden treasures and bonuses—you’ll automatically unlock this during Chapter Two.
Find the store called No Surf No Life and head upwards and towards the right of its entrance. You should see a grappling hook spot; use that and photograph the surfer on the roof for another stamp.
East Aloha Beach
Get on your segway and head over to Aloha Beach. You’ll need to venture onto the sand for this task. Just south of the Crazy Delivery mini-game, near a small section of beach that extends into the water, you’ll find a dolphin statue on a pole that you need to capture.
Shop With a Lovely Wink
You’ll head east for this one, specifically to Wink Mini Mart on Waikiki Street. Simply photograph the shop’s sign.
Water Buffalo Painting
Next, find the mural located next to Julie’s Gearworks, to the west of her shop and right above a vibrant red motorcycle.
Market Village
Now, let’s take a photo of the tree outside Alo-Happy. This is an excellent chance to collect any other Photo Rally rewards you may have earned.
Surfboard Statue On The Sands
Take a taxi to the Aloha Beachfront taxi stand or walk there. Your next target is the surfboard statue depicting a man on the sands.
Street Corner Restaurant Sign
You might have noticed this landmark early on; it’s located just west of the East Waikiki trolley stop, at Big King Pizza. Take a picture of their sign, which humorously features a pizza piece eating one of its slices.
Famed Hotel Insignia
Head to Crystal Aloha Resort on the western side of Aloha Beach. Capture a photo of the hotel’s sign beneath the awning to get another stamp.
Aloha Sign
Many more Photo Rally spots await you in the Anaconda Shopping Center. Enter via the north entrance and look straight ahead for a large "Aloha" sign.
Anaconda Arcade
Just behind the Aloha sign is the Anaconda Arcade where you’ll take a picture of the logo on the back wall, positioned between the UFO Catcher and Ocean Hunter machines.
Anaconda Arcade, Part 2
Next, check the east side of the arcade and photograph the cutout board located there.
Snake Jar
Now, head up to the second floor, where a big diamond-shaped plaza features a fountain at its center. Be sure to photograph the snake sculpture within that fountain.
Colorful Mannequin
Return to the area west of the arcade and locate a store called Archipelagoer. You’ll need to photograph its window display.
Shopping Center South Entrance
Leave Anaconda through the southern parking lot, finding the designated area mentioned earlier. Look up and photograph the snake on the sign.
Shopping Center West Entrance
Stroll around to the west side of Anaconda and find a small window display underneath an awning to photograph for your next stamp.
Hidden Anaconda: Shrubbery
Back to the second floor, seek out the clothing store Fiddler Brand. Look at the planter right by it and capture the small snake carving nestled in the corner.
Hidden Anaconda: Window Display
Also on the second floor, walk west past the ABC Store until you see a window display showcasing two shells. Snap a picture of the anaconda crafted into the crate beneath them.
Hidden Anaconda: Restroom
Take the escalators back down and enter the restroom in the southeast, close to the arcade. Find a small yellow snake on the floor next to the second urinal from the left.
Sujigami PC Shop
Make your way back to the second floor yet again. This time, you’ll want to take a picture of the Sujigami PC Shop, located in the northeastern corner next to Abaca Rondo.
Tropical Showcase
Take a snapshot of the window display just outside the north entrance, next to Café Trip.
Big Heart and Message
Photograph the sign and window display at Cutesy Doodles, a store situated in the northwestern area right next to the escalators.
Big High Heels
You’ll need to look between Hilo Hattie and the Anaconda taxi stand. On the north side, there’s a large window display featuring an enormous red shoe.
Golden Cow
Go to Boogie Woogie Steakhouse located on the west side of the first floor and take a picture of the large golden cow statue inside. If you’ve collected all the previous Anaconda Photo Rally stamps, you’ll score the Legend Darts, which are considerably more precise than the usual darts equipment in the mini-game.
Locations for the Photo Rally in Downtown/Chinatown/District Five
Wall Graffiti in District Five
These three neighborhoods are grouped for the Photo Rally. Your first stop is an octopus mural, situated on a wall just south of Diamond Head.
One Mismatched Slice
Directly south of the mural is Buster’s Pizza. Examine the painted pizza slices on the windows and snap a picture of the one with expressive eyes and a mouth.
Cuffed Nightspot
Travel west from Buster’s until you reach the large neon sign of Club Guilty. Take a photo of this as your next stamp.
Inside Ruins
Just west of Club Guilty, there’s a small alley. Inside, turn left, and capture a picture of the boxing gloves resting on the frayed armchair.
Streetside Café Interior
Continue west to Café Soramame. Upon entering, you may trigger a substory. You’ll want a picture of their sizable red coffee grinder.
Streetside Water Installation
Head further west, located between the Orphanage taxi stand and the Anaconda Boulevard Crazy Delivery mini-game. You’ll come across a sizable marble fountain. Take a picture for your next stamp.
Bar Interior
Now, journey back to Diamond Head and step inside. Capture a picture of the mounted deer on the wall beside the jukebox.
Serrated Storefront
On Kolonahe Street, you’ll encounter a gift shop named Shark Teeth Souvenirs. You’ll need to photograph its storefront adorned with teeth.
Chinese Weapons Dealer
Travel to the House of Wushu in Chinatown. Snap a picture of the panda plushies displayed on the counter.
Sign of Bliss
At the northwestern edge of the map rests the grand Nirvana Coast Hotel. Take a photo of its impressive sign.
Herbal Store Mascot
Next, find the Wan Shang Tong Herbal Medicine Store in Chinatown. Your target is the store’s mascot, a quirky humanoid ginseng figure that might seem slightly unnerving.
Orphanage Symbol
Return to the Orphanage taxi stand and take a picture of the Palekana insignia positioned above the door, located northeast of the taxi stand.
Streetside Water Installation
Head back to Shark Teeth Souvenirs and photograph the nearby fountain situated southeast of the gift shop.
Elevator Panda
Now, we’ll go to Fantasia Mahjong (no worries, you won’t be playing). Look for a stuffed panda hanging above the door.
Police Station Entrance
Continue along Downtown Street until it intersects with Sunset Street. The police station is at the northwest corner; capture a picture of its sign. If this is your final Photo Rally location in the district, you’ll be awarded the Hannya sails, a distinct cosmetic to customize your ship in Pirate Yakuza, inspired by Majima’s back tattoo.
Locations for the Photo Rally in Cultural District/Harbor Park
Dock Graffiti
Catch a taxi to the Pier in the southwest corner of the map. Then, head to the marked location. Photograph the graffiti on the shipping container for your first stamp in this area.
Dolphins at Play
Travel to Onaga Maritime Fare, nestled between the dock where the Goromaru is anchored and Anaconda Harbor Park. You’ll need to capture a photo of a statue displaying a dolphin leaping up from the water.
Chinese Restaurant Fish Tank
Next, visit the Black Hibiscus Chinese restaurant located on the far west side of Downtown Street. Head inside and photograph the fish tank, which sits to the left of the dining area.
Yacht-Watching Port
Also located near Onaga Maritime Fare, this time you need to take a picture of the deep-sea fishing sign positioned next to the docks.
Food Truck Near Ship Landing
This task is simple. Just snap a picture of Hip-Hop Shrimp, the food truck adjacent to the dock where you board the Goromaru.
Raunchy Corset Display
Continuing on with the photo adventures, head over to Hyper Ecstasy on Twilight Drive and take a picture of their eye-catching window display for your next stamp.
Tattoo Parlor Wall
Keep moving down Twilight Drive heading east of the taxi stand. Your target this time is the rose mural outside Volcano Tattoo Studio.
Art Walls
Head towards the Art Walls, close to the southwest corner of the map behind the Black Hibiscus. There are plenty of beautiful murals, but photograph the eagle painting on the northern wall for your stamp.
Jewelry Store Near Art Walls
Go find Akahai Jewelers located east of the Art Walls. This task simply involves taking a photo of the storefront.
Bar With Wall Art
Continuing the wall art trend, find the Oka Charger in Night Square, then head east. Capture a photo of Bar Moderne, which sports graffiti on its walls.
Monument In Front Of Entrance
This Photo Rally location is just outside Ounabara Vocational School, which serves more as a trivia mini-game compared to its role in Infinite Wealth. You’re looking for the large spinning medal outside the main entrance.
Currently Closed Theater
To get this next stamp, photograph the Cabaret El Dorado, which is located on Night Street, directly across from Loco Fiesta Liquor.
Pineapples for Sale
Go to the Bullet Hell Armory in the furthest southwest corner of the map, where you’ll find a table stacked with pineapples. Snap a picture for another stamp.
Art Walls Alley
Return to the alleys behind Black Hibiscus, but now enter from the east side of the restaurant. You’re looking for the Necochan Cawaii mural to photograph.
Light Fixture
Finally, return to Twilight Drive and photograph the heart-shaped neon light displayed in the window of the building just next to the taxi stand. You might miss it during the day as it shines brighter at night.
Once you’ve collected all the Photo Rally stamps for this area, you’ll unlock a rainbow-colored light for your Street Surfer. If you’ve completed all the other stamp books in Honolulu, you’re ready to move on to the next Photo Rally region in Like A Dragon: Pirate Yakuza in Hawaii.