Select Language:
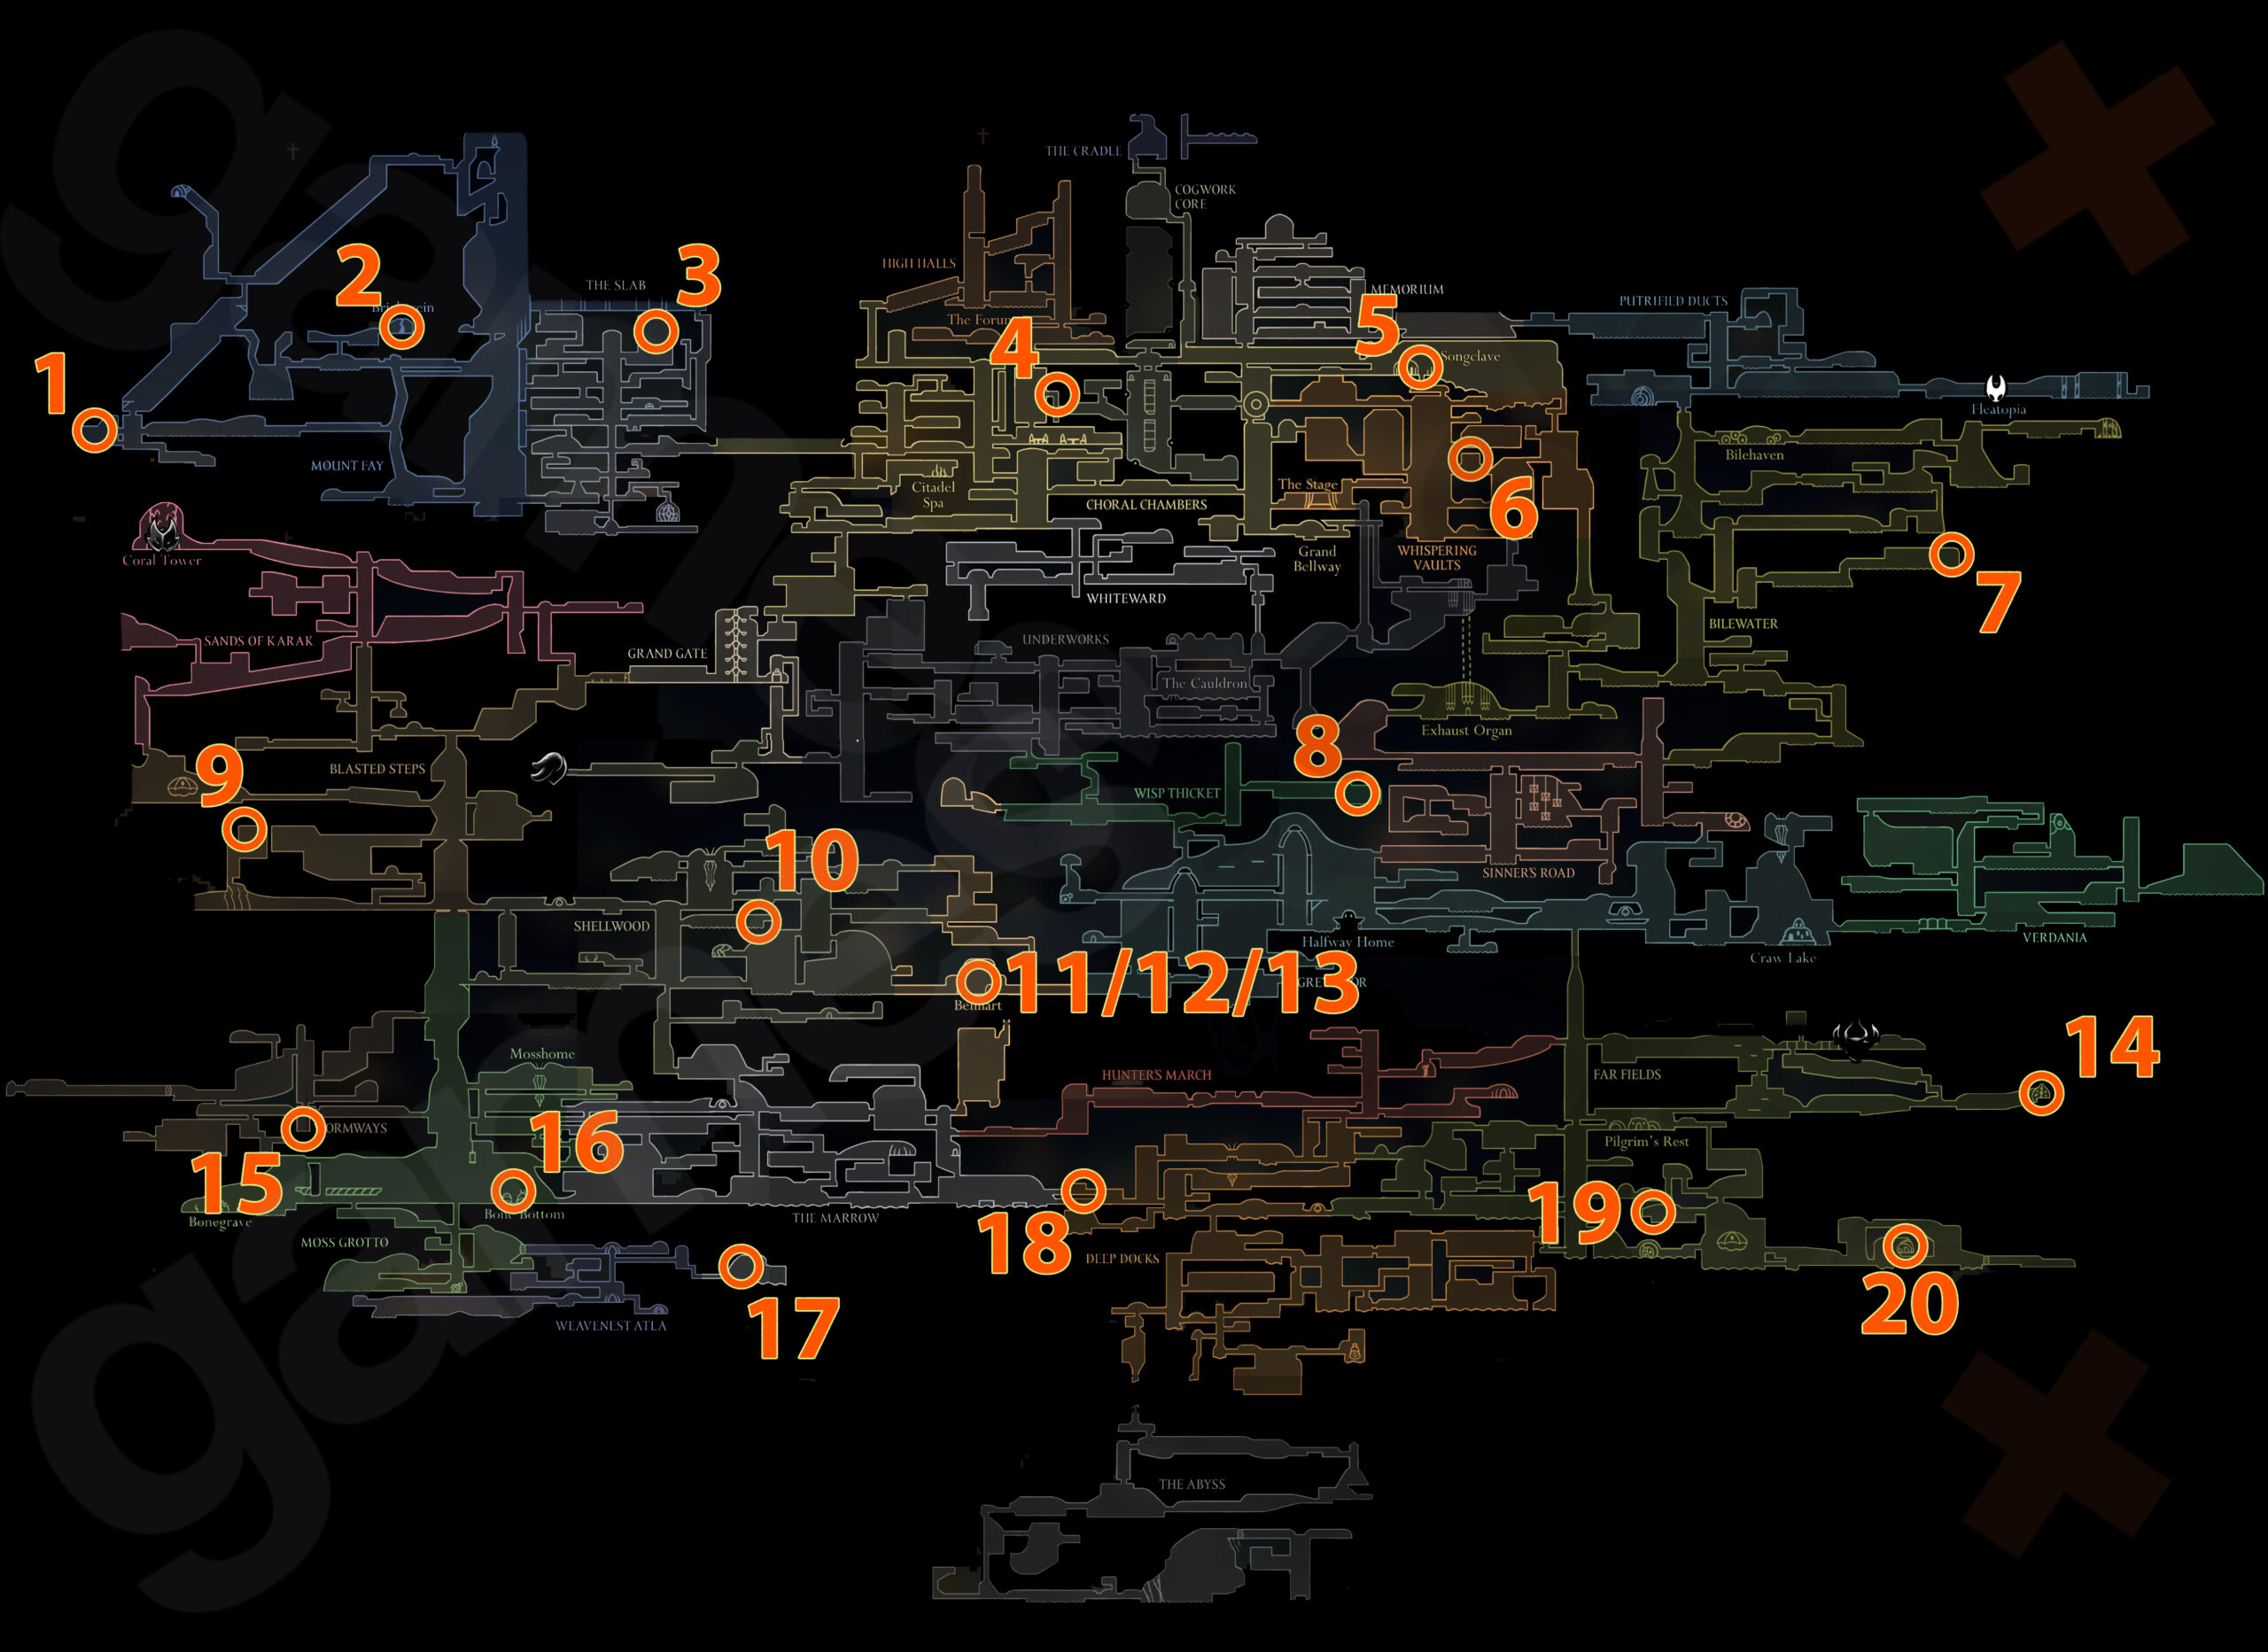
Silksong Mask Shards are items that boost your maximum health, with a total of 20 scattered throughout the map. Since you need to collect four Mask Shards to increase your health by one, finding all 20 means you can add five more health points, effectively doubling your health bar. If you feel a bit fragile during Silksong, here’s a complete list of where to find each Mask Shard, along with what abilities you’ll need and how far along in the game you should be.
All Mask Shard Locations in Silksong and How to Find Them
Use the map and the table below to locate every Mask Shard. The chart also details the game’s act progress needed and the abilities required to reach each one.
-
Mount Fay (Act 2: Needs Double Jump) – On the far left of this area, find a dead-end room with a hollow pillar in the ceiling. Jump inside and wall-jump upwards to grab the Mask Shard.
ADVERTISEMENT -
Mount Fay (Act 3: Needs Super Jump) – By Act 3, reach this area. Super jump into the bright corridor leading to the Brightvein room. Complete the platforming challenge at the top to find the Mask Shard.
-
The Slab (Act 2) – If you have the Silksong Apostate Key, access this room. Bounce your way to the top to claim your Mask Shard.
-
Cogwork Core (Act 2) – After defeating the Cogwork Dancers, fight through enemies southwest of them in a gauntlet. Proceed through the corridor into the Choral Chambers, where the Mask Shard awaits.
-
Songclave (Act 2) – After Jubliana returns to Songclave, she sells the Mask Shard for 750 Rosaries.
-
Whispering Vaults (Act 2) – Break through the wall and move a crate to reveal the Mask Shard inside this side room.
-
Bilewater (Act 2: Needs Double Jump) – This long, poison-filled corridor is packed with enemies. Survive the passage to find the Mask Shard at the end.
-
Wisp Thicket (Act 2: Needs Double Jump) – This optional area, accessed via Greymoor, features a platforming challenge where enemies spit fire. Reach the end for the Mask Shard.
-
Blasted Steps (Act 2: Needs Double Jump) – Use the raised step on the right and expert platforming to access this hidden ceiling room. Bounce around the crawling bugs inside to find the Mask Shard.
-
Shellwood (Act 1: Needs Glide) – Traveling right from the fast travel station will lead you to a pogo platforming challenge, which hides the Mask Shard.
-
Bellhart (Act 2) – Complete Wishes in Bellhart regions to unlock three Mask Shards. Defeat certain enemies after slaying Cogwork Dancers and the Savage Beastfly in Hunter’s March, then in Far Fields, to earn one.
-
Bellhart (Act 3) – On your return, accept the “Dark Hearts” Wish on the notice board. Defeat 12 Void Masses around the game to earn a Mask Shard; these are enemy groups wrapped in darkness that shoot projectiles.
-
Bellhart (Act 3: Needs Super Jump) – After completing the “Hidden Hunter” Wish, reveal the northeast corner of Far Fields by locating the tracks west of Sprintmaster Swift. Hunt down Gurr the Outcast for your reward.
-
Far Fields (Act 3: Needs Super Jump) – Win three races against Sprintmaster Swift by using Flea Brew and Silkspeed Anklets. Success earns you a Mask Shard.
-
Wormways (Act 1: Needs Swift Step) – Enter Mosshome and leap into Wormways. Break the destructible wall at the bottom of the central pillar, then mount the gauntlet of enemies to claim the Mask Shard.
-
Mossy Bottom (Act 1) – Purchase this Mask from the Bone Bottom merchant for 300 Rosaries. After Act 3, Grindle in the Silksong Blasted Steps region will sell it instead.
-
Weavenest Alta (Act 1: Needs Needolin and Wall Jump) – Open the door to Weavenest Alta with Needolin, then activate the elevator. Upon riding it down, climb back up and move right past the platforming challenge to find the Mask Shard.
-
Deep Docks (Act 1: Needs Wall Jump) – Early in the game, you can get here once you acquire the Cling Grip. Wall jump into The Marrow, then ascend to access the Deep Docks. Defeat enemies in the gauntlet to get the Mask Shard.
-
Far Fields (Act 1: Needs Glide) – Using the air currents near the Seamstress, launch yourself into a room filled with explosives. Detonate them to break the floor and reveal the Mask Shard.
-
Far Fields (Act 2: Needs Harpoon) – Climb upward on rings to a small house, then break through the floor into a lava room. Fight enemies while avoiding lava, then quickly platform upward as it rises. Successful navigation will lead to an air current that pulls you to the Mask Shard.
Most players won’t find all twenty Mask Shards, but determined explorers reaching the final act and willing to put in the effort can uncover them all!
If you need more help, check out the full Silksong map or learn about the hidden boss, the Silksong Watcher at the Edge, in our guides.