
Select Language:
Have you ever looked for a file in Windows and come up empty-handed? Or waited endlessly for search results? You’re not alone. Many users find Windows Search to be frustrating, mainly because of its default configuration.
By default, Windows only indexes specific locations like the Desktop, Documents, Pictures, and Music libraries under “My Documents.” If your files are stored elsewhere, you might experience long wait times or fail to find what you’re searching for.
Another peculiarity is that search outcomes can differ based on where you initiate the search. Whether you’re using the Start menu, File Explorer, or the taskbar, each method may produce different results.
This guide will walk you through optimizing Windows’ built-in search settings so you can swiftly locate your files.
How to Optimize Your Desktop Search Settings
It’s logical that Windows doesn’t index the entire hard drive by default and restricts itself to certain file types to conserve system resources. Indexing all files, including system files, would slow down performance and generate excessive, often irrelevant results. The default setup aims to strike a balance but may not align with your organization.
Beware, activating the “Enhanced” option shown above without paying attention to the “Search all” warning below can lead to unintended side effects, such as overly broad indexing.
Next, we’ll demonstrate how to modify default search settings to better suit your needs. These steps are applicable to Windows 11, with minor differences for Windows 10.
Here’s the process: To customize which directories are indexed, open the Windows Settings app, click on “Privacy and security” on the left pane, then select the blue link “Customize search locations – Charge” under “Classic” in the right pane.
This opens a window where you can use dropdown menus at the top to select specific directories for indexing by Windows.
After selecting your preferences, click “OK.” Note that reindexing might take several hours depending on the size and content of these folders.
You can continue using your PC during reindexing, but search results may be inaccurate until the process completes.
Once finished, any changes or additions to your files will be automatically incorporated into the index, ensuring quicker searches.
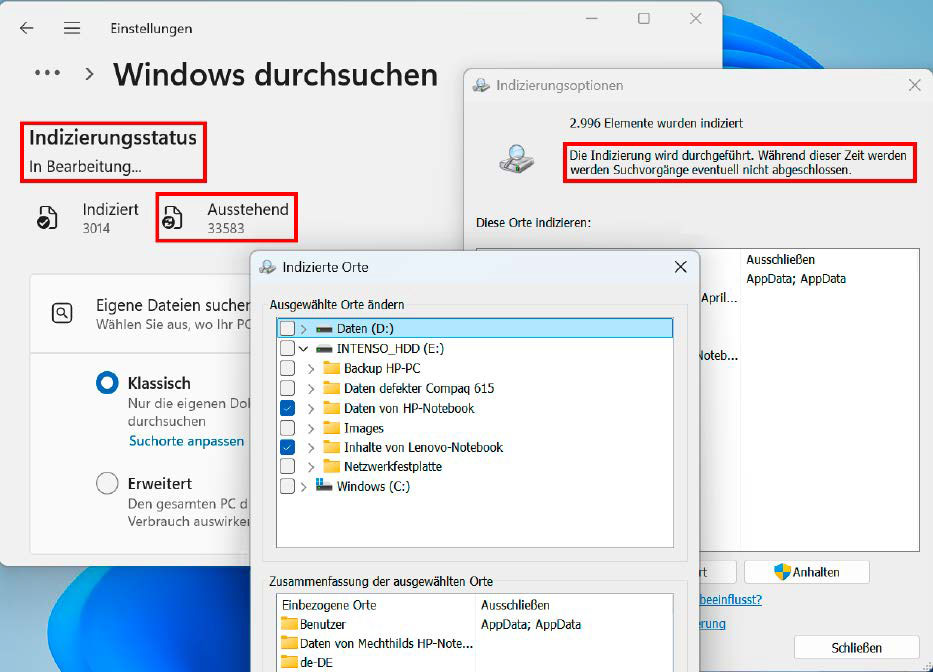
You can include network and external drives in Windows Search similarly, as long as those drives stay powered on and connected during indexing. If the drive letter changes, the search may no longer work correctly, so using tools like USB Drive Info can help prevent such issues.
Additional preferences are accessible via the “Advanced” button next to “Change.” Here, you can enable indexing of encrypted files, rebuild the index if needed, or relocate the index to another partition, especially if space on the primary drive runs low. The index typically consumes around ten percent of the storage space of the files it catalogs.
Leveraging File Explorer for Better Search Accuracy
Although configuring desktop search should make it more effective, practical challenges remain. Microsoft provides two main search avenues: the taskbar (or Start menu) search box and the one within File Explorer. These two function quite differently.
The taskbar or Start menu search is quick but often less reliable, especially if the file’s location isn’t included in the index. Even if your search term is part of the file name, results may not appear unless the location was previously indexed.
The categories like Apps, Documents, Settings, Folders, and Photos in the Start menu often mislead users, as they filter results by storage location rather than file type. This means searches outside default directories won’t yield results from other locations.
While the Start menu search may not always locate the target file, traditional File Explorer searches tend to be more accurate and reliable.
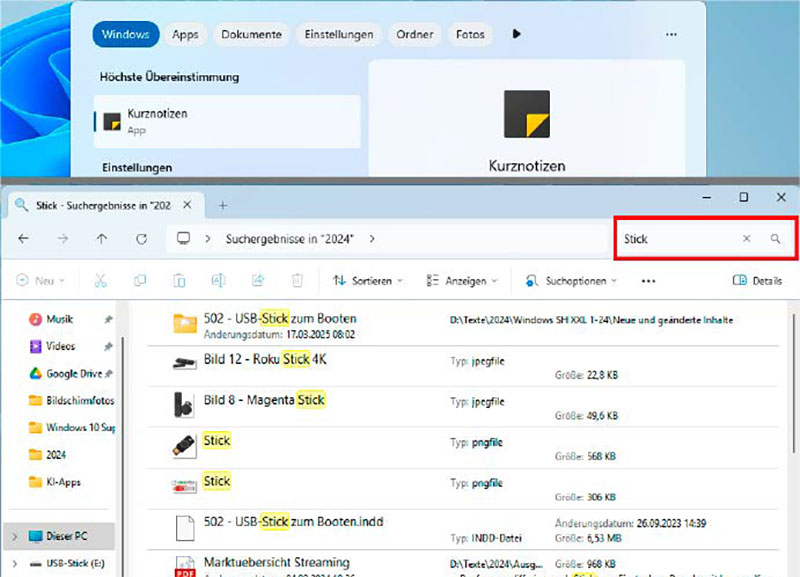
File Explorer’s search tool provides more control and generally yields more trustworthy results. As long as the current folder has been indexed, Windows will list files quickly, accurately, and thoroughly. You can refine your search by entering multiple keywords, then narrowing results through options like “Sort” or “Search options” in the toolbar.
Disabling the “File contents” search might also help streamline results. Remember, searches are limited to the folder currently open; ensure you’re in the correct directory before starting your query.
Tip: Since the search operates within the current folder and its subfolders, select the appropriate folder in the directory tree before searching to ensure relevant results.
Photo Search by Subject and People
Advanced image analysis surpasses simple filename searches by recognizing subjects and content within photos.
To utilize this feature, install Microsoft Photos Legacy from the Microsoft Store. This older app displays images similarly to the Windows Photo Viewer but offers enhanced organization and search capabilities.
You can find more details about its features on Microsoft’s official site.
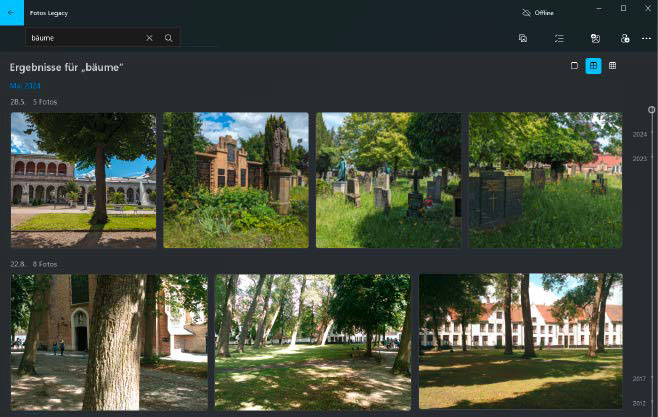
Microsoft Photos Legacy analyzes and tags images automatically, enabling quick subject-based searches without manual tagging.
The app continuously analyzes and tags your photos in the background, allowing you to search for people, places, and objects using the main search bar. Its automatic tagging isn’t always perfect, but overall, the feature offers a convenient way to locate images based on content. It also supports face recognition and optical character recognition (OCR) for text within images, letting you search for text in screenshots and recordings.
Alternate Search Tools for Windows
The best alternative to Windows Search is **Everything**—a lightweight, user-friendly tool that supports complex searches using various operators. It responds instantly to your input, displaying results as soon as you start typing.
The “Advanced search” feature allows for whole-word matches, exact phrases, logical operators (“or”, “not”), and exclusion filters, enhancing search precision.
Note: Because Everything does not index file contents, it can’t replace Windows Search entirely but complements it as a swift and powerful file finder.
You can also link the Windows taskbar search directly to Everything for quicker access.
Another option is **Ultrasearch Free**, which also uses the Master File Table (MFT) for fast, comprehensive searches. It can search within document content on demand but does not create an index for that purpose, so limiting search paths helps reduce processing time.
Additional useful tools include **DocFetcher** and **Search My Files**—both for more specialized searches. Tools like **Alldup** help locate duplicate files to free up disk space. Finally, **PowerToys Run** (part of Microsoft’s PowerToys suite) provides quick access to applications, folders, and files.
Recalling the Limitations of Recall Search
Recalling was meant to be a key feature in Windows 11 24H2, especially on the new Copilot+ laptops released last summer, designed to make all your recent activities quickly retrievable through continuous screenshot analysis and indexing.
However, due to initial concerns over data privacy, Microsoft withdrew Recall before it was officially launched.
In recent updates, Microsoft has improved data privacy measures and integrated the new Recall into Windows 11 via patches. In testing, the system performs well but reveals limitations: static screenshots taken at fixed intervals miss continuous activity, and a more dynamic, real-time analysis might be necessary for comprehensive capture.
Furthermore, the semantic Windows Search, which understands natural language queries, is currently restricted to Copilot+ devices, limiting its widespread application.